RunLoop

思考:

  • 讲讲 RunLoop,项目中有用到吗?
  • RunLoop 内部实现逻辑?
  • RunLoop 和线程的关系?
  • timer 与 RunLoop 的关系?
  • 程序中添加每3秒响应一次的 NSTimer,当拖动 tableview 时 timer 可能无法响应要怎么解决?
  • RunLoop 是怎么响应用户操作的, 具体流程是什么样的?
  • 说说 RunLoop 的几种状态
  • RunLoop 的 mode 作用是什么?

什么是 RunLoop

顾名思义:运行循环,在程序运行过程中循环做一些事情。

应用范畴:

  1. 定时器(Timer)、PerformSelector
  2. GCD Async Main Queue
  3. 事件响应、手势识别、界面刷新
  4. 网络请求
  5. AutoreleasePool
    RunLoop01

如果没有 RunLoop

打印完“Hello, World!”后,执行完 return 方法会退出程序:

1
2
3
4
5
6
int main(int argc, char * argv[]) {
@autoreleasepool {
NSLog(@"Hello, World!");
}
return 0; //退出程序
}

如果有了 RunLoop

程序并不会马上退出,而是保持运行状态。UIApplicationMain() 方法的内部创建了 RunLoop:

1
2
3
4
5
6
7
int main(int argc, char * argv[]) {
NSString * appDelegateClassName;
@autoreleasepool {
appDelegateClassName = NSStringFromClass([AppDelegate class]);
}
return UIApplicationMain(argc, argv, nil, appDelegateClassName);
}

RunLoop 的基本作用

  • 保持程序的持续运行
  • 处理App中的各种事件(比如触摸事件、定时器事件等)
  • 节省CPU资源,提高程序性能:该做事时做事,该休息时休息
    ……

RunLoop 的实现原理(伪代码)

1
2
3
4
5
6
7
8
9
10
11
12
int main(int argc, char * argv[]) {
@autoreleasepool {
int retVal = 0;
do {
// 没有任务时进入睡眠等待消息,不会执行下一行代码;有任务消息是被唤醒,执行下一行代码处理消息;
int message = sleep_and_wait();
// 处理消息
retVal = process_message(message);
} while (0 == retVal);
return 0;
}
}

RunLoop 对象

获取 RunLoop 对象

iOS 中有2套 API 来访问和使用 RunLoop:

  1. Foundation:NSRunLoop
  2. Core Foundation:CFRunLoopRef

Foundation

1
2
3
4
5
// 获取当前线程的 RunLoop 对象
NSRunLoop *currentRunLoop = [NSRunLoop currentRunLoop];
// 获取主线程的 RunLoop 对象
NSRunLoop *mainRunLoop = [NSRunLoop mainRunLoop];
NSLog(@"%p %p", currentRunLoop, mainRunLoop);

打印结果:

1
0x600003a0e880 0x600003a0e880

因为是在主线程打印的,所以 +currentRunLoop+mainRunLoop 获取的都是主线程的 RunLoop。

Core Foundation

1
2
3
4
5
// 获取当前线程的 RunLoop 对象
CFRunLoopRef currentCFRunLoop = CFRunLoopGetCurrent();
// 获取主线程的 RunLoop 对象
CFRunLoopRef mainCFRunLoop = CFRunLoopGetMain();
NSLog(@"%p %p", currentCFRunLoop, mainCFRunLoop);

打印结果:

1
0x600002208500 0x600002208500

因为是在主线程打印的,所以 CFRunLoopGetCurrent()CFRunLoopGetMain() 获取的都是主线程的 CFRunLoopRef。

从打印结果可以看出,上面种方式在获取主线程的 RunLoop 时获取到的 NSRunLoopCFRunLoopRef 内存地址不一样。NSRunLoop 和 CFRunLoopRef 都代表着 RunLoop 对象,但是 NSRunLoop 是基于 CFRunLoopRef 的一层 OC 包装,真正的 RunLoop 是里面的 CFRunLoopRef(如:NSArray 是基于 CFArrayRef 的封装,NSString 是基于 CFStringRef 的封装)。

RunLoop 与线程

  • 每条线程都有唯一的一个与之对应的 RunLoop 对象;
  • RunLoop 保存在一个全局的 Dictionary 里,线程作为 key,RunLoop 作为 value;
  • 线程刚创建时并没有 RunLoop 对象,RunLoop 会在第一次获取它时创建;
  • RunLoop 会在线程结束时销毁;
  • 主线程的 RunLoop 已经自动获取(创建),子线程默认没有开启 RunLoop;

CFRunLoopRef 是开源的,下载 CF-1153.18 。找到 CFRunLoop.c 文件里的 _CFRunLoopGet0() 方法:

1
2
3
4
5
6
7
8
9
10
11
12
13
14
15
16
17
18
19
20
21
22
23
24
25
26
27
28
29
30
31
32
33
34
35
36
37
38
39
40
41
42
43
44
45
46
/// 全局字典,key 是 pthread_t, value 是 CFRunLoopRef
static CFMutableDictionaryRef __CFRunLoops = NULL;
/// 获取一个 pthread 对应的 RunLoop
CF_EXPORT CFRunLoopRef _CFRunLoopGet0(pthread_t t) {
if (pthread_equal(t, kNilPthreadT)) {
t = pthread_main_thread_np();
}
__CFLock(&loopsLock);
if (!__CFRunLoops) { //如果不存在就创建
__CFUnlock(&loopsLock);
///初始化全局Dic
CFMutableDictionaryRef dict = CFDictionaryCreateMutable(kCFAllocatorSystemDefault, 0, NULL, &kCFTypeDictionaryValueCallBacks);
///为主线程创建一个 RunLoop
CFRunLoopRef mainLoop = __CFRunLoopCreate(pthread_main_thread_np());
CFDictionarySetValue(dict, pthreadPointer(pthread_main_thread_np()), mainLoop);
if (!OSAtomicCompareAndSwapPtrBarrier(NULL, dict, (void * volatile *)&__CFRunLoops)) {
CFRelease(dict);
}
CFRelease(mainLoop);
__CFLock(&loopsLock);
}
///以 pthreadPointer(t) 为 key,在 __CFRunLoops 里查找 loop
CFRunLoopRef loop = (CFRunLoopRef)CFDictionaryGetValue(__CFRunLoops, pthreadPointer(t));
__CFUnlock(&loopsLock);
if (!loop) {
///如果 loop 不存在就创建新的 newLoop
CFRunLoopRef newLoop = __CFRunLoopCreate(t);
__CFLock(&loopsLock);
loop = (CFRunLoopRef)CFDictionaryGetValue(__CFRunLoops, pthreadPointer(t));
if (!loop) {
///以 pthreadPointer(t) 为 key,newLoop 为 value 保存到 __CFRunLoops 里
CFDictionarySetValue(__CFRunLoops, pthreadPointer(t), newLoop);
loop = newLoop;
}
// don't release run loops inside the loopsLock, because CFRunLoopDeallocate may end up taking it
__CFUnlock(&loopsLock);
CFRelease(newLoop);
}
if (pthread_equal(t, pthread_self())) {
_CFSetTSD(__CFTSDKeyRunLoop, (void *)loop, NULL);
if (0 == _CFGetTSD(__CFTSDKeyRunLoopCntr)) {
_CFSetTSD(__CFTSDKeyRunLoopCntr, (void *)(PTHREAD_DESTRUCTOR_ITERATIONS-1), (void (*)(void *))__CFFinalizeRunLoop);
}
}
return loop;
}

从源码里可以看到线程和 RunLoop 之间是一一对应的,其关系是保存在一个全局的 Dictionary 里。_CFRunLoopGet0() 先调用 CFDictionaryGetValue() 方法,以线程 pthreadPointer(t) 为 key 在 __CFRunLoops 里查找 loop。如果 loop 不存在,再通过 __CFRunLoopCreate() 方法创建新的 newLoop,并以线程 pthreadPointer(t) 为 key,newLoop 为 value 保存到 __CFRunLoops 里。

RunLoop 相关的类

Core Foundation 中关于 RunLoop 的5个类:

  • CFRunLoopRef
  • CFRunLoopModeRef
  • CFRunLoopSourceRef
  • CFRunLoopTimerRef
  • CFRunLoopObserverRef

查看 RunLoop 源码,找到 CF-1153.18 里的 RunLoop.c 文件:

CFRunLoopRef

CFRunLoopRef:RunLoop 类对象的结构体。

1
2
3
4
5
6
7
8
9
10
11
12
13
14
15
16
17
18
19
20
typedef struct __CFRunLoop * CFRunLoopRef;
struct __CFRunLoop {
CFRuntimeBase _base;
pthread_mutex_t _lock; /* locked for accessing mode list */
__CFPort _wakeUpPort; // used for CFRunLoopWakeUp
Boolean _unused;
volatile _per_run_data *_perRunData; // reset for runs of the run loop
pthread_t _pthread;
uint32_t _winthread;
CFMutableSetRef _commonModes;
CFMutableSetRef _commonModeItems;
CFRunLoopModeRef _currentMode;
CFMutableSetRef _modes;
struct _block_item *_blocks_head;
struct _block_item *_blocks_tail;
CFAbsoluteTime _runTime;
CFAbsoluteTime _sleepTime;
CFTypeRef _counterpart;
};

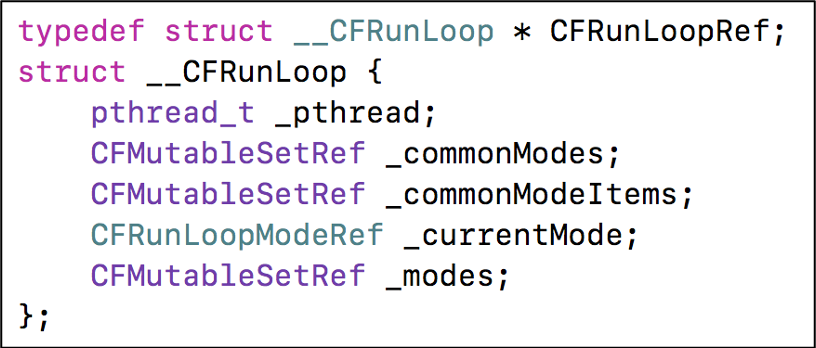
精简版
RunLoop03

_pthread:__CFRunLoop 对应的线程。
_currentMode:当前的 CFRunLoopModeRef。
_modes:装着 CFRunLoopModeRef 的集合。

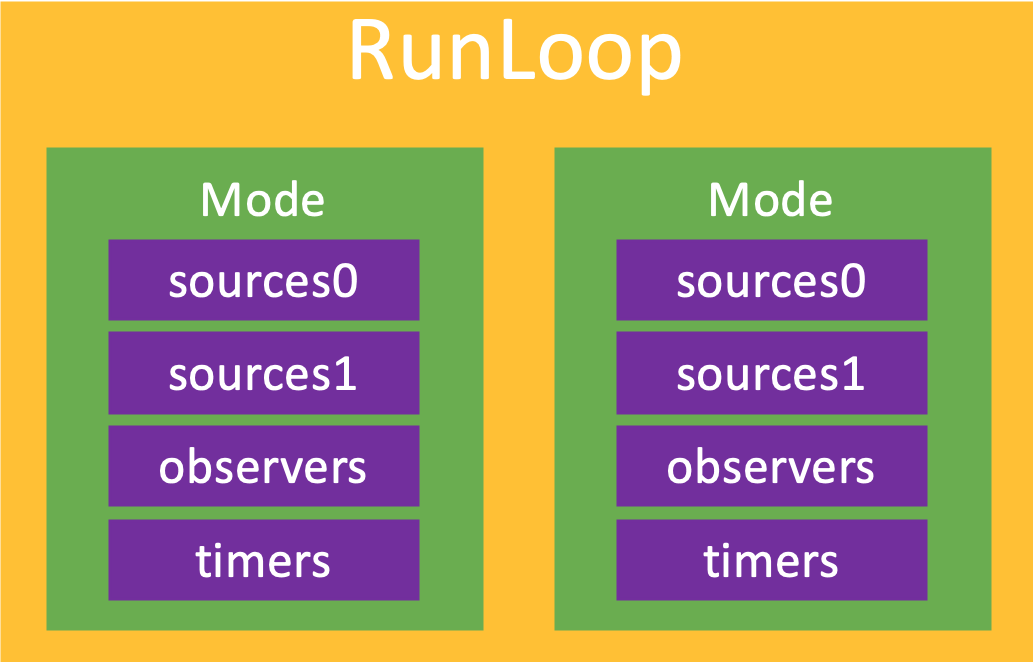
CFRunLoopModeRef 代表 RunLoop 的运行模式。RunLoop 启动时只能选择其中一个 Mode,作为 _currentMode。如果需要切换 Mode,只能退出当前 Loop,再重新选择一个 Mode 进入。

一个 RunLoop 包含若干个 Mode,每个 Mode 又包含若干个 Sources0/Sources1/Timer/Observer。不同组(不同mode)的 Sources0/Sources1/Timer/Observer 能分隔开来,互不影响。

👉 注意:如果 Mode 里没有任何 Sources0/Sources1/Timer/Observer,RunLoop 会立马退出。
RunLoop04

CFRunLoopModeRef

CFRunLoopModeRef:RunLoop 的运行模式。

1
2
3
4
5
6
7
8
9
10
11
12
13
14
15
16
17
18
19
20
21
22
23
24
25
26
27
28
29
30
31
32
typedef struct __CFRunLoopMode *CFRunLoopModeRef;
struct __CFRunLoopMode {
CFRuntimeBase _base;
pthread_mutex_t _lock; /* must have the run loop locked before locking this */
CFStringRef _name;
Boolean _stopped;
char _padding[3];
CFMutableSetRef _sources0;
CFMutableSetRef _sources1;
CFMutableArrayRef _observers;
CFMutableArrayRef _timers;
CFMutableDictionaryRef _portToV1SourceMap;
__CFPortSet _portSet;
CFIndex _observerMask;
#if USE_DISPATCH_SOURCE_FOR_TIMERS
dispatch_source_t _timerSource;
dispatch_queue_t _queue;
Boolean _timerFired; // set to true by the source when a timer has fired
Boolean _dispatchTimerArmed;
#endif
#if USE_MK_TIMER_TOO
mach_port_t _timerPort;
Boolean _mkTimerArmed;
#endif
#if DEPLOYMENT_TARGET_WINDOWS
DWORD _msgQMask;
void (*_msgPump)(void);
#endif
uint64_t _timerSoftDeadline; /* TSR */
uint64_t _timerHardDeadline; /* TSR */
};

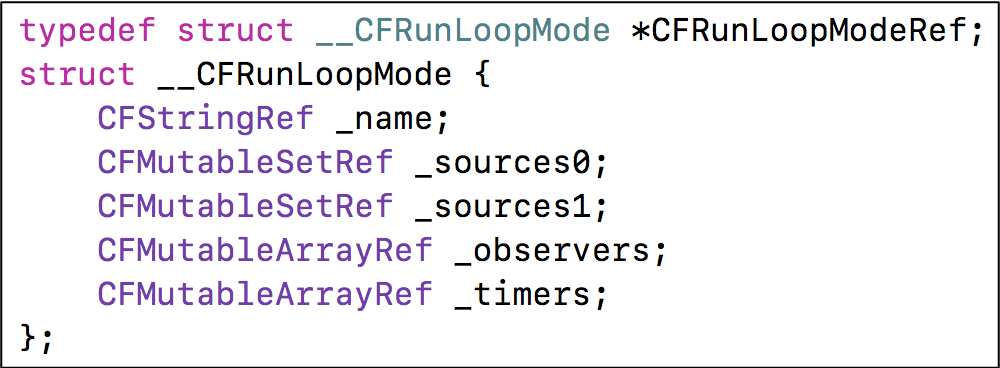
精简版
RunLoop03

_sources0:装着 CFRunLoopSourceRef 的集合。
_sources1:装着 CFRunLoopSourceRef 的集合。
_observers:装着 CFRunLoopObserverRef 的集合。
_timers:装着 CFRunLoopTimerRef 的集合。

RunLoop 在选择了某一种模式作为当前模式后,就开始处理当前模式里的 Source0/Source1/Timer/Observer 事件了:

  • Source0:触摸事件、performSelector:onThread: 方法
  • Source1:基于 Port 的线程间通信、系统事件捕捉
  • Timers:NSTimer、performSelector:withObject:afterDelay: 方法
  • Observers:用于监听 RunLoop 的状态、UI 刷新(BeforeWaiting)、Autorelease pool(BeforeWaiting)

RunLoop 将 OC 代码转换成了 Sources0/Sources1/Timer/Observer,并且循环监测并执行它们。比如 UI 的刷新和Autorelease pool 的自动释放都是在进入休眠前完成的。

CFRunLoopSourceRef

1
2
3
4
5
6
7
8
9
10
11
12
13
typedef struct CF_BRIDGED_MUTABLE_TYPE(id) __CFRunLoopSource * CFRunLoopSourceRef;
struct __CFRunLoopSource {
CFRuntimeBase _base;
uint32_t _bits;
pthread_mutex_t _lock;
CFIndex _order; /* immutable */
CFMutableBagRef _runLoops;
union {
CFRunLoopSourceContext version0; /* immutable, except invalidation */
CFRunLoopSourceContext1 version1; /* immutable, except invalidation */
} _context;
};

触摸事件:

1
2
3
4
5
6
@implementation ViewController
- (void)touchesBegan:(NSSet<UITouch *> *)touches withEvent:(UIEvent *)event
{
NSLog(@"%s", __func__); //断点
}
@end

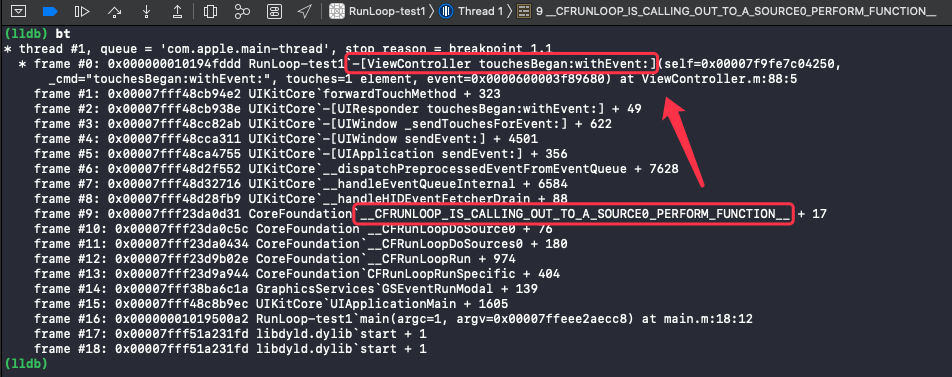
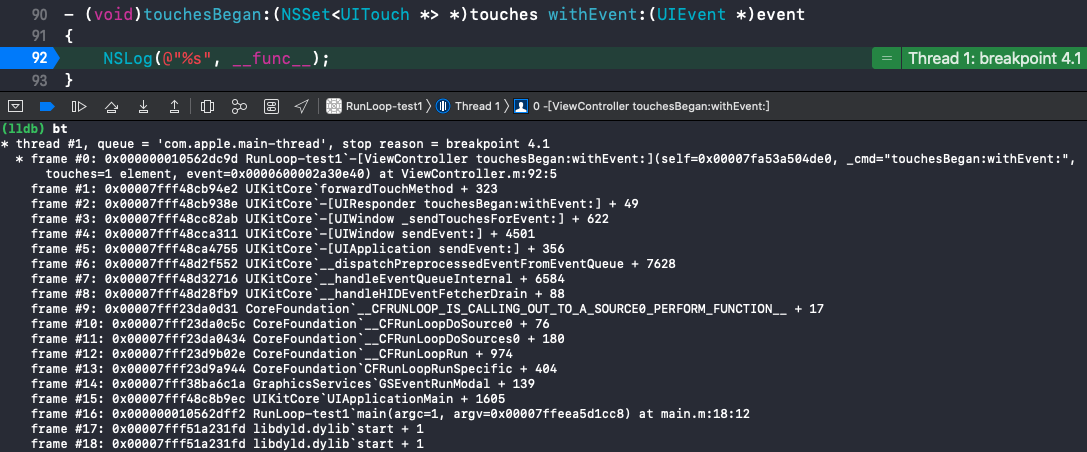
在断点处打印函数调用栈:
RunLoop06

在打印出的函数调用栈里可以看到该事件是由 __CFRUNLOOP_IS_CALLING_OUT_TO_A_SOURCE0_PERFORM_FUNCTION__ 调用过来的。触摸事件先是由 Sources1 捕捉到后传递给 Sources0。

CFRunLoopObserverRef

实现:

1
2
3
4
5
6
7
8
9
10
11
12
typedef struct CF_BRIDGED_MUTABLE_TYPE(id) __CFRunLoopObserver * CFRunLoopObserverRef;
struct __CFRunLoopObserver {
CFRuntimeBase _base;
pthread_mutex_t _lock;
CFRunLoopRef _runLoop;
CFIndex _rlCount;
CFOptionFlags _activities; //RunLoop 状态枚举
CFIndex _order; /* immutable */
CFRunLoopObserverCallBack _callout; /* immutable */
CFRunLoopObserverContext _context; /* immutable, except invalidation */
};

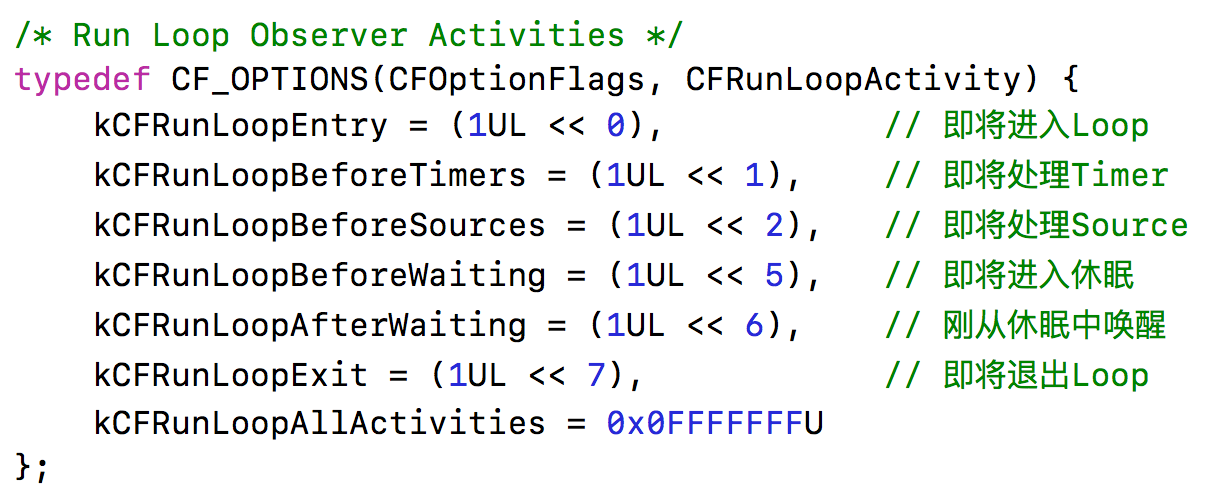
__CFRunLoopObserver_activities 是一个枚举,包含以下状态:
RunLoop05

CFRunLoopObserverCreateWithHandler()

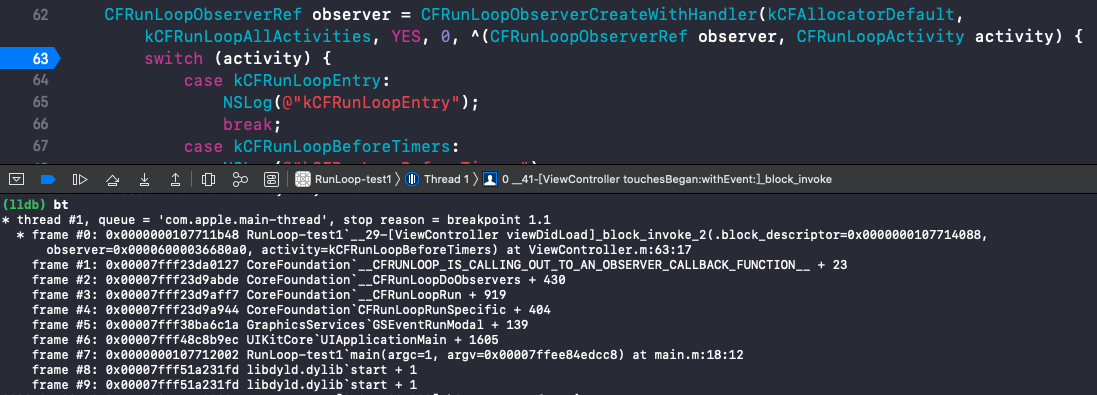
使用 CFRunLoopObserverCreateWithHandler() 方法监听 RunLoop:

1
2
3
4
5
6
7
8
9
10
11
12
13
14
15
16
17
18
19
20
21
22
23
24
25
26
27
28
29
30
31
32
@implementation ViewController
- (void)viewDidLoad {
[super viewDidLoad];
CFRunLoopObserverRef observer = CFRunLoopObserverCreateWithHandler(kCFAllocatorDefault, kCFRunLoopAllActivities, YES, 0, ^(CFRunLoopObserverRef observer, CFRunLoopActivity activity) {
switch (activity) {
case kCFRunLoopEntry:
NSLog(@"kCFRunLoopEntry");
break;
case kCFRunLoopBeforeTimers:
NSLog(@"kCFRunLoopBeforeTimers");
break;
case kCFRunLoopBeforeSources:
NSLog(@"kCFRunLoopBeforeSources");
break;
case kCFRunLoopBeforeWaiting:
NSLog(@"kCFRunLoopBeforeWaiting");
break;
case kCFRunLoopAfterWaiting:
NSLog(@"kCFRunLoopAfterWaiting");
break;
case kCFRunLoopExit:
NSLog(@"kCFRunLoopExit");
break;
default:
break;
}
});
CFRunLoopAddObserver(CFRunLoopGetCurrent(), observer, kCFRunLoopCommonModes);
CFRelease(observer);
}
@end

点击事件唤醒 RunLoop

1
2
3
4
- (void)touchesBegan:(NSSet<UITouch *> *)touches withEvent:(UIEvent *)event
{
NSLog(@"%s", __func__);
}

点击屏幕打印结果:

1
2
3
4
5
6
2020-07-04 21:11:18.429011+0800 RunLoop-test1[7880:206615] kCFRunLoopAfterWaiting
2020-07-04 21:11:18.429138+0800 RunLoop-test1[7880:206615] kCFRunLoopBeforeTimers
2020-07-04 21:11:18.429218+0800 RunLoop-test1[7880:206615] kCFRunLoopBeforeSources
2020-07-04 21:11:18.430235+0800 RunLoop-test1[7880:206615] -[ViewController touchesBegan:withEvent:]
......

从打印结果可以看到,在处理点击事件前,RunLoop 先进入到了 kCFRunLoopBeforeSources 状态,表明即将处理 sources。

NSTimer 唤醒 RunLoop

1
2
3
4
5
6
- (void)touchesBegan:(NSSet<UITouch *> *)touches withEvent:(UIEvent *)event
{
[NSTimer scheduledTimerWithTimeInterval:3.0 repeats:NO block:^(NSTimer * _Nonnull timer) {
NSLog(@"------- 定时器 -------");
}];
}

点击屏幕打印结果:

1
2
3
4
5
6
7
8
9
10
......
2020-07-04 21:01:17.901246+0800 RunLoop-test1[7611:196926] kCFRunLoopBeforeWaiting
2020-07-04 21:01:20.832895+0800 RunLoop-test1[7611:196926] kCFRunLoopAfterWaiting
2020-07-04 21:01:20.833116+0800 RunLoop-test1[7611:196926] ------- 定时器 -------
2020-07-04 21:01:20.833258+0800 RunLoop-test1[7611:196926] kCFRunLoopBeforeTimers
2020-07-04 21:01:20.833354+0800 RunLoop-test1[7611:196926] kCFRunLoopBeforeSources
2020-07-04 21:01:20.833450+0800 RunLoop-test1[7611:196926] kCFRunLoopBeforeWaiting
......

从打印结果可以看到,RunLoop 在17秒处进入了 kCFRunLoopBeforeWaiting(休眠)状态,20秒处进入了 kCFRunLoopAfterWaiting(唤醒)状态,同时执行了代码块打印出了结果。

CFRunLoopObserverCreate()

使用 CFRunLoopObserverCreate() 方法监听 RunLoop:

1
2
3
4
5
6
7
8
9
10
11
12
13
14
15
16
17
18
19
20
21
22
23
24
25
26
27
28
29
30
31
32
33
34
35
36
@implementation ViewController
void observerCallBackAllActivities(CFRunLoopObserverRef observer, CFRunLoopActivity activity, void *info)
{
switch (activity) {
case kCFRunLoopEntry:
NSLog(@"kCFRunLoopEntry");
break;
case kCFRunLoopBeforeTimers:
NSLog(@"kCFRunLoopBeforeTimers");
break;
case kCFRunLoopBeforeSources:
NSLog(@"kCFRunLoopBeforeSources");
break;
case kCFRunLoopBeforeWaiting:
NSLog(@"kCFRunLoopBeforeWaiting");
break;
case kCFRunLoopAfterWaiting:
NSLog(@"kCFRunLoopAfterWaiting");
break;
case kCFRunLoopExit:
NSLog(@"kCFRunLoopExit");
break;
default:
break;
}
}
- (void)viewDidLoad {
[super viewDidLoad];
CFRunLoopObserverRef observer = CFRunLoopObserverCreate(kCFAllocatorDefault, kCFRunLoopAllActivities, YES, 0, observerCallBackAllActivities, nil);
CFRunLoopAddObserver(CFRunLoopGetMain(), observer, kCFRunLoopCommonModes);
CFRelease(observer);
}
@end

常见的2种 Mode

kCFRunLoopDefaultMode(NSDefaultRunLoopMode):App 的默认 Mode,通常主线程是在这个 Mode 下运行。
UITrackingRunLoopMode:界面跟踪 Mode,用于 ScrollView 追踪触摸滑动,保证界面滑动时不受其他 Mode 影响。(只有主线程需要考虑这种 mode)

RunLoop 的模式切换:

1
2
3
4
5
6
7
8
9
10
11
12
13
14
15
16
17
18
19
20
21
22
23
24
25
26
@implementation ViewController
- (void)viewDidLoad {
[super viewDidLoad];
CFRunLoopObserverRef observer = CFRunLoopObserverCreateWithHandler(kCFAllocatorDefault, kCFRunLoopAllActivities, YES, 0, ^(CFRunLoopObserverRef observer, CFRunLoopActivity activity) {
switch (activity) {
case kCFRunLoopEntry:{
CFRunLoopMode mode = CFRunLoopCopyCurrentMode(CFRunLoopGetCurrent());
NSLog(@"kCFRunLoopEntry - %@", mode);
CFRelease(mode);
}
case kCFRunLoopExit:{
CFRunLoopMode mode = CFRunLoopCopyCurrentMode(CFRunLoopGetCurrent());
NSLog(@"kCFRunLoopExit - %@", mode);
CFRelease(mode);
}
break;
default:
break;
}
});
CFRunLoopAddObserver(CFRunLoopGetCurrent(), observer, kCFRunLoopCommonModes);
CFRelease(observer);
}
@end

添加监听后,在页面上添一个 UITextView。

开始滚动 UITextView 时的打印:

1
2
kCFRunLoopExit - kCFRunLoopDefaultMode
kCFRunLoopEntry - UITrackingRunLoopMode

停止滚动 UITextView 时的打印:

1
2
kCFRunLoopExit - UITrackingRunLoopMode
kCFRunLoopEntry - kCFRunLoopDefaultMode

从打印结果可以看到,操作 textView 时 RunLoop 进行了模式切换:
在开始滚动 textView 时,RunLoop 先退出了 kCFRunLoopDefaultMode 再进入了 UITrackingRunLoopMode。
在停止滚动 textView 时,RunLoop 先退出了 UITrackingRunLoopMode 再进入 kCFRunLoopDefaultMode。

RunLoop 源码分析

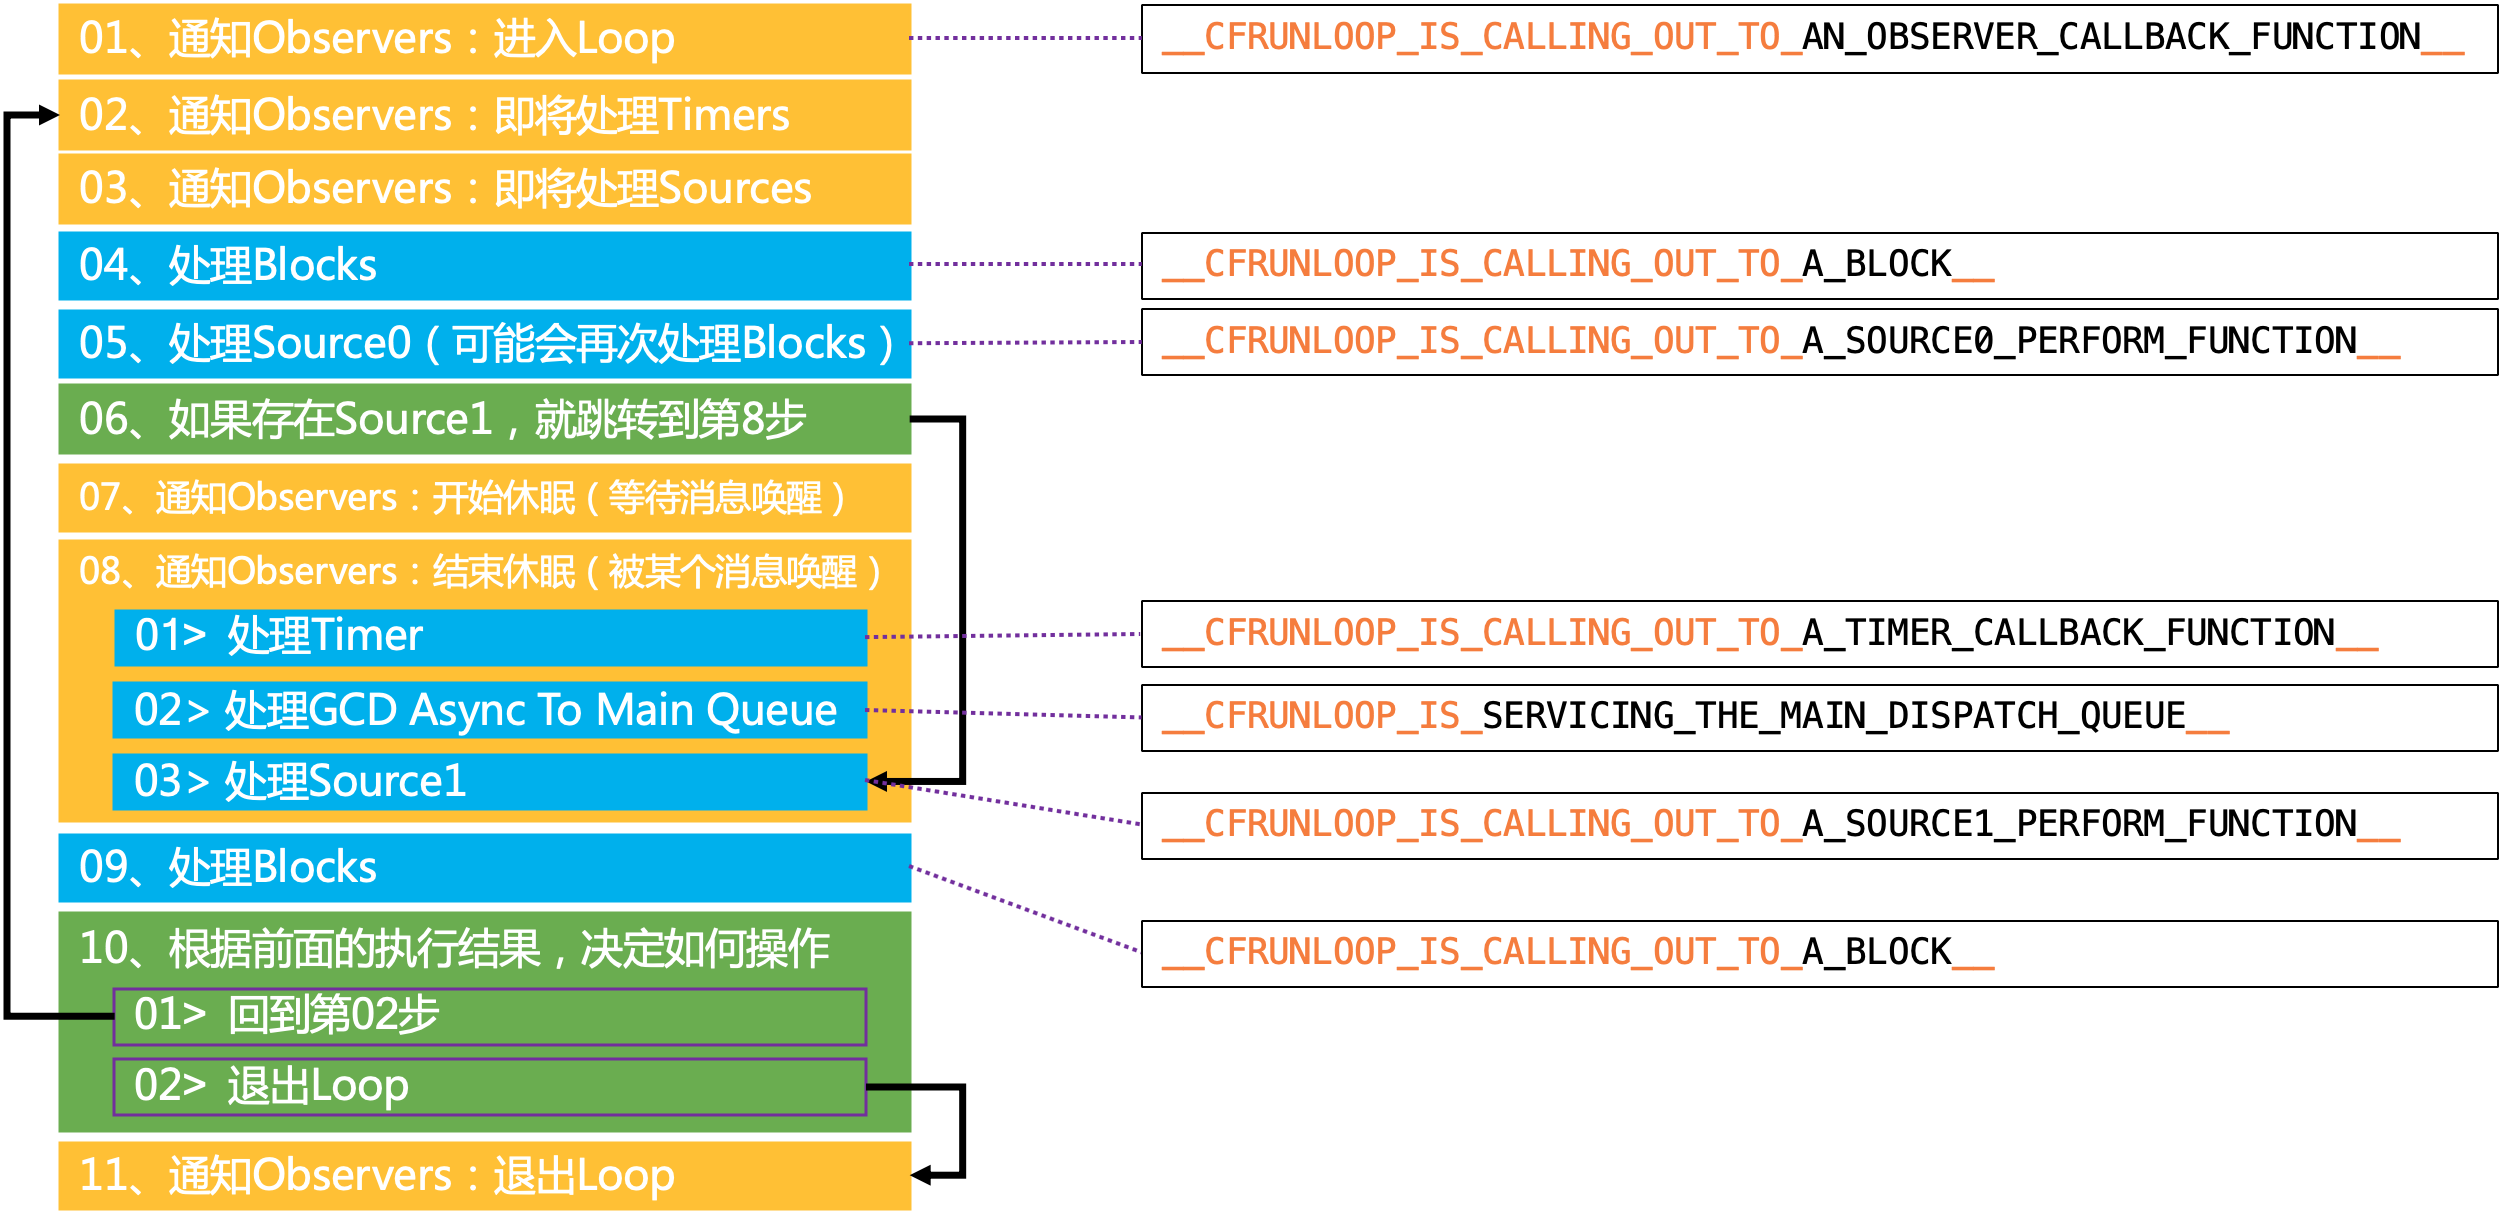
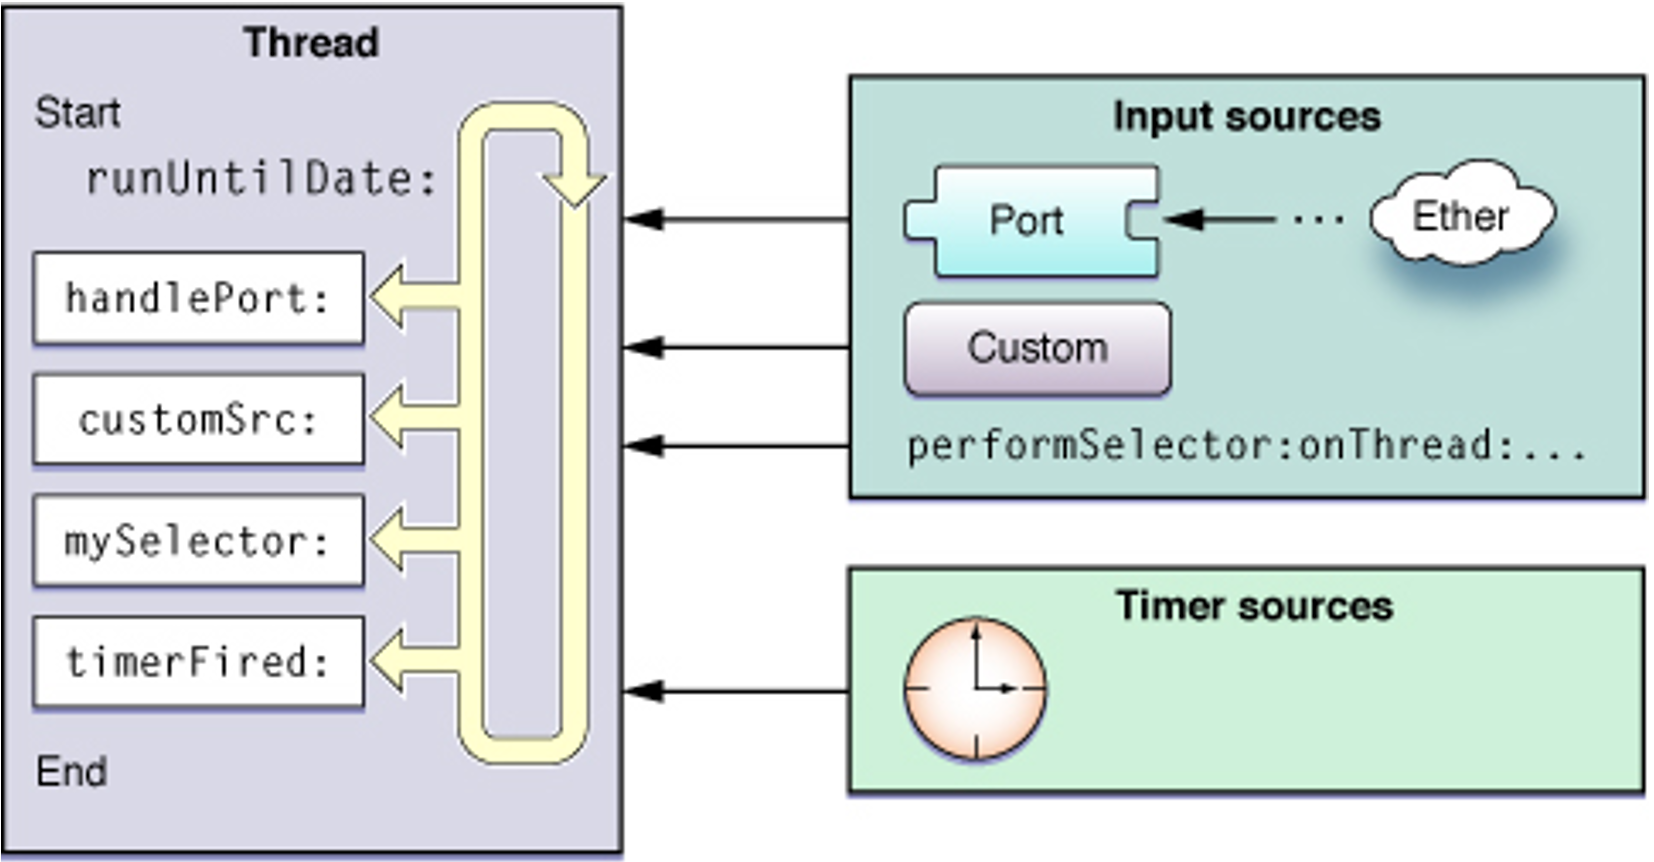
RunLoop 执行流程图:
RunLoop07

RunLoop 的实现原理

找到 RunLoop 的入口:

1
2
3
4
5
6
@implementation ViewController
- (void)touchesBegan:(NSSet<UITouch *> *)touches withEvent:(UIEvent *)event
{
NSLog(@"%s", __func__); //断点
}
@end

断点处查看函数调用栈:
RunLoop09
从图中可以看到,RunLoop 先通过 CFRunLoopRunSpecific() 方法调用了 __CFRunLoopRun() 方法,__CFRunLoopRun 方法调用了 __CFRunLoopDoSources0() 方法,所以 CFRunLoopRunSpecific 就是 RunLoop 的入口。

CFRunLoopRunSpecific

实现:

1
2
3
4
5
6
7
8
9
10
11
12
13
14
15
16
17
18
19
20
21
22
23
24
25
26
27
28
29
30
31
SInt32 CFRunLoopRunSpecific(CFRunLoopRef rl, CFStringRef modeName, CFTimeInterval seconds, Boolean returnAfterSourceHandled) {
CHECK_FOR_FORK();
if (__CFRunLoopIsDeallocating(rl)) return kCFRunLoopRunFinished;
__CFRunLoopLock(rl);
/// 根据modeName找到对应mode
CFRunLoopModeRef currentMode = __CFRunLoopFindMode(rl, modeName, false);
/// 如果mode里没有source/timer/observer, 直接返回。
if (NULL == currentMode || __CFRunLoopModeIsEmpty(rl, currentMode, rl->_currentMode)) {
Boolean did = false;
if (currentMode) __CFRunLoopModeUnlock(currentMode);
__CFRunLoopUnlock(rl);
return did ? kCFRunLoopRunHandledSource : kCFRunLoopRunFinished;
}
volatile _per_run_data *previousPerRun = __CFRunLoopPushPerRunData(rl);
CFRunLoopModeRef previousMode = rl->_currentMode;
rl->_currentMode = currentMode;
int32_t result = kCFRunLoopRunFinished;
/// 通知 Observers:进入 Loop
if (currentMode->_observerMask & kCFRunLoopEntry ) __CFRunLoopDoObservers(rl, currentMode, kCFRunLoopEntry);
/// 具体要做的事情
result = __CFRunLoopRun(rl, currentMode, seconds, returnAfterSourceHandled, previousMode);
/// 通知 Observers:退出 Loop
if (currentMode->_observerMask & kCFRunLoopExit ) __CFRunLoopDoObservers(rl, currentMode, kCFRunLoopExit);
__CFRunLoopModeUnlock(currentMode);
__CFRunLoopPopPerRunData(rl, previousPerRun);
rl->_currentMode = previousMode;
__CFRunLoopUnlock(rl);
return result;
}

简化后:

1
2
3
4
5
6
7
8
9
10
11
12
SInt32 CFRunLoopRunSpecific(CFRunLoopRef rl, CFStringRef modeName, CFTimeInterval seconds, Boolean returnAfterSourceHandled) {
/// 通知 Observers:进入 Loop
__CFRunLoopDoObservers(rl, currentMode, kCFRunLoopEntry);
/// 具体要做的事情
result = __CFRunLoopRun(rl, currentMode, seconds, returnAfterSourceHandled, previousMode);
/// 通知 Observers:退出 Loop
__CFRunLoopDoObservers(rl, currentMode, kCFRunLoopExit);
return result;
}

CFRunLoopRunSpecific() 方法内部调用了 __CFRunLoopRun() 方法来实现 RunLoop 的具体处理逻辑。

__CFRunLoopRun

CF-1153.18 找到 RunLoop.c 文件,再找到 __CFRunLoopRun() 方法。简化后:

1
2
3
4
5
6
7
8
9
10
11
12
13
14
15
16
17
18
19
20
21
22
23
24
25
26
27
28
29
30
31
32
33
34
35
36
37
38
39
40
41
42
43
44
45
46
47
48
49
50
51
52
53
54
55
56
57
58
59
60
61
62
63
64
65
66
67
68
69
70
71
72
73
74
75
76
77
78
79
80
81
82
83
84
85
86
87
88
static int32_t __CFRunLoopRun(CFRunLoopRef rl, CFRunLoopModeRef rlm, CFTimeInterval seconds, Boolean stopAfterHandle, CFRunLoopModeRef previousMode) {
int32_t retVal = 0;
do {
/// 通知 Observers:即将处理 Timers
__CFRunLoopDoObservers(rl, rlm, kCFRunLoopBeforeTimers);
/// 通知 Observers:即将处理 Sources
__CFRunLoopDoObservers(rl, rlm, kCFRunLoopBeforeSources);
/// 处理 Blocks
__CFRunLoopDoBlocks(rl, rlm);
/// 处理 Sources0
Boolean sourceHandledThisLoop = __CFRunLoopDoSources0(rl, rlm, stopAfterHandle);
if (sourceHandledThisLoop) {
// 处理 Blocks
__CFRunLoopDoBlocks(rl, rlm);
}
/// 判断有无 Sources1
if (__CFRunLoopServiceMachPort(dispatchPort, &msg, sizeof(msg_buffer), &livePort, 0, &voucherState, NULL)) {
// 如果有 Sources1,就直接跳转到 handle_msg👇
goto handle_msg;
}
/// 通知 Observers:即将休眠
__CFRunLoopDoObservers(rl, rlm, kCFRunLoopBeforeWaiting);
__CFRunLoopSetSleeping(rl);
do {
/// 等待消息唤醒当前线程(进入休眠,不会执行任何代码,也不会消耗CPU)
__CFRunLoopServiceMachPort(waitSet, &msg, sizeof(msg_buffer), &livePort, poll ? 0 : TIMEOUT_INFINITY, &voucherState, &voucherCopy);
} while (1); // 循环内部的 RunLoop 会阻塞 while 循环,RunLoop 退出后,while 循环的阻塞消失,再次创建一个新的 RunLoop 阻塞 while 循环,保证一直会有一个 RunLoop 存在
__CFRunLoopSetIgnoreWakeUps(rl);
__CFRunLoopUnsetSleeping(rl);
/// 通知 Observers:结束休眠
__CFRunLoopDoObservers(rl, rlm, kCFRunLoopAfterWaiting);
///(👉 如果有 Sources1,会直接跳转到这里。没有 Sources1,就等上面的代码走走完了再来到这里)
handle_msg:;
__CFRunLoopSetIgnoreWakeUps(rl);
if (rlm->_timerPort != MACH_PORT_NULL && livePort == rlm->_timerPort) {
/// 被timer唤醒
CFRUNLOOP_WAKEUP_FOR_TIMER();
/// 处理 Timers
if (!__CFRunLoopDoTimers(rl, rlm, mach_absolute_time())) {
__CFArmNextTimerInMode(rlm, rl);
}
}
else if (livePort == dispatchPort) {
/// 被gcd唤醒
CFRUNLOOP_WAKEUP_FOR_DISPATCH();
/// 处理gcd
__CFRUNLOOP_IS_SERVICING_THE_MAIN_DISPATCH_QUEUE__(msg);
} else {
/// 被 Sources1 唤醒
CFRUNLOOP_WAKEUP_FOR_SOURCE();
/// 处理 Sources1
__CFRunLoopDoSource1(rl, rlm, rls, msg, msg->msgh_size, &reply) || sourceHandledThisLoop;
}
/// 处理 Blocks
__CFRunLoopDoBlocks(rl, rlm);
/// 设置返回值
if (sourceHandledThisLoop && stopAfterHandle) {
retVal = kCFRunLoopRunHandledSource;
} else if (timeout_context->termTSR < mach_absolute_time()) {
retVal = kCFRunLoopRunTimedOut;
} else if (__CFRunLoopIsStopped(rl)) {
__CFRunLoopUnsetStopped(rl);
retVal = kCFRunLoopRunStopped;
} else if (rlm->_stopped) {
rlm->_stopped = false;
retVal = kCFRunLoopRunStopped;
} else if (__CFRunLoopModeIsEmpty(rl, rlm, previousMode)) {
retVal = kCFRunLoopRunFinished;
}
voucher_mach_msg_revert(voucherState);
os_release(voucherCopy);
} while (0 == retVal); //是否继续执行
return retVal;
}

可以看到 RunLoop 主要做了以下6件事(有序):

  1. __CFRunLoopDoObservers() 通知 observers
  2. __CFRunLoopDoBlocks() 处理 blocks
  3. __CFRunLoopDoSources0() 处理 sources0
  4. __CFRunLoopDoTimers() 处理 timers
  5. __CFRUNLOOP_IS_SERVICING_THE_MAIN_DISPATCH_QUEUE__() 处理 GCD
  6. __CFRunLoopDoSource1() 处理 sources1

除了处理 GCD 的方法外,其它的5个方法,在调用到 Foundation 框架的函数前,还会调用一个 Core Foundation 框架的函数:

__CFRunLoopDoObservers()

1
2
3
4
5
6
7
8
9
10
11
12
13
14
15
static void __CFRUNLOOP_IS_CALLING_OUT_TO_AN_OBSERVER_CALLBACK_FUNCTION__() __attribute__((noinline));
static void __CFRUNLOOP_IS_CALLING_OUT_TO_AN_OBSERVER_CALLBACK_FUNCTION__(CFRunLoopObserverCallBack func, CFRunLoopObserverRef observer, CFRunLoopActivity activity, void *info) {
if (func) {
func(observer, activity, info);
}
asm __volatile__(""); // thwart tail-call optimization
}
static void __CFRunLoopDoObservers(CFRunLoopRef rl, CFRunLoopModeRef rlm, CFRunLoopActivity activity) {
......
__CFRUNLOOP_IS_CALLING_OUT_TO_AN_OBSERVER_CALLBACK_FUNCTION__(rlo->_callout, rlo, activity, rlo->_context.info);
......
}

函数调用栈:
RunLoop10

__CFRunLoopDoBlocks()

内部调用的是 __CFRUNLOOP_IS_CALLING_OUT_TO_A_BLOCK__() 方法:

1
2
3
4
5
6
7
8
9
10
11
12
13
14
15
static void __CFRUNLOOP_IS_CALLING_OUT_TO_A_BLOCK__() __attribute__((noinline));
static void __CFRUNLOOP_IS_CALLING_OUT_TO_A_BLOCK__(void (^block)(void)) {
if (block) {
block();
}
asm __volatile__(""); // thwart tail-call optimization
}
static Boolean __CFRunLoopDoBlocks(CFRunLoopRef rl, CFRunLoopModeRef rlm) {
......
__CFRUNLOOP_IS_CALLING_OUT_TO_A_BLOCK__(block);
......
}

函数调用栈:
RunLoop11

__CFRunLoopDoSources0()

内部调用的是 __CFRUNLOOP_IS_CALLING_OUT_TO_A_SOURCE0_PERFORM_FUNCTION__() 方法:

1
2
3
4
5
6
7
8
9
10
11
12
13
14
15
static void __CFRUNLOOP_IS_CALLING_OUT_TO_A_SOURCE0_PERFORM_FUNCTION__() __attribute__((noinline));
static void __CFRUNLOOP_IS_CALLING_OUT_TO_A_SOURCE0_PERFORM_FUNCTION__(void (*perform)(void *), void *info) {
if (perform) {
perform(info);
}
asm __volatile__(""); // thwart tail-call optimization
}
static Boolean __CFRunLoopDoSources0(CFRunLoopRef rl, CFRunLoopModeRef rlm, Boolean stopAfterHandle) {
......
__CFRUNLOOP_IS_CALLING_OUT_TO_A_SOURCE0_PERFORM_FUNCTION__(rls->_context.version0.perform, rls->_context.version0.info);
......
}

函数调用栈:
RunLoop12

__CFRunLoopDoTimers()

内部调用的是 __CFRUNLOOP_IS_CALLING_OUT_TO_A_TIMER_CALLBACK_FUNCTION__() 方法:

1
2
3
4
5
6
7
8
9
10
11
12
13
14
15
16
17
18
19
20
21
22
23
static void __CFRUNLOOP_IS_CALLING_OUT_TO_A_TIMER_CALLBACK_FUNCTION__() __attribute__((noinline));
static void __CFRUNLOOP_IS_CALLING_OUT_TO_A_TIMER_CALLBACK_FUNCTION__(CFRunLoopTimerCallBack func, CFRunLoopTimerRef timer, void *info) {
if (func) {
func(timer, info);
}
asm __volatile__(""); // thwart tail-call optimization
}
static Boolean __CFRunLoopDoTimers(CFRunLoopRef rl, CFRunLoopModeRef rlm, uint64_t limitTSR) {
......
Boolean did = __CFRunLoopDoTimer(rl, rlm, rlt);
......
}
static Boolean __CFRunLoopDoTimer(CFRunLoopRef rl, CFRunLoopModeRef rlm, CFRunLoopTimerRef rlt) {
......
__CFRUNLOOP_IS_CALLING_OUT_TO_A_TIMER_CALLBACK_FUNCTION__(rlt->_callout, rlt, context_info);
......
}

函数调用栈:
RunLoop13

__CFRunLoopDoSource1()

内部调用的是 __CFRUNLOOP_IS_CALLING_OUT_TO_A_SOURCE1_PERFORM_FUNCTION__() 方法:

1
2
3
4
5
6
7
8
9
10
11
12
13
14
15
16
static void __CFRUNLOOP_IS_CALLING_OUT_TO_A_SOURCE1_PERFORM_FUNCTION__() __attribute__((noinline));
static void __CFRUNLOOP_IS_CALLING_OUT_TO_A_SOURCE1_PERFORM_FUNCTION__(
void *(*perform)(void *msg, CFIndex size, CFAllocatorRef allocator, void *info), mach_msg_header_t *msg, CFIndex size, mach_msg_header_t **reply, void *info) {
if (perform) {
*reply = perform(msg, size, kCFAllocatorSystemDefault, info);
}
asm __volatile__(""); // thwart tail-call optimization
}
static Boolean __CFRunLoopDoSource1(CFRunLoopRef rl, CFRunLoopModeRef rlm, CFRunLoopSourceRef rls, mach_msg_header_t *msg, CFIndex size, mach_msg_header_t **reply) {
......
__CFRUNLOOP_IS_CALLING_OUT_TO_A_SOURCE1_PERFORM_FUNCTION__(rls->_context.version1.perform, msg, size, reply, rls->_context.version1.info);
......
}

__CFRUNLOOP_IS_SERVICING_THE_MAIN_DISPATCH_QUEUE__

1
2
3
4
5
static void __CFRUNLOOP_IS_SERVICING_THE_MAIN_DISPATCH_QUEUE__() __attribute__((noinline));
static void __CFRUNLOOP_IS_SERVICING_THE_MAIN_DISPATCH_QUEUE__(void *msg) {
_dispatch_main_queue_callback_4CF(msg);
asm __volatile__(""); // thwart tail-call optimization
}

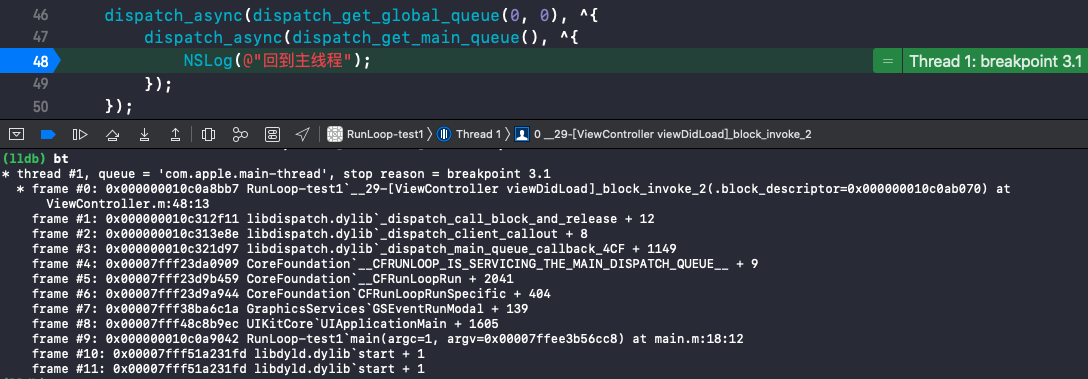
GCD 和 RunLoop 是相对独立的,只在一种情况下会调用到 RunLoop 的 __CFRUNLOOP_IS_SERVICING_THE_MAIN_DISPATCH_QUEUE__() 方法:
RunLoop14

文字版流程图

RunLoop08
图中的 block 是通过 CFRunLoopPerformBlock() 添加的任务。

1
2
3
CFRunLoopPerformBlock(CFRunLoopGetCurrent(), kCFRunLoopCommonModes, ^{
});

RunLoop 休眠的实现原理

1
2
3
4
5
6
7
8
9
10
11
12
13
14
15
16
17
18
static int32_t __CFRunLoopRun(CFRunLoopRef rl, CFRunLoopModeRef rlm, CFTimeInterval seconds, Boolean stopAfterHandle, CFRunLoopModeRef previousMode) {
......
do {
// 等待消息唤醒当前线程(进入休眠,不会执行任何代码,也不会消耗CPU)
__CFRunLoopServiceMachPort(waitSet, &msg, sizeof(msg_buffer), &livePort, poll ? 0 : TIMEOUT_INFINITY, &voucherState, &voucherCopy);
} while (1);
......
}
static Boolean __CFRunLoopServiceMachPort(mach_port_name_t port, mach_msg_header_t **buffer, size_t buffer_size, mach_port_t *livePort, mach_msg_timeout_t timeout, voucher_mach_msg_state_t *voucherState, voucher_t *voucherCopy) {
......
ret = mach_msg(msg, MACH_RCV_MSG|(voucherState ? MACH_RCV_VOUCHER : 0)|MACH_RCV_LARGE|((TIMEOUT_INFINITY != timeout) ? MACH_RCV_TIMEOUT : 0)|MACH_RCV_TRAILER_TYPE(MACH_MSG_TRAILER_FORMAT_0)|MACH_RCV_TRAILER_ELEMENTS(MACH_RCV_TRAILER_AV), 0, msg->msgh_size, port, timeout, MACH_PORT_NULL);
......
}

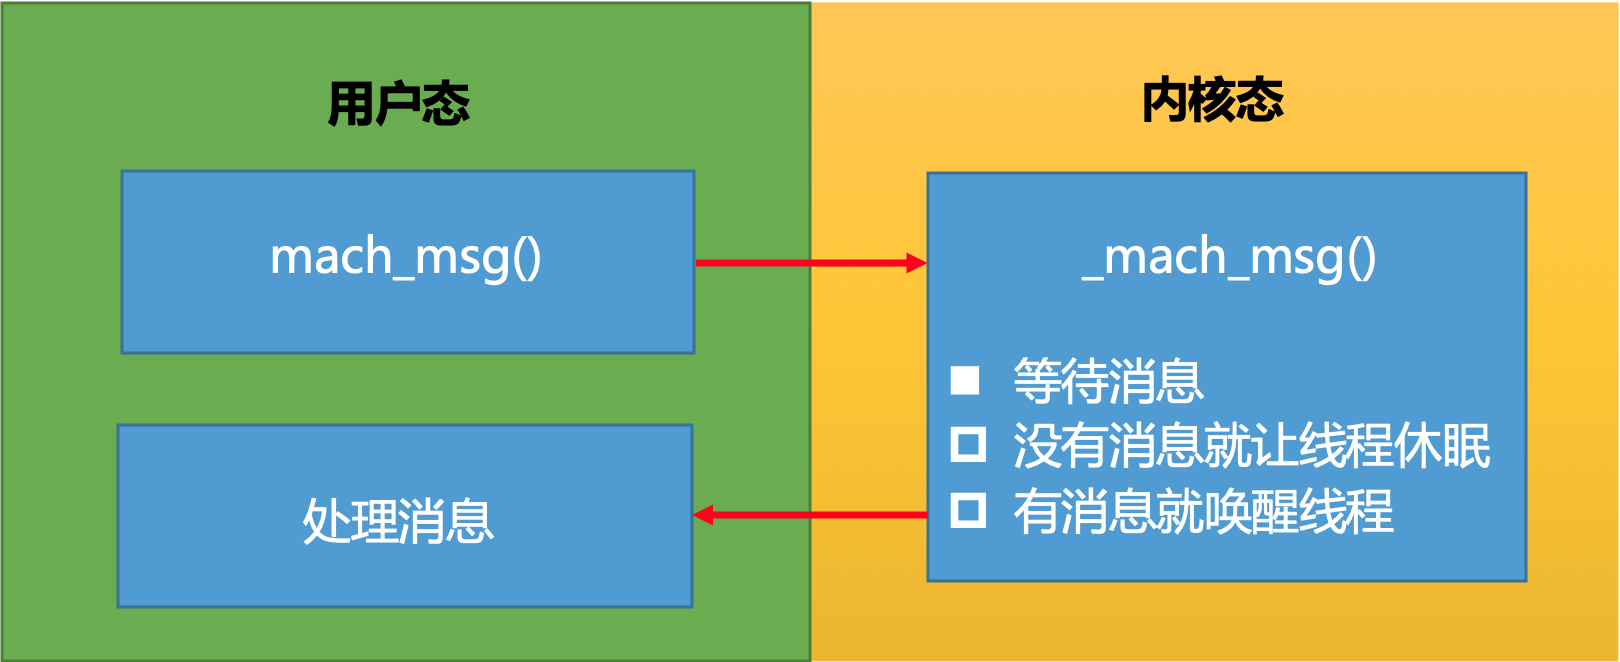
__CFRunLoopRun() 方法中调用了 __CFRunLoopServiceMachPort() 方法,__CFRunLoopServiceMachPort() 方法内部又调用了 mach_msg() 方法,使得 RunLoop 进入休眠状态。此时当前线程不再执行,while 循环会停止在 __CFRunLoopServiceMachPort() 方法这里,同时 RunLoop 会释放在 CPU 占用的资源,不再执行任何代码,直到有消息唤醒时才会继续执行当前线程(while 循环,以及 while 循环下面省略掉的代码),充分做到了节省资源。RunLoop 就是这样一个函数,其内部是一个 do-while 循环。当你调用 CFRunLoopRun() 时,线程就会一直停留在这个循环里;直到超时或被手动停止,该函数才会返回。

mach_msg() 方法会调用到内核层级的 API,该 API 对应的函数主要功能是等待消息,实现逻辑包括:

  • 没有消息的时候让线程休眠
  • 有消息的时候唤醒线程

RunLoop16

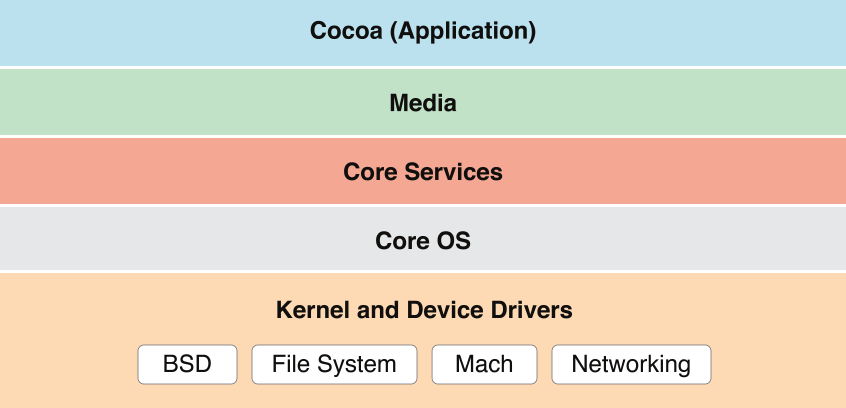
苹果官方将整个系统大致划分为上述4个层次:

  • Cocoa 层:是直接向iOS应用程序提供各种基础功能的支持。其中的UIKit框架提供各种可视化控件供应用程序使用,如窗口、视图、视图控制器与各种用户控件等。另外UIKit也定义了应用程序的默认行为和事件处理结构。
  • Media层:依赖于Core Services层提供的功能,主要负责图形与多媒体服务。它包含了CoreGraphics、Core Text、OpenGL ES、Core Animation、AVFoundation、Core Audio等与图形、视频和音频相关的功能模块。
  • Core Services层:可称之为核心服务层,顾名思义,它提供诸如字符串管理、集合管理、网络操作、URL实用工具、联系人管理、偏好设置等服务。除此之外,它还提供很多基于硬件特性的服务,如GPS、加速仪、陀螺仪等。该层包含了Core Location、Core Motion、SystemConfiguration、Foundation与Core Foundation子模块。其中Foundation与Core Foundation子模块提供了对公共数据类型(字符串、集合等)的抽象,Core Foundation中的Core Data子模块可以实现对象图形管理与对象持久化。
  • Core OS层:位于baiiOS框架的最底层,主要du包含内核、文件系统、网zhi络基础架构、安全管理、电源管理、设备驱动、线程管理、内存管理等。简而言之,该层提供了最低级的、系统级的服务。
  • Darwin 即操作系统的核心,包括系统内核、驱动、Shell 等内容,这一层是开源的,其所有源码都可以在 opensource.apple.com 里找到。

OC 的 API 有很多个层级,开发者可以调用的属于用户层级的 API,向 _mach_msg() 这种属于内核层级的 API。
RunLoop15

RunLoop 在实际开中的应用

NSTimer 失效

1
2
3
4
5
6
7
8
9
10
11
12
13
@interface ViewController : UIViewController
@end
@implementation ViewController
- (void)viewDidLoad {
[super viewDidLoad];
static int count = 0;
[NSTimer scheduledTimerWithTimeInterval:1.0 repeats:YES block:^(NSTimer * _Nonnull timer) {
NSLog(@"%d", ++count);
}];
}
@end

在控制器上加一个 UITextView 并上下拖拽,打印结果:

1
2
3
4
5
6
7
00:34:43.342490+0800 RunLoop-test1[5939:131757] 1
00:34:44.341608+0800 RunLoop-test1[5939:131757] 2
00:34:45.341603+0800 RunLoop-test1[5939:131757] 3
00:34:55.169027+0800 RunLoop-test1[5939:131757] 4
00:34:55.341906+0800 RunLoop-test1[5939:131757] 5
00:34:56.341997+0800 RunLoop-test1[5939:131757] 6
......

会发现定时器的打印在拖拽 TextView 时停止了,停止拖拽后,定时器的打印又继续进行了。这是因为 +scheduledTimerWithTimeInterval:repeats:block: 方法会自动将创建的 timer 添加到 RunLoop 中,并将 RunLoop 的 mode 设置为 kCFRunLoopDefaultMode,而拖拽 TextView 使用的是 UITrackingRunLoopMode,但是 RunLoop 在同一时间只会执行一种 Mode,所以在拖拽 TextView 时 RunLoop 将 currentMode 切换成了 UITrackingRunLoopMode,NSTimer 自然就停止了。

解决方案:
通过 +timerWithTimeInterval:repeats:block: 方法创建 timer,然后手动添加到 RunLoop 中,并将 RunLoop 的 mode 设置为 NSRunLoopCommonModes。这个时候拖拽 TextView 就不会影响到 timer 了:

1
2
3
4
5
6
7
8
9
10
11
12
@implementation ViewController
- (void)viewDidLoad {
[super viewDidLoad];
static int count = 0;
NSTimer *timer = [NSTimer timerWithTimeInterval:1.0 repeats:YES block:^(NSTimer * _Nonnull timer) {
NSLog(@"%d", ++count);
}];
[[NSRunLoop currentRunLoop] addTimer:timer forMode:NSRunLoopCommonModes]; //也可以用 CFRunLoopAddTimer(CFRunLoopGetCurrent(), timer, kCFRunLoopCommonModes);
}
@end

👉 思考:
为什么将 NSTimer 的 RunLoop 的 mode 设置为 NSRunLoopCommonModes 就可以正常执行了?NSRunLoopCommonModes 跟 UITrackingRunLoopMode 和 kCFRunLoopDefaultMode 有什么区别?

NSRunLoopCommonModes

1
2
3
4
5
6
7
8
9
10
11
12
13
14
15
16
17
18
19
20
21
22
23
struct __CFRunLoop {
......
pthread_t _pthread;
CFMutableSetRef _commonModes; //保存着 UITrackingRunLoopMode 和 kCFRunLoopDefaultMode
CFMutableSetRef _commonModeItems; //保存着 NSRunLoopCommonModes 类型的任务(timer)
CFRunLoopModeRef _currentMode;
CFMutableSetRef _modes;
......
};
struct __CFRunLoopMode {
......
CFStringRef _name;
CFMutableSetRef _sources0;
CFMutableSetRef _sources1;
CFMutableArrayRef _observers;
CFMutableArrayRef _timers;
......
};

NSRunLoopCommonModes 并不是一个真正的模式,只是一个标记。UITrackingRunLoopMode 和 kCFRunLoopDefaultMode 才是真正意义上的模式。

一般情况下添加 timer 到 RunLoop 时 mode 设置为 kCFRunLoopDefaultMode,timer 运行在 RunLoop 的 _modes 里的模式下,同时 timer 被保存到 mode 里的 _timers 中。当添加 timer 到 RunLoop 将 mode 设置为 NSRunLoopCommonModes 标记时,那么 timer 能在 _commonModes 里的模式下运行,同时 timer 被保存到了 RunLoop 的 _commonModeItems 中。

线程保活

1
2
3
4
5
6
7
8
9
10
11
12
13
14
15
16
17
18
19
20
21
22
23
24
25
26
@interface YQThread : NSThread
@end
@implementation YQThread
- (void)dealloc
{
NSLog(@"%s", __func__);
}
@end
@implementation ViewController
- (void)viewDidLoad {
[super viewDidLoad];
}
- (void)touchesBegan:(NSSet<UITouch *> *)touches withEvent:(UIEvent *)event
{
YQThread *thread = [[YQThread alloc] initWithTarget:self selector:@selector(run) object:nil];
[thread start];
}
- (void)run
{
NSLog(@"%s %@", __func__, [NSThread currentThread]);
}

点击屏幕,打印结果:

1
2
3
4
-[ViewController run] <YQThread: 0x600002375fc0>{number = 8, name = (null)}
-[YQThread dealloc]
-[ViewController run] <YQThread: 0x600002352c80>{number = 9, name = (null)}
-[YQThread dealloc]

在线程中添加 RunLoop,可以保证线程不被释放,并在需要的时候工作,不需要的时候休眠。-(void)run 方法是线程调用的,所以在线程中添加 RunLoop 可以加在 -(void)run 方法中。RunLoop 不需要手动创建,在线程中第一次获取 RunLoop 的时候就会自动创建。

1
2
3
4
5
6
- (void)run
{
NSLog(@"%s %@", __func__, [NSThread currentThread]);
[[NSRunLoop currentRunLoop] run];
NSLog(@"--- end ---");
}

点击屏幕,打印结果:

1
2
3
4
5
6
-[ViewController run] <YQThread: 0x600000335f80>{number = 6, name = (null)}
--- end ---
-[YQThread dealloc]
-[ViewController run] <YQThread: 0x60000033d380>{number = 7, name = (null)}
--- end ---
-[YQThread dealloc]

可以看到线程还是被销毁了,这是因为 RunLoop 没有找到 Sources0/Sources1/Timer/Observer 就退出了,所以需要向 RunLoop 中添加任务:

1
2
3
4
5
6
7
8
- (void)run
{
NSLog(@"%s %@", __func__, [NSThread currentThread]);
// 在 RunLoop 中添加 Sources/timer/observer
[[NSRunLoop currentRunLoop] addPort:[[NSPort alloc] init] forMode:NSDefaultRunLoopMode];
[[NSRunLoop currentRunLoop] run]; //线程停留在这里,不会打印下面这句
NSLog(@"--- end ---");
}

打印结果:

1
2
3
-[ViewController run] <YQThread: 0x60000101d000>{number = 6, name = (null)}
-[ViewController run] <YQThread: 0x60000101b480>{number = 7, name = (null)}
-[ViewController run] <YQThread: 0x600001077680>{number = 8, name = (null)}

从打印结果可以看到,线程停留在了 [[NSRunLoop currentRunLoop] run]; 这一行,一直都没有打印 “—- end —-“。

因为 port 是 sources1 类型的事件,添加到 RunLoop 中却没有什么事情可做,RunLoop 就进入了休眠等待任务唤醒(没有退出),即 RunLoop 阻塞住了线程保证了线程不被释放,所以一直没有打印 “—- end —-“。

因为是在异步线程,所以不需要考虑 UITrackingRunLoopMode,直接设置为 NSDefaultRunLoopMode 就可以了。

为一直存活的线程添加任务:

1
2
3
4
5
6
7
8
9
10
11
12
13
14
15
16
17
18
19
20
21
22
23
24
25
26
27
28
29
30
31
32
33
@interface ViewController ()
@property (nonatomic, strong) YQThread *thread;
@end
@implementation ViewController
- (void)viewDidLoad {
[super viewDidLoad];
self.thread = [[YQThread alloc] initWithTarget:self selector:@selector(run) object:nil];
[self.thread start];
}
- (void)touchesBegan:(NSSet<UITouch *> *)touches withEvent:(UIEvent *)event
{
[self performSelector:@selector(test) onThread:self.thread withObject:nil waitUntilDone:NO];
}
// 子线程的任务
- (void)test {
NSLog(@"%s %@", __func__, [NSThread currentThread]);
}
// 这个方法的目的:线程保活
- (void)run
{
NSLog(@"%s %@", __func__, [NSThread currentThread]);
// 在 RunLoop 中添加 Sources/timer/observer
[[NSRunLoop currentRunLoop] addPort:[[NSPort alloc] init] forMode:NSDefaultRunLoopMode];
[[NSRunLoop currentRunLoop] run];
NSLog(@"--- end ---");
}
@end

点击屏幕,打印结果:

1
2
3
4
-[ViewController run] <YQThread: 0x600000d56640>{number = 6, name = (null)}
-[ViewController test] <YQThread: 0x600000d56640>{number = 6, name = (null)}

从打印结果可以看到,线程一直存在,并且可以重复执行任务。

上面👆的实现有以下几个问题:

  1. NSThread 的初始化方法会对 self 进行强引用,导致 thread 和 self 循环引用问题。

    1
    self.thread = [[YQThread alloc] initWithTarget:self selector:@selector(run)
  2. RunLoop 进入休眠并没有退出,所以一直不会打印 “—- end —-“,线程也就无法结束。

  3. NSRunLoop 的 -(void)run 方法是无法停止的,它专门用于开启一个永不销毁的线程。-(void)run 方法内部在重复创建 RunLoop。while 循环在第一次循环时会创建一个 RunLoop1 阻塞住 while 循环,RunLoop1 会在有任务时执行任务,没任务时休眠。当调用退出方法让 RunLoop1 退出后,while 循环会再次启动并创建一个新的 RunLoop2,逻辑同 RunLoop1。即退出了当前的 RunLoop 还会创建一个新的 RunLoop。伪代码实现:
    1
    2
    3
    while (1) {
    [[NSRunLoop currentRunLoop] runMode:NSDefaultRunLoopMode beforeDate:[NSDate distantFuture]];
    }

优化后的实现:

1
2
3
4
5
6
7
8
9
10
11
12
13
14
15
16
17
18
19
20
21
22
23
24
25
26
27
28
29
30
31
32
33
34
35
36
37
38
39
40
41
42
43
44
45
46
47
48
49
50
51
@interface ViewController ()
@property (nonatomic, strong) YQThread *thread;
@property (nonatomic, assign, getter=isStop) BOOL stop; //停止RunLoop的标记
@end
@implementation ViewController
- (void)viewDidLoad
{
[super viewDidLoad];
__weak typeof(self) weakSelf = self;
self.thread = [[YQThread alloc] initWithBlock:^{
NSLog(@"%@--- begain ---", [NSThread currentThread]);
/**--- 线程保活 ---*/
[[NSRunLoop currentRunLoop] addPort:[[NSPort alloc] init] forMode:NSDefaultRunLoopMode];
while (!weakSelf.isStop) {
[[NSRunLoop currentRunLoop] runMode:NSDefaultRunLoopMode beforeDate:[NSDate distantFuture]];
}
/**--- 线程保活 end ---*/
NSLog(@"%@--- end ---", [NSThread currentThread]);
}];
[self.thread start];
}
- (void)touchesBegan:(NSSet<UITouch *> *)touches withEvent:(UIEvent *)event
{
[self performSelector:@selector(test) onThread:self.thread withObject:nil waitUntilDone:NO];
}
// 子线程的任务
- (void)test
{
NSLog(@"%s %@", __func__, [NSThread currentThread]);
}
- (void)stopThread
{
// 设置停止线程标记
self.stop = YES;
// 停止RunLoop
CFRunLoopStop(CFRunLoopGetCurrent());
}
- (void)dealloc
{
NSLog(@"%s", __func__);
//停止 RunLoop 的方法需要在对应线程内执行,dealloc 方法在主线程,可以通过该方法调用到需要停止的线程里执行
[self performSelector:@selector(stopThread) onThread:self.thread withObject:nil waitUntilDone:NO];
}
@end

打印结果:

1
2
3
4
<YQThread: 0x60000372e200>{number = 7, name = (null)}--- begain ---
-[ViewControllerNew test] <YQThread: 0x60000372e200>{number = 7, name = (null)}
-[ViewControllerNew dealloc]

CFRunLoopStop(CFRunLoopGetCurrent()) 方法会退出当前的 RunLoop,此时 while 循环重新启动并在判断 isStop == YES 时停止循环,不会再创建新的 RunLoop。

打印结果中没有打印 “—- end —-“,线程也没有释放,是因为上面👆的实现还有以下几个问题:

  1. performSelector:onThread:waitUntilDone 方法的第三个参数 waitUntilDone 表示是否需要当前线程等待方法执行完成后再继续执行下一行。如果设置为 NO,则表示不需要等待,那么在控制器的 -(void)dealloc 方法里在 self 调用 performSelector:onThread:waitUntilDone 后,-(void)dealloc 方法会继续往下执行,控制器被释放。那么在执行 -(void)stopThread 方法的时候再访问 self 就会出现坏内存访问的错误。
  2. while (!weakSelf.isStop) 在控制器被销毁后也是成立的(while (!nil) == while (true)),所以 while 循环又会创建新的 RunLoop,线程还是无法释放。

最终实现:

1
2
3
4
5
6
7
8
9
10
11
12
13
14
15
16
17
18
19
20
21
22
23
24
25
26
27
28
29
30
31
32
33
34
35
36
37
38
39
40
41
42
43
44
45
46
47
48
49
50
51
52
@interface ViewController ()
@property (nonatomic, strong) YQThread *thread;
@property (nonatomic, assign, getter=isStop) BOOL stop; //停止RunLoop的标记
@end
@implementation ViewController
- (void)viewDidLoad
{
[super viewDidLoad];
__weak typeof(self) weakSelf = self;
self.thread = [[YQThread alloc] initWithBlock:^{
NSLog(@"%@--- begain ---", [NSThread currentThread]);
/**--- 线程保活 ---*/
[[NSRunLoop currentRunLoop] addPort:[[NSPort alloc] init] forMode:NSDefaultRunLoopMode];
while (weakSelf && !weakSelf.isStop) {
[[NSRunLoop currentRunLoop] runMode:NSDefaultRunLoopMode beforeDate:[NSDate distantFuture]];
}
/**--- 线程保活 end ---*/
NSLog(@"%@--- end ---", [NSThread currentThread]);
}];
[self.thread start];
}
- (void)touchesBegan:(NSSet<UITouch *> *)touches withEvent:(UIEvent *)event
{
[self performSelector:@selector(test) onThread:self.thread withObject:nil waitUntilDone:NO];
}
// 子线程的任务
- (void)test
{
NSLog(@"%s %@", __func__, [NSThread currentThread]);
}
- (void)stopThread
{
// 设置停止线程标记
self.stop = YES;
// 停止RunLoop
CFRunLoopStop(CFRunLoopGetCurrent());
}
- (void)dealloc
{
NSLog(@"%s", __func__);
// 停止 RunLoop 的方法需要在对应线程内执行,dealloc 方法在主线程,可以通过该方法调用到需要停止的线程里去执行
// waitUntilDone:YES,表示执行完该方法在向下执行,保证了在执行该方法时,控制器(self)不会被销毁
[self performSelector:@selector(stopThread) onThread:self.thread withObject:nil waitUntilDone:YES];
}
@end

打印结果:

1
2
3
4
5
6
<YQThread: 0x600000c70100>{number = 6, name = (null)}--- begain ---
-[ViewControllerNew test] <YQThread: 0x600000c70100>{number = 6, name = (null)}
-[ViewControllerNew dealloc]
<YQThread: 0x600000c70100>{number = 6, name = (null)}--- end ---
-[YQThread dealloc]

线程的封装

为了方便使用,将线程封装成一个工具类,这样在使用的时候就不用管理线程的创建、保活和销毁了。

接口设计

方案一:创建一个 NSThread 的分类。这种方式需要用到关联对象创建 NSThread 对象,而且在外部使用时调用者可以调用 NSThread 提供的 API,封装性不够好。

方案二:创建一个 NSObject 管理类,里面管理一个 NSThread 对象。不直接继承 NSThread 的原因同上,为了控制调用者不能去访问 NSThread 提供的 API,保证 NSThread 相关的操作(创建、保活和销毁)全部且只能在管理类的内部操作,调用者只能调用由管理类提供的 API,这样就保证了封装性。

定义接口:

1
2
3
4
5
6
7
8
9
10
11
12
13
14
@interface YQPermenantThread : NSObject
/**
开启线程
*/
- (void)run;
/**
执行任务
*/
- (void)executeTaskWithTarget:(id)target action:(SEL)action object:(id)object;
/**
结束线程
*/
- (void)stop;
@end

调用:

1
2
3
4
5
6
7
8
9
10
11
12
13
14
15
16
17
18
19
20
21
22
23
24
25
26
27
28
@interface ViewControllerNew ()
@property (nonatomic, strong) YQPermenantThread *thread;
@end
@implementation ViewControllerNew
- (void)viewDidLoad
{
[super view];
self.thread = [[YQPermenantThread alloc] init];
[self.thread run];
}
- (void)touchesBegan:(NSSet<UITouch *> *)touches withEvent:(UIEvent *)event
{
[self.thread executeTaskWithTarget:self action:@selector(test) object:nil];
}
- (void)test
{
NSLog(@"%s %@", __func__, [NSThread currentThread]);
}
- (void)dealloc
{
[self.thread stop];
}
@end

执行任务的方法也可以设计成 Block 的形式,代码会更精简:

1
2
3
4
5
6
7
8
9
10
11
12
13
14
15
16
17
18
19
20
21
22
23
24
25
26
27
28
29
30
31
32
33
34
35
36
37
38
39
40
41
42
43
44
45
46
47
48
49
50
51
52
@interface YQPermenantThread : NSObject
/**
开启线程
*/
- (void)run;
/**
执行任务
*/
- (void)executeTask:(void (^)(void))task;
/**
结束线程
*/
- (void)stop;
@end
@interface ViewControllerNew ()
@property (nonatomic, strong) YQPermenantThread *thread;
@end
@implementation ViewControllerNew
- (void)viewDidLoad
{
[super view];
self.thread = [[YQPermenantThread alloc] init];
[self.thread run];
}
- (void)touchesBegan:(NSSet<UITouch *> *)touches withEvent:(UIEvent *)event
{
/**
[self.thread executeTask:^{
NSLog(@"%@", [NSThread currentThread]);
}];
*/
__weak typeof(self) weakSelf = self;
[self.thread executeTask:^{
[weakSelf test];
}];
}
- (void)test
{
NSLog(@"%s %@", __func__, [NSThread currentThread]);
}
- (void)dealloc
{
[self.thread stop];
}
@end

内部实现

1
2
3
4
5
6
7
8
9
10
11
12
13
14
15
16
17
18
19
20
21
22
23
24
25
26
27
28
29
30
31
32
33
34
35
36
37
38
39
40
41
42
43
44
45
46
47
48
49
50
51
52
53
54
55
56
57
58
59
60
61
62
63
64
65
66
67
68
69
70
71
72
73
@interface YQThread : NSThread
@end
@implementation YQThread
- (void)dealloc
{
NSLog(@"%s", __func__);
}
@end
@interface YQPermenantThread()
@property (nonatomic, strong) YQThread *innerThread;
@property (nonatomic, assign, getter=isStopped) BOOL stopped; //停止RunLoop的标记
@end
@implementation YQPermenantThread
- (instancetype)init
{
self = [super init];
if (self) {
self.stopped = NO;
__weak typeof(self) weakSelf = self;
self.innerThread = [[YQThread alloc] initWithBlock:^{
[[NSRunLoop currentRunLoop] addPort:[[NSPort alloc] init] forMode:NSDefaultRunLoopMode];
while (weakSelf && !weakSelf.isStopped) {
[[NSRunLoop currentRunLoop] runMode:NSDefaultRunLoopMode beforeDate:[NSDate distantFuture]];
}
}];
}
return self;
}
- (void)run
{
if (!self.innerThread) return;
[self.innerThread start];
}
- (void)executeTask:(void (^)(void))task
{
if (!self.innerThread || !task) return;
[self performSelector:@selector(__executeTask:) onThread:self.innerThread withObject:task waitUntilDone:NO];
}
- (void)stop
{
if (!self.innerThread) return;
[self performSelector:@selector(__stop) onThread:self.innerThread withObject:nil waitUntilDone:YES];
}
- (void)dealloc
{
NSLog(@"%s", __func__);
[self stop];
}
#pragma mark - private methods
- (void)__stop
{
self.stopped = YES;
CFRunLoopStop(CFRunLoopGetCurrent());
self.innerThread = nil;
}
- (void)__executeTask:(void(^)(void))task
{
task();
}
@end

调用:

1
2
3
4
5
6
7
8
9
10
11
12
13
14
15
16
17
18
19
20
21
22
23
24
25
26
27
28
29
30
31
32
33
@interface ViewControllerNew ()
@property (nonatomic, strong) YQPermenantThread *thread;
@end
@implementation ViewControllerNew
- (void)viewDidLoad
{
[super viewDidLoad];
self.view.backgroundColor = [UIColor orangeColor];
self.thread = [[YQPermenantThread alloc] init];
[self.thread run];
}
- (void)touchesBegan:(NSSet<UITouch *> *)touches withEvent:(UIEvent *)event
{
__weak typeof(self) weakSelf = self;
[self.thread executeTask:^{
[weakSelf test];
}];
}
- (void)test
{
NSLog(@"%s %@", __func__, [NSThread currentThread]);
}
- (void)dealloc
{
NSLog(@"%s", __func__);
}
@end

打印结果:

1
2
3
4
-[ViewControllerNew test] <YQThread: 0x600000d76f00>{number = 9, name = (null)}
-[ViewControllerNew dealloc]
-[YQPermenantThread dealloc]
-[YQThread dealloc]

C语言方式实现

1
2
3
4
5
6
7
8
9
10
11
12
13
14
15
16
17
18
19
20
21
22
23
24
25
26
27
28
29
30
31
32
33
34
35
36
37
38
39
40
41
42
43
44
45
46
47
48
49
50
51
52
53
54
55
56
57
58
59
60
61
62
63
64
65
66
67
68
69
70
71
72
73
74
75
76
77
78
79
@interface YQThread : NSThread
@end
@implementation YQThread
- (void)dealloc
{
NSLog(@"%s", __func__);
}
@end
@interface YQPermenantThread()
@property (nonatomic, strong) YQThread *innerThread;
@end
@implementation YQPermenantThread
- (instancetype)init
{
self = [super init];
if (self) {
__weak typeof(self) weakSelf = self;
self.innerThread = [[YQThread alloc] initWithBlock:^{
// 创建上下文
CFRunLoopSourceContext context = {0};
// 创建source
CFRunLoopSourceRef source = CFRunLoopSourceCreate(kCFAllocatorDefault, 0, &context);
// 往RunLoop中添加source
CFRunLoopAddSource(CFRunLoopGetCurrent(), source, kCFRunLoopDefaultMode);
// 销毁source
CFRelease(source);
// 启动(ture:执行完source退出;false:执行完source不退出)
CFRunLoopRunInMode(kCFRunLoopDefaultMode, 1.0e10, false);
}];
}
return self;
}
- (void)run
{
if (!self.innerThread) return;
[self.innerThread start];
}
- (void)executeTask:(void (^)(void))task
{
if (!self.innerThread || !task) return;
[self performSelector:@selector(__executeTask:) onThread:self.innerThread withObject:task waitUntilDone:NO];
}
- (void)stop
{
if (!self.innerThread) return;
[self performSelector:@selector(__stop) onThread:self.innerThread withObject:nil waitUntilDone:YES];
}
- (void)dealloc
{
NSLog(@"%s", __func__);
[self stop];
}
#pragma mark - private methods
- (void)__stop
{
CFRunLoopStop(CFRunLoopGetCurrent());
self.innerThread = nil;
}
- (void)__executeTask:(void(^)(void))task
{
task();
}
@end

打印结果:

1
2
3
-[ViewControllerNew dealloc]
-[YQPermenantThread dealloc]
-[YQThread dealloc]

👉注意:

  1. 在创建上下文时,CFRunLoopSourceContext 是一个结构体,如果没有进行初始化,context 的内部的值可能会是一堆乱码。只有添加了初始化方法{0},才能保证结构里内部的值是正常的数值:

    1
    CFRunLoopSourceContext context = {0};
  2. 启动 RunLoop 时,第三个参数传 true 表示执行完 source 立即退出,传 false 表示执行完 source 不退出。在这里传 false 等同于 OC 实现中的 while 循环的作用。

    1
    CFRunLoopRunInMode(kCFRunLoopDefaultMode, 1.0e10, false);

总结

  • 讲讲 RunLoop,项目中有用到吗?

    1. RunLoop 保持程序的持续运行,没有 RunLoop 程序会马上退出,有了 RunLoop 程序并不会马上退出,而是保持运行状态;
    2. RunLoop 处理App中的各种事件(如:定时器(Timer)、PerformSelector、GCD、事件响应、手势识别、界面刷新、网络请求和 AutoreleasePool 等)。这些事件的代码最终都变成了 RunLoop 里的执行任务(sources0/sources1/timers),由 RunLoop 监控和执行;
    3. RunLoop 的休眠机制极大可能的节省了对CPU资源的占用,提高了程序性能;
    4. 每条线程都有唯一的一个与之对应的 RunLoop 对象。RunLoop 保存在一个全局的 Dictionary 里,线程作为 key,RunLoop 作为 value。线程刚创建时并没有 RunLoop 对象,RunLoop 会在第一次获取它时创建。RunLoop 会在线程结束时销毁。主线程的 RunLoop 已经自动获取(创建),子线程默认没有开启 RunLoop;
    5. RunLoop 启动时只能选择其中一个 Mode,作为 _currentMode。如果需要切换 Mode,只能退出当前 Loop,再重新选择一个 Mode 进入。一个 RunLoop 包含若干个 Mode,每个 Mode 又包含若干个 Sources0/Sources1/Timer/Observer。如果 Mode 里没有任何 Source0/Source1/Timer/Observer,RunLoop 会立马退出。
    6. RunLoop 有两种常见的 mode:
      kCFRunLoopDefaultMode(NSDefaultRunLoopMode):App 的默认 Mode,通常主线程是在这个 Mode 下运行。
      UITrackingRunLoopMode:界面跟踪 Mode,用于 ScrollView 追踪触摸滑动,保证界面滑动时不受其他 Mode 影响。(只有主线程需要考虑这种 mode)
      NSRunLoopCommonModes:并不是一个真正的模式,只是一个标记。UITrackingRunLoopMode 和 kCFRunLoopDefaultMode 才是真正意义上的模式。一般情况下添加 timer 到 RunLoop 时 mode 设置为 kCFRunLoopDefaultMode,timer 运行在 RunLoop 的 _modes 里的模式下,同时 timer 被保存到 mode 里的 _timers 中。当添加 timer 到 RunLoop 将 mode 设置为 NSRunLoopCommonModes 标记时,那么 timer 能在 _commonModes 里的模式下运行,同时 timer 被保存到了 RunLoop 的 _commonModeItems 中。
    7. RunLoop 的休眠唤醒逻辑是通过调用一个内核方法 mach_msg() 实现的。

      项目中使用 RunLoop 的地方比较少,主要有解决 NSTimer 失效问题,自定义线程保活。

  • RunLoop 内部实现逻辑?

    1. RunLoop 启动时只能选择其中一个 Mode,作为 _currentMode。如果需要切换 Mode,只能退出当前 Loop,再重新选择一个 Mode 进入。一个 RunLoop 包含若干个 Mode,每个 Mode 又包含若干个 Sources0/Sources1/Timer/Observer。如果 Mode 里没有任何 Source0/Source1/Timer/Observer,RunLoop 会立马退出。

    2. RunLoop 的休眠唤醒逻辑是通过调用一个内核方法 mach_msg() 实现的。

  • RunLoop 和线程的关系?
    每条线程都有唯一的一个与之对应的 RunLoop 对象。RunLoop 保存在一个全局的 Dictionary 里,线程作为 key,RunLoop 作为 value。线程刚创建时并没有 RunLoop 对象,RunLoop 会在第一次获取它时创建。RunLoop 会在线程结束时销毁。主线程的 RunLoop 已经自动获取(创建),子线程默认没有开启 RunLoop;

  • timer 与 RunLoop 的关系?
    一般情况下添加 timer 到 RunLoop 时 mode 设置为 kCFRunLoopDefaultMode,timer 运行在 RunLoop 的 _modes 里的模式下,同时 timer 被保存到 mode 里的 _timers 中。当添加 timer 到 RunLoop 将 mode 设置为 NSRunLoopCommonModes 标记时,那么 timer 能在 _commonModes 里的模式下运行,同时 timer 被保存到了 RunLoop 的 _commonModeItems 中。

  • 程序中添加每3秒响应一次的 NSTimer,当拖动 tableview 时 timer 可能无法响应要怎么解决?
    通过 +timerWithTimeInterval:repeats:block: 方法创建 timer,然后手动添加到 RunLoop 中,并将 RunLoop 的 mode 设置为 NSRunLoopCommonModes。这个时候拖拽 TextView 就不会影响到 timer 了。原因在上面“timer 与 RunLoop 的关系”。

  • RunLoop 是怎么响应用户操作的, 具体流程是什么样的?
    RunLoop08

  • 说说 RunLoop 的几种状态

    1
    2
    3
    4
    5
    6
    7
    8
    9
    typedef CF_OPTIONS(CFOptionFlags, CFRunLoopActivity) {
    kCFRunLoopEntry = (1UL << 0), //即将进入Loop
    kCFRunLoopBeforeTimers = (1UL << 1), //即将处理Timer
    kCFRunLoopBeforeSources = (1UL << 2), //即将处理Source
    kCFRunLoopBeforeWaiting = (1UL << 5), //即将进入休眠
    kCFRunLoopAfterWaiting = (1UL << 6), //刚从休眠中唤醒
    kCFRunLoopExit = (1UL << 7), //即将推出Loop
    kCFRunLoopAllActivities = 0x0FFFFFFFU
    };
  • RunLoop 的 mode 作用是什么?
    mode 是 RunLoop 的运行模式。RunLoop 启动时只能选择其中一个 Mode,作为 _currentMode。如果需要切换 Mode,只能退出当前 Loop,再重新选择一个 Mode 进入。一个 RunLoop 包含若干个 Mode,每个 Mode 又包含若干个 Sources0/Sources1/Timer/Observer。不同组(不同mode)的 Sources0/Sources1/Timer/Observer 能分隔开来,互不影响。如果 Mode 里没有任何 Sources0/Sources1/Timer/Observer,RunLoop 会立马退出。RunLoop 将 OC 代码转换成了 Sources0/Sources1/Timer/Observer 保存到不同的 mode 里,并且循环监测并执行它们。比如:定时器(Timer)、PerformSelector、GCD、事件响应、手势识别、界面刷新、网络请求和 AutoreleasePool 等都是在进入休眠前完成的。