多线程

思考:

  • 你理解的多线程?
  • iOS的多线程方案有哪几种?你更倾向于哪一种?
  • 你在项目中用过 GCD 吗?
  • GCD 的队列类型
  • 说一下 OperationQueue 和 GCD 的区别,以及各自的优势
  • 线程安全的处理手段有哪些?
  • OC你了解的锁有哪些?在你回答基础上进行二次提问;
    追问一:自旋和互斥对比?
    追问二:使用以上锁需要注意哪些?
    追问三:用C/OC/C++,任选其一,实现自旋或互斥?
  • 请问下面代码的打印结果是什么?

    1
    2
    3
    4
    5
    6
    7
    8
    9
    10
    11
    12
    13
    14
    15
    16
    17
    @implementation ViewController
    - (void)viewDidLoad {
    [super viewDidLoad];
    dispatch_queue_t queue = dispatch_get_global_queue(0, 0);
    dispatch_async(queue, ^{
    NSLog(@"1");
    [self performSelector:@selector(test) withObject:nil afterDelay:.0];
    NSLog(@"3");
    });
    }
    - (void)test
    {
    NSLog(@"2");
    }
    @end
  • 请问下面代码的打印结果是什么?

    1
    2
    3
    4
    5
    6
    7
    8
    9
    10
    11
    12
    13
    14
    15
    16
    @implementation ViewController
    - (void)test
    {
    NSLog(@"2");
    }
    - (void)touchesBegan:(NSSet<UITouch *> *)touches withEvent:(UIEvent *)event
    {
    NSThread *thread = [[NSThread alloc] initWithBlock:^{
    NSLog(@"1");
    }];
    [thread start];
    [self performSelector:@selector(test) onThread:thread withObject:nil waitUntilDone:YES];
    }
    @end

GCD

👉 GCD源码

iOS中的常见多线程方案

技术方案 简介 语言 线程生命周期 使用频率
phread 1.一套通用的多线程API;
2.适用于Unix\Linux\Windows等系统;
3.跨平台\可移植;
4.使用难度大;
C 开发者管理 几乎不用
NSThread 1.使用更加面向对象;
2.简单易用,可直接操作线程对象;
OC 开发者管理 偶尔使用
GCD 1.旨在替代NSThread等多线程技术; C 自动管理 经常使用
NSOperation 1.基于GCD(底层是GCD);
2.比GCD多了一些更简单使用的功能;
3.使用更加面向对象;
OC 自动管理 经常使用

phread 在实际开发中几乎不会用到,一般只会在加锁解锁的地方用到。另外,NSThead、GCD 和 NSOperation 底层都会用到 phread,比如创建线程等。NSThread 就是对 phread 的包装。

GCD的常用函数

GCD 中有2个用来执行任务的函数:

  • 用同步的方式执行任务(queue:队列;block:任务)

    1
    dispatch_sync(dispatch_queue_t queue, dispatch_block_t block);
  • 用异步的方式执行任务

    1
    dispatch_async(dispatch_queue_t queue, dispatch_block_t block);

队列相关函数:

  • 获取主队列

    1
    dispatch_queue_t queue = dispatch_get_main_queue();
  • 获取全局并发队列

    1
    dispatch_queue_t queue = dispatch_get_global_queue(0, 0);
  • 手动创建并发队列

    1
    dispatch_queue_t queue = dispatch_queue_create("myQueue", DISPATCH_QUEUE_CONCURRENT);
  • 手动创建串行队列

    1
    dispatch_queue_t queue = dispatch_queue_create("mySerialQueue", DISPATCH_QUEUE_SERIAL);
  • 手动创建队列组

    1
    dispatch_group_t group = dispatch_group_create();

GCD的队列

GCD的队列可以分为2大类型

  • 并发队列(Concurrent Dispatch Queue)
    可以让多个任务并发(同时)执行(自动开启多个线程同时执行任务);
    并发功能只有在异步(dispatch_async)函数下才有效;

  • 串行队列(Serial Dispatch Queue)
    让任务一个接着一个地执行(一个任务执行完毕后,再执行下一个任务);

容易混淆的术语

有4个术语比较容易混淆:同步、异步、并发、串行

  • 同步和异步主要影响:能不能开启新的线程
    同步:在当前线程中执行任务,不具备开启新线程的能力;
    异步:在新的线程中执行任务,具备开启新线程的能力;

  • 并发和串行主要影响:任务的执行方式
    并发:多个任务并发(同时)执行;
    串行:一个任务执行完毕后,再执行下一个任务;

各种队列的执行效果

  并发队列 手动穿件的串行队列 主队列
同步(sync) 没有开启新线程
串行执行任务
没有开启新线程
串行执行任务
没有开启新线程
串行执行任务
异步(async) 有开启新线程
并发执行任务
有开启新线程
串行执行任务
没有开启新线程
串行执行任务

使用sync函数往当前串行队列中添加任务,会卡住当前的串行队列(产生死锁)。

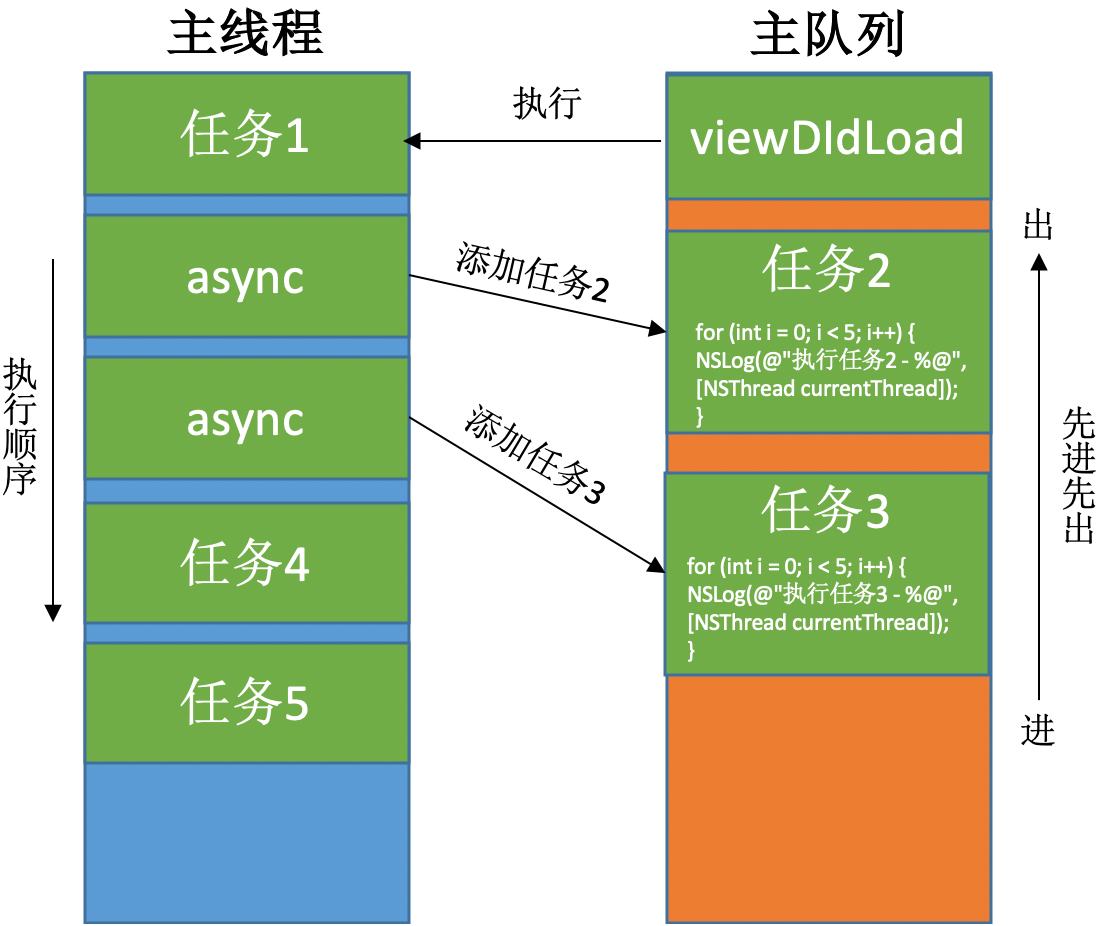
主队列是一个特殊的串行队列,async 方法在主队列中添加任务不会开启新线程,并且是串行执行任务。

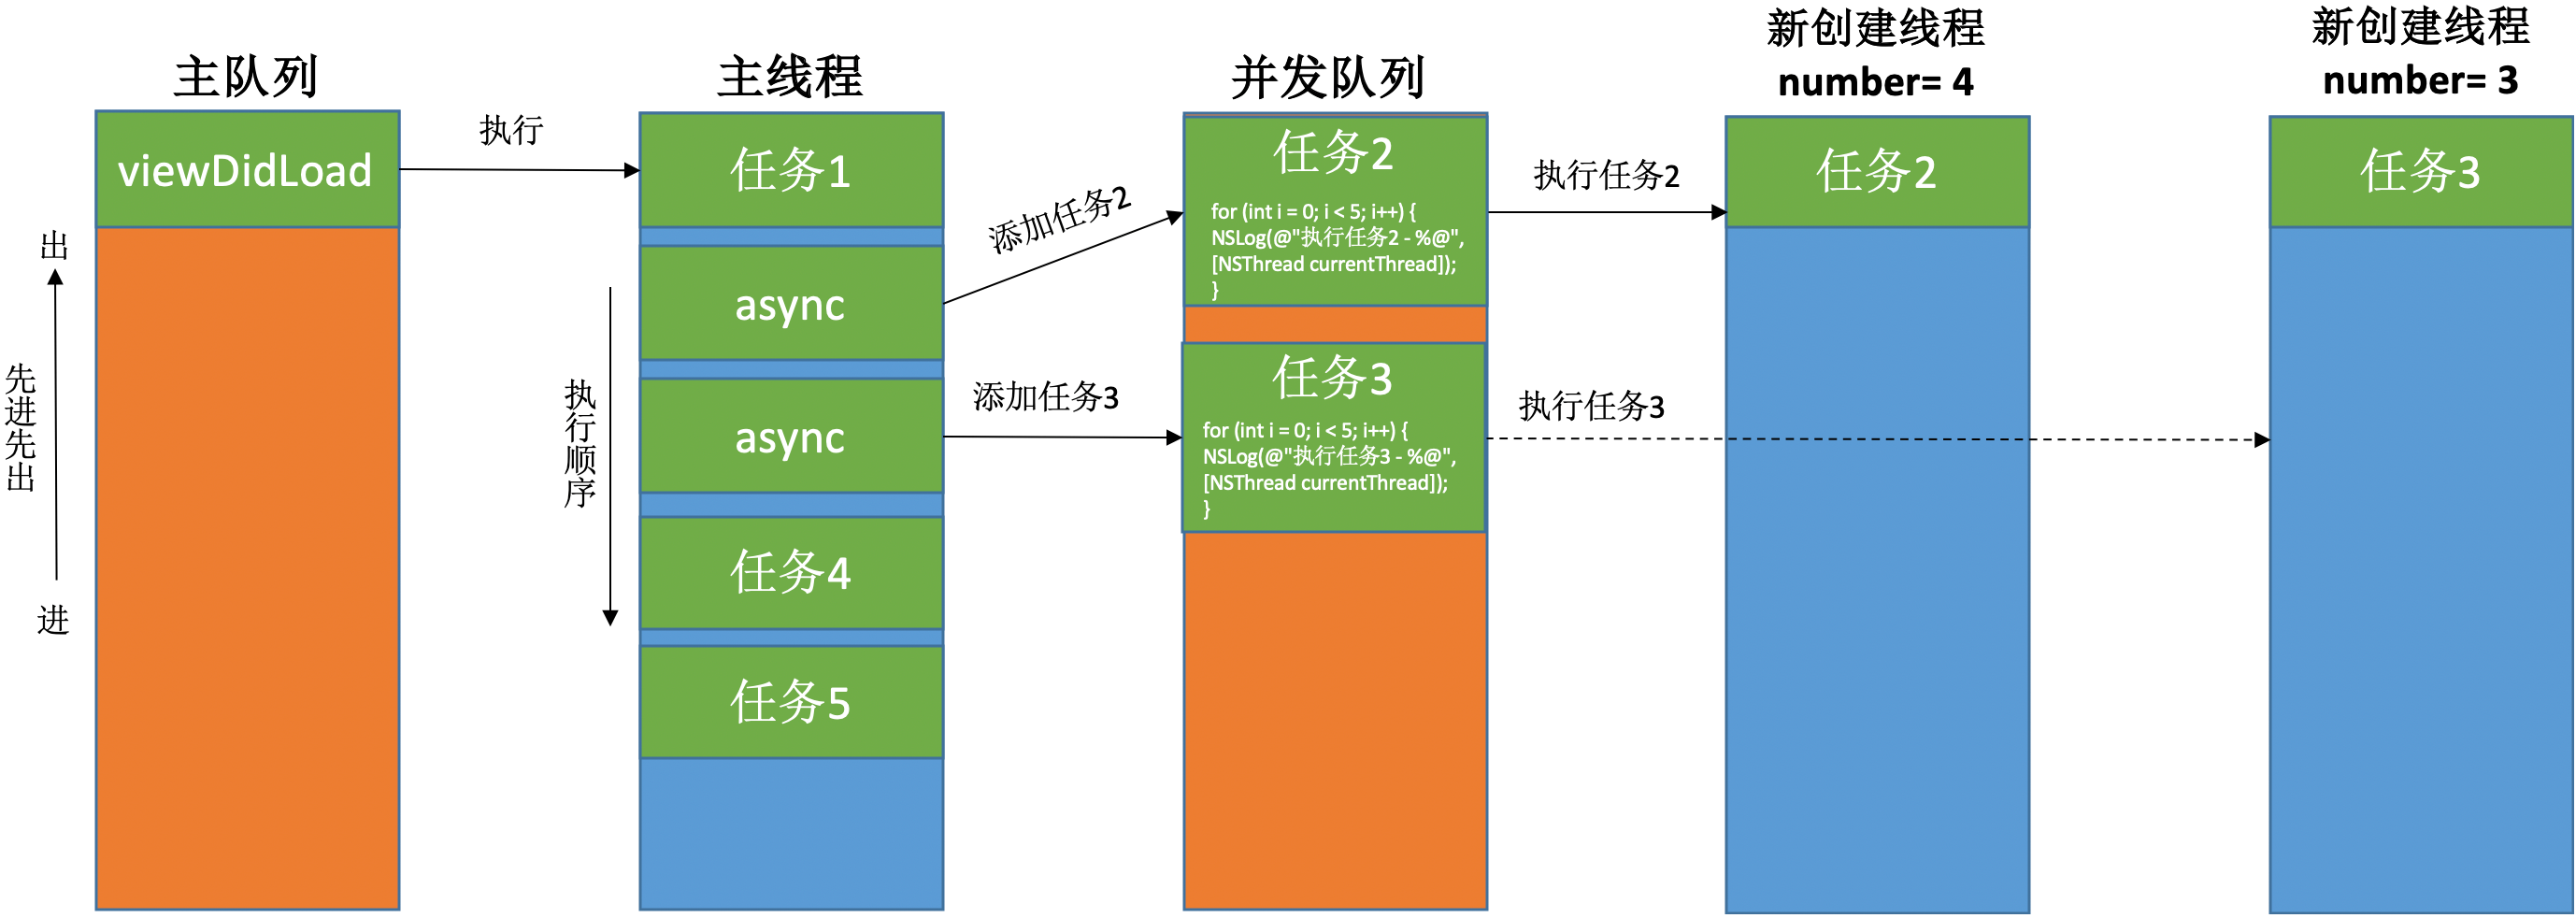
并发队列 & 异步执行(async)

1
2
3
4
5
6
7
8
9
10
11
12
13
14
15
16
17
18
19
20
21
22
23
24
25
- (void)viewDidLoad {
[super viewDidLoad];
NSLog(@"任务1 - %@", [NSThread currentThread]);
/// 全局并发队列
dispatch_queue_t queue = dispatch_get_global_queue(0, 0);
/// 任务2
dispatch_async(queue, ^{
for (int i = 0; i < 5; i++) {
NSLog(@"执行任务2 - %@", [NSThread currentThread]);
}
});
/// 任务3
dispatch_async(queue, ^{
for (int i = 0; i < 5; i++) {
NSLog(@"执行任务3 - %@", [NSThread currentThread]);
}
});
NSLog(@"任务4 - %@", [NSThread currentThread]);
/// 主线程睡1秒
sleep(1);
NSLog(@"任务5 - %@", [NSThread currentThread]);
}

打印结果:

1
2
3
4
5
6
7
8
9
10
11
12
13
任务1 - <NSThread: 0x600003595140>{number = 1, name = main}
任务4 - <NSThread: 0x600003595140>{number = 1, name = main}
执行任务2 - <NSThread: 0x600003588f00>{number = 4, name = (null)}
执行任务3 - <NSThread: 0x6000035c1ec0>{number = 3, name = (null)}
执行任务2 - <NSThread: 0x600003588f00>{number = 4, name = (null)}
执行任务3 - <NSThread: 0x6000035c1ec0>{number = 3, name = (null)}
执行任务2 - <NSThread: 0x600003588f00>{number = 4, name = (null)}
执行任务3 - <NSThread: 0x6000035c1ec0>{number = 3, name = (null)}
执行任务2 - <NSThread: 0x600003588f00>{number = 4, name = (null)}
执行任务3 - <NSThread: 0x6000035c1ec0>{number = 3, name = (null)}
执行任务2 - <NSThread: 0x600003588f00>{number = 4, name = (null)}
任务5 - <NSThread: 0x600000434d40>{number = 1, name = main}

从打印结果可以看到,队列里任务的执行方式为:并发,创建新线程。
多线程03

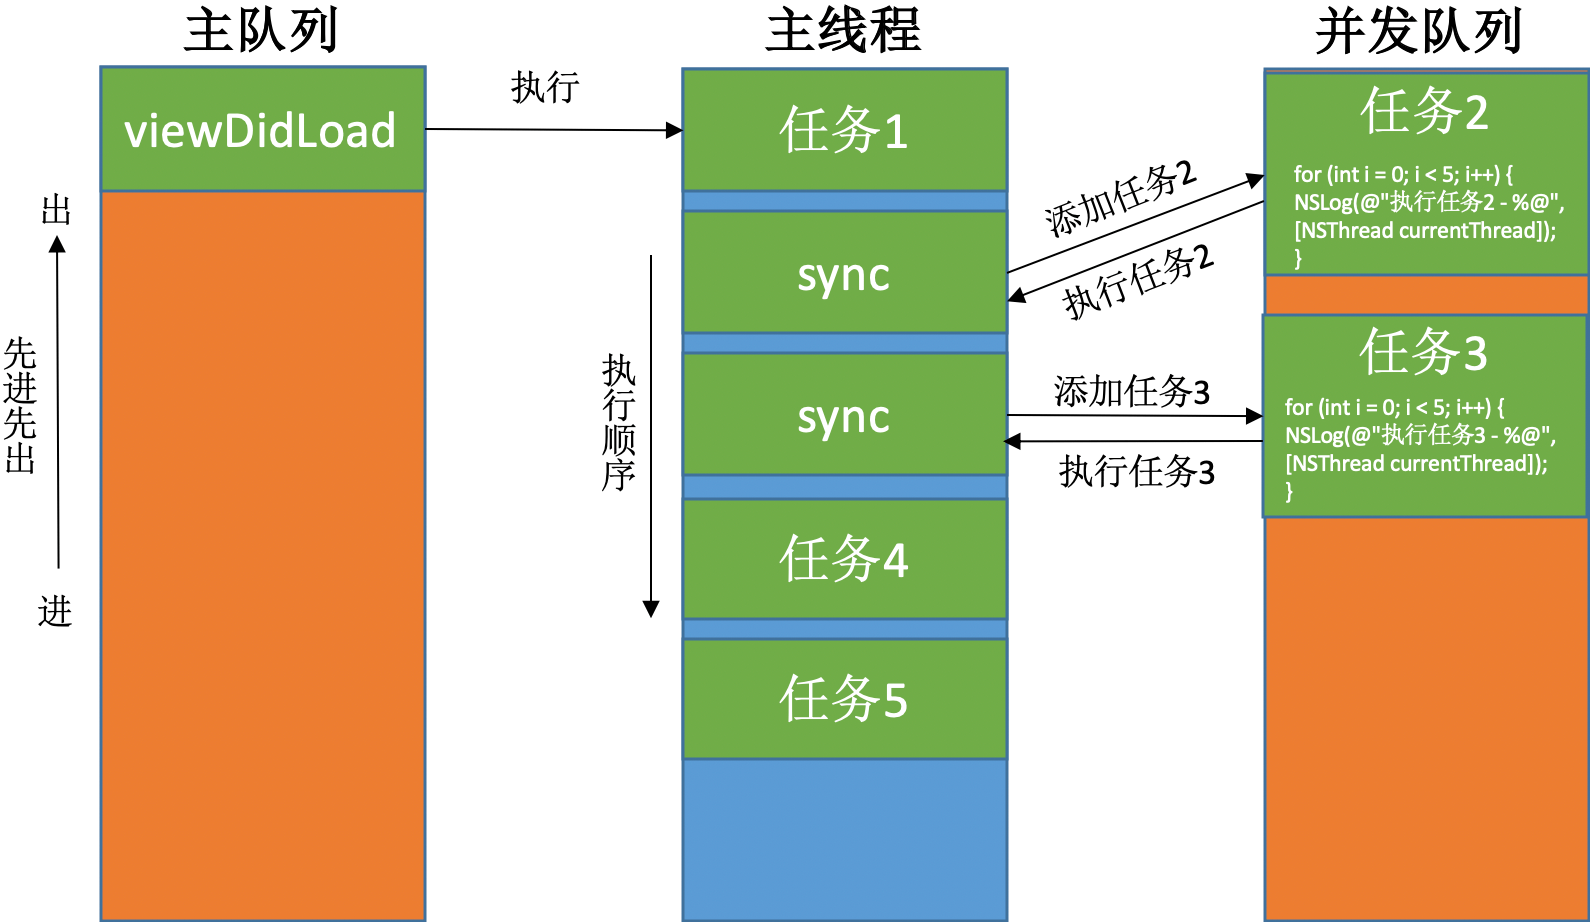
并发队列 & 同步执行(sync)

1
2
3
4
5
6
7
8
9
10
11
12
13
14
15
16
17
18
19
20
21
22
23
24
25
- (void)viewDidLoad {
[super viewDidLoad];
NSLog(@"任务1 - %@", [NSThread currentThread]);
/// 全局并发队列
dispatch_queue_t queue = dispatch_get_global_queue(0, 0);
/// 任务2
dispatch_sync(queue, ^{
for (int i = 0; i < 5; i++) {
NSLog(@"执行任务2 - %@", [NSThread currentThread]);
}
});
/// 任务3
dispatch_sync(queue, ^{
for (int i = 0; i < 5; i++) {
NSLog(@"执行任务3 - %@", [NSThread currentThread]);
}
});
NSLog(@"任务4 - %@", [NSThread currentThread]);
/// 主线程睡1秒
sleep(1);
NSLog(@"任务5 - %@", [NSThread currentThread]);
}

打印结果:

1
2
3
4
5
6
7
8
9
10
11
12
13
任务1 - <NSThread: 0x600002fa4d80>{number = 1, name = main}
执行任务2 - <NSThread: 0x600002fa4d80>{number = 1, name = main}
执行任务3 - <NSThread: 0x600002fa4d80>{number = 1, name = main}
任务4 - <NSThread: 0x600002fa4d80>{number = 1, name = main}
任务5 - <NSThread: 0x600002fa4d80>{number = 1, name = main}

从打印结果可以看到,队列里任务的执行方式为:串行,主线程。
多线程04

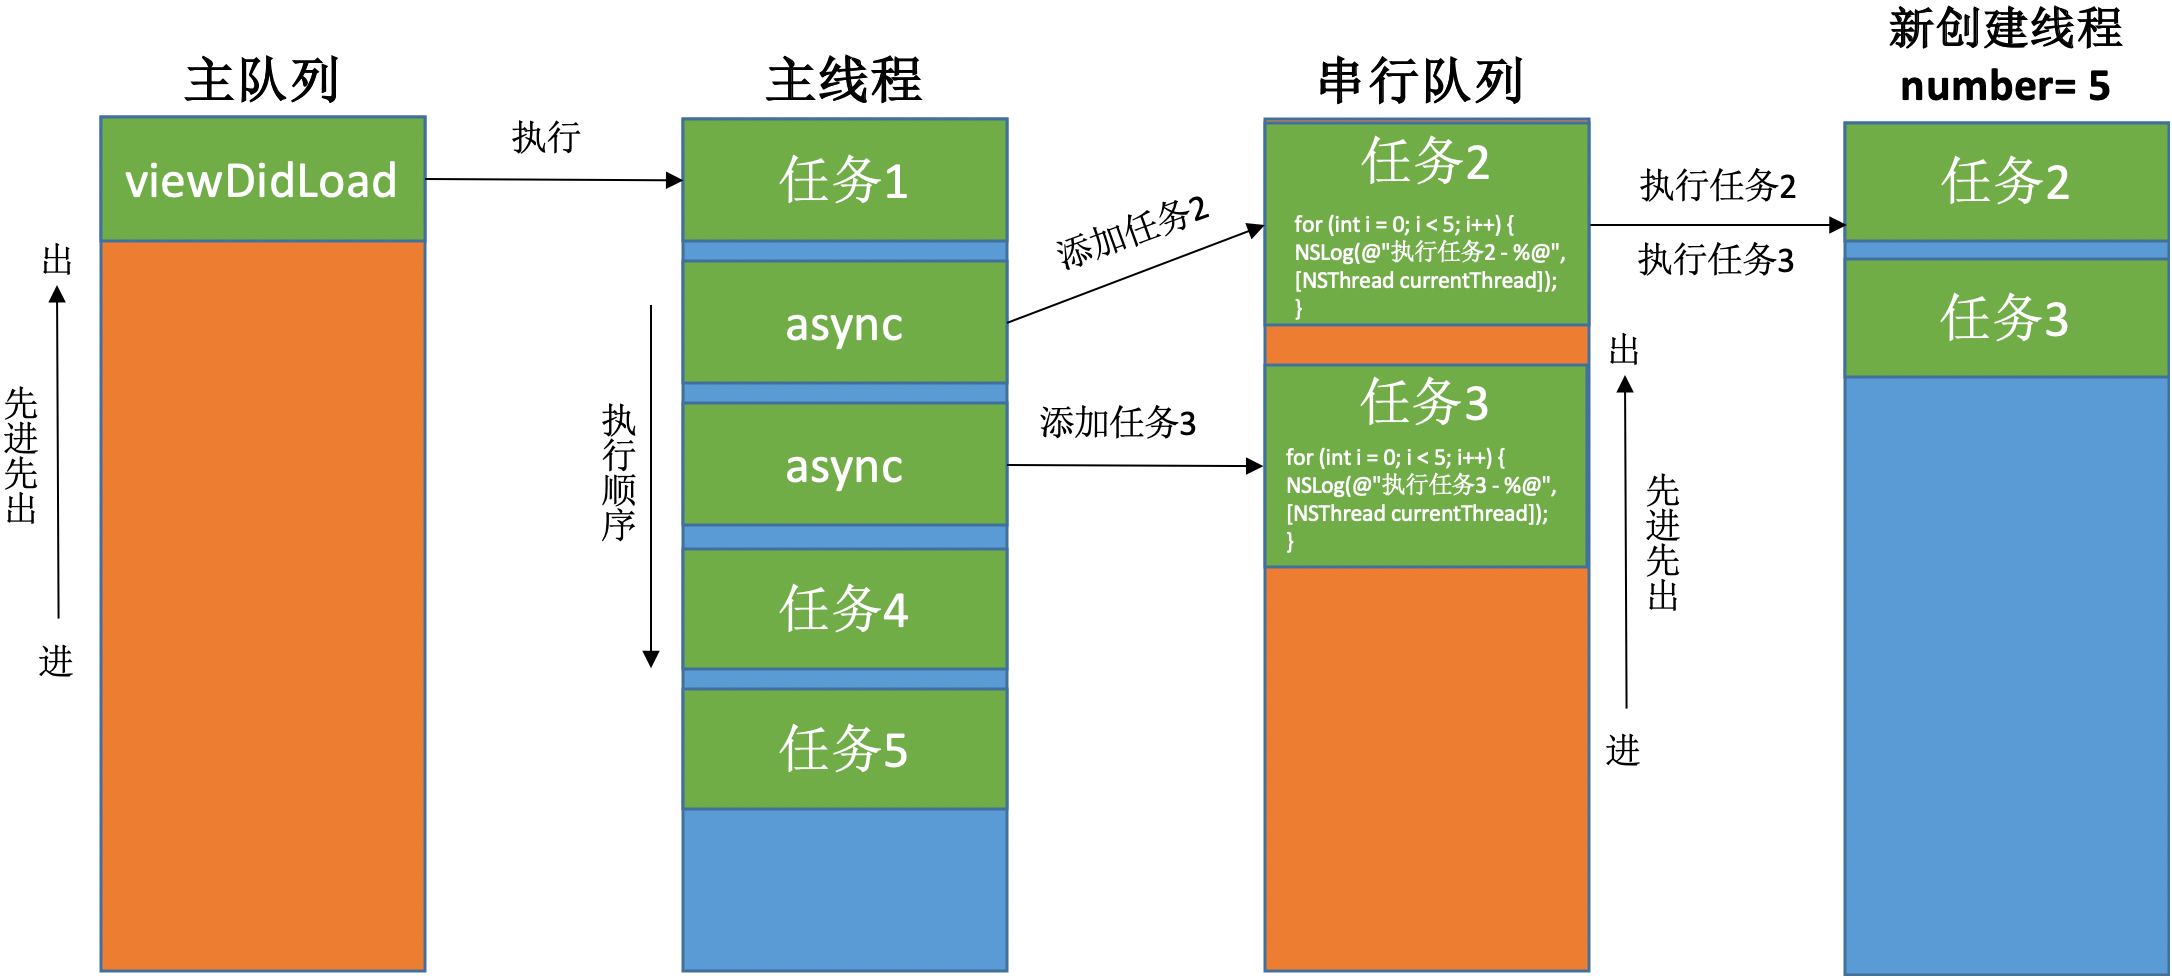
串行队列 & 异步执行(async)

1
2
3
4
5
6
7
8
9
10
11
12
13
14
15
16
17
18
19
20
21
22
23
24
25
- (void)viewDidLoad {
[super viewDidLoad];
NSLog(@"任务1 - %@", [NSThread currentThread]);
/// 手动创建并发队列
dispatch_queue_t queue = dispatch_queue_create("myQueue", DISPATCH_QUEUE_SERIAL);
/// 任务2
dispatch_async(queue, ^{
for (int i = 0; i < 5; i++) {
NSLog(@"执行任务2 - %@", [NSThread currentThread]);
}
});
/// 任务3
dispatch_async(queue, ^{
for (int i = 0; i < 5; i++) {
NSLog(@"执行任务3 - %@", [NSThread currentThread]);
}
});
NSLog(@"任务4 - %@", [NSThread currentThread]);
/// 主线程睡1秒
sleep(1);
NSLog(@"任务5 - %@", [NSThread currentThread]);
}

打印结果:

1
2
3
4
5
6
7
8
9
10
11
12
13
任务1 - <NSThread: 0x6000004b0d40>{number = 1, name = main}
任务4 - <NSThread: 0x6000004b0d40>{number = 1, name = main}
执行任务2 - <NSThread: 0x6000004dc740>{number = 5, name = (null)}
执行任务3 - <NSThread: 0x6000004dc740>{number = 5, name = (null)}
任务5 - <NSThread: 0x6000004b0d40>{number = 1, name = main}

从打印结果可以看到,队列里任务的执行方式为:串行,创建新线程。
多线程05

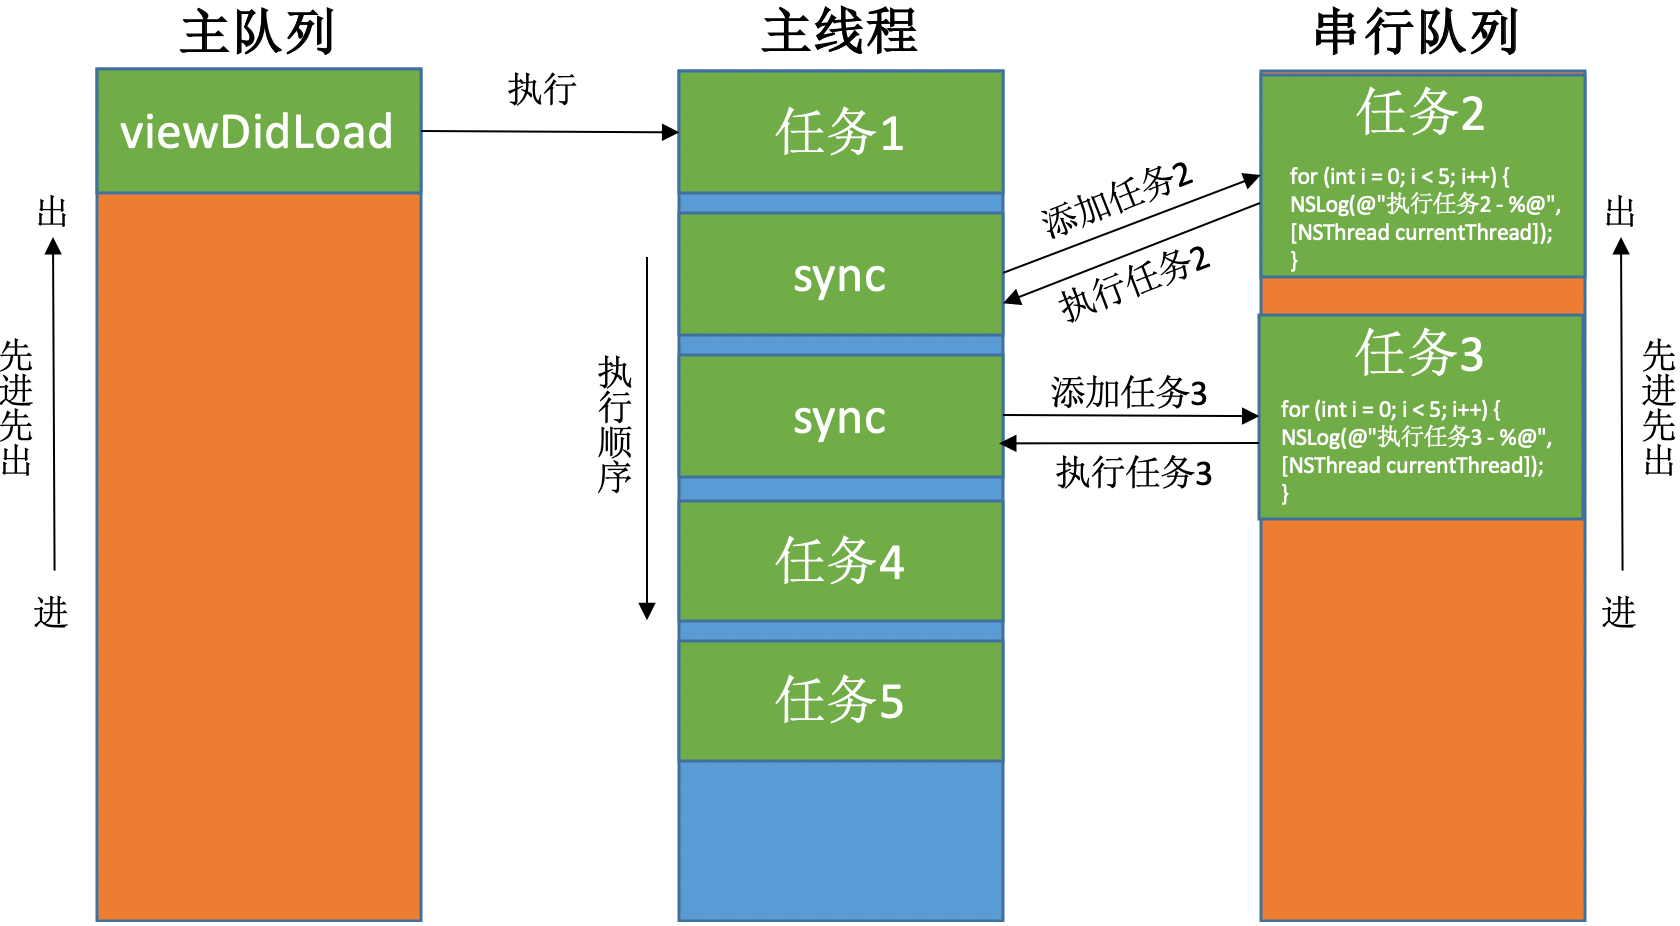
串行队列 & 同步执行(sync)

1
2
3
4
5
6
7
8
9
10
11
12
13
14
15
16
17
18
19
20
21
22
23
24
25
- (void)viewDidLoad {
[super viewDidLoad];
NSLog(@"任务1 - %@", [NSThread currentThread]);
/// 手动创建并发队列
dispatch_queue_t queue = dispatch_queue_create("myQueue", DISPATCH_QUEUE_SERIAL);
/// 任务2
dispatch_sync(queue, ^{
for (int i = 0; i < 5; i++) {
NSLog(@"执行任务2 - %@", [NSThread currentThread]);
}
});
/// 任务3
dispatch_sync(queue, ^{
for (int i = 0; i < 5; i++) {
NSLog(@"执行任务3 - %@", [NSThread currentThread]);
}
});
NSLog(@"任务4 - %@", [NSThread currentThread]);
/// 主线程睡1秒
sleep(1);
NSLog(@"任务5 - %@", [NSThread currentThread]);
}

打印结果:

1
2
3
4
5
6
7
8
9
10
11
12
13
任务1 - <NSThread: 0x600001438d40>{number = 1, name = main}
执行任务2 - <NSThread: 0x600001438d40>{number = 1, name = main}
执行任务3 - <NSThread: 0x600001438d40>{number = 1, name = main}
任务4 - <NSThread: 0x600001438d40>{number = 1, name = main}
任务5 - <NSThread: 0x600001438d40>{number = 1, name = main}

从打印结果可以看到,队列里任务的执行方式为:串行,主线程。
多线程06

主队列 & 异步执行(async)

1
2
3
4
5
6
7
8
9
10
11
12
13
14
15
16
17
18
19
20
21
22
23
24
25
- (void)viewDidLoad {
[super viewDidLoad];
NSLog(@"任务1 - %@", [NSThread currentThread]);
/// 手动创建并发队列
dispatch_queue_t queue = dispatch_get_main_queue();
/// 任务2
dispatch_async(queue, ^{
for (int i = 0; i < 5; i++) {
NSLog(@"执行任务2 - %@", [NSThread currentThread]);
}
});
/// 任务3
dispatch_async(queue, ^{
for (int i = 0; i < 5; i++) {
NSLog(@"执行任务3 - %@", [NSThread currentThread]);
}
});
NSLog(@"任务4 - %@", [NSThread currentThread]);
/// 主线程睡1秒
sleep(1);
NSLog(@"任务5 - %@", [NSThread currentThread]);
}

打印结果:

1
2
3
4
5
6
7
8
9
10
11
12
13
任务1 - <NSThread: 0x600002408d80>{number = 1, name = main}
任务4 - <NSThread: 0x600002408d80>{number = 1, name = main}
任务5 - <NSThread: 0x600002408d80>{number = 1, name = main}
执行任务2 - <NSThread: 0x600002408d80>{number = 1, name = main}
执行任务3 - <NSThread: 0x600002408d80>{number = 1, name = main}

从打印结果可以看到,队列里任务的执行方式为:串行,主线程。
多线程07

主队列 & 同步执行(sync)-> 死锁

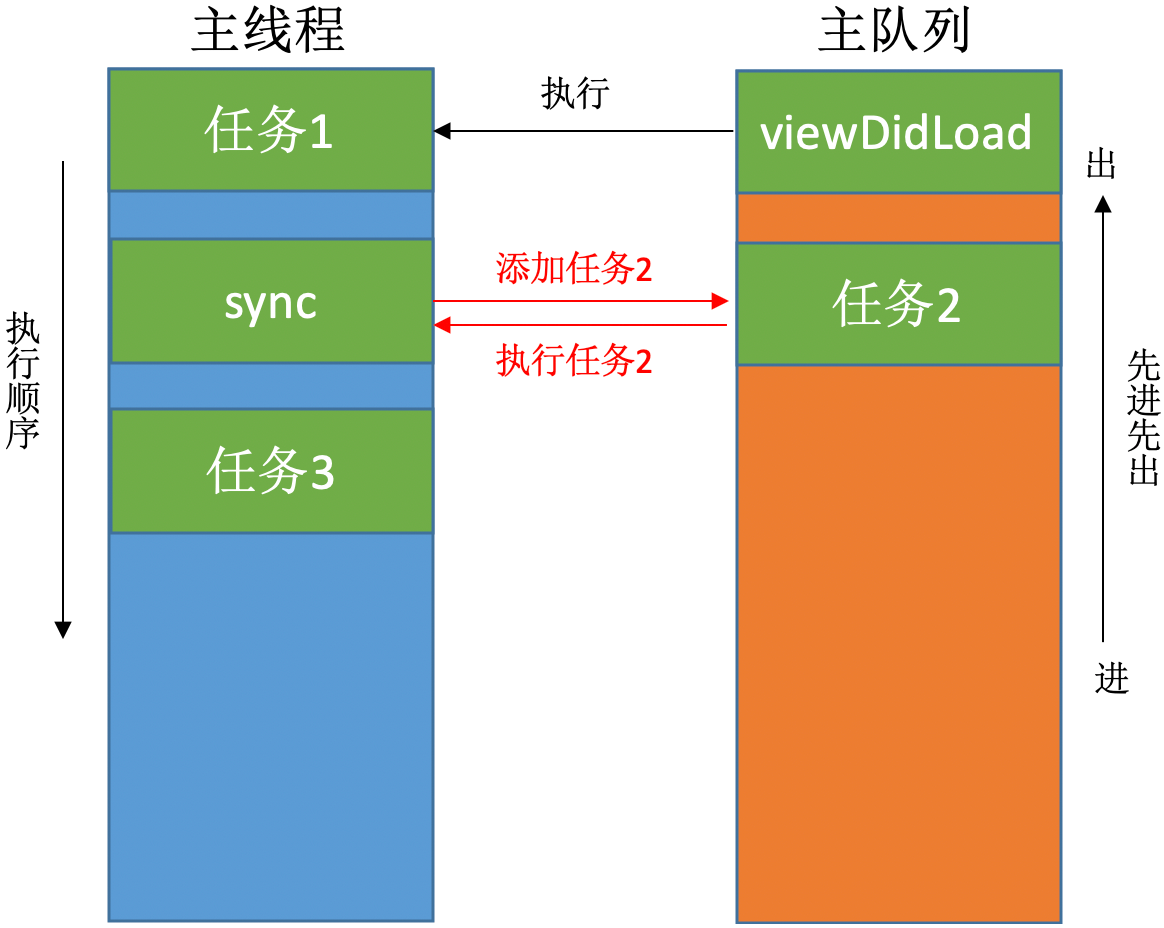
死锁一:使用sync函数往当前串行队列中添加任务,会卡住当前的串行队列(产生死锁):
多线程01

问题分析:
多线程02

sync 函数在这里的作用有两个,第一个是添加任务2,第二个是执行任务2。因为主队列是串行队列,所以遵循先进先出原则,只有在第一个任务 viewDidLoad 执行完成后才能执行任务2。但是第一个任务 viewDidLoad 要想执行完就必须执行完 sync 函数,而 sync 函数要想执行完就必须执行完任务2,而任务2要想执行完就必须执行完 viewDidLoad … … 产生死锁。

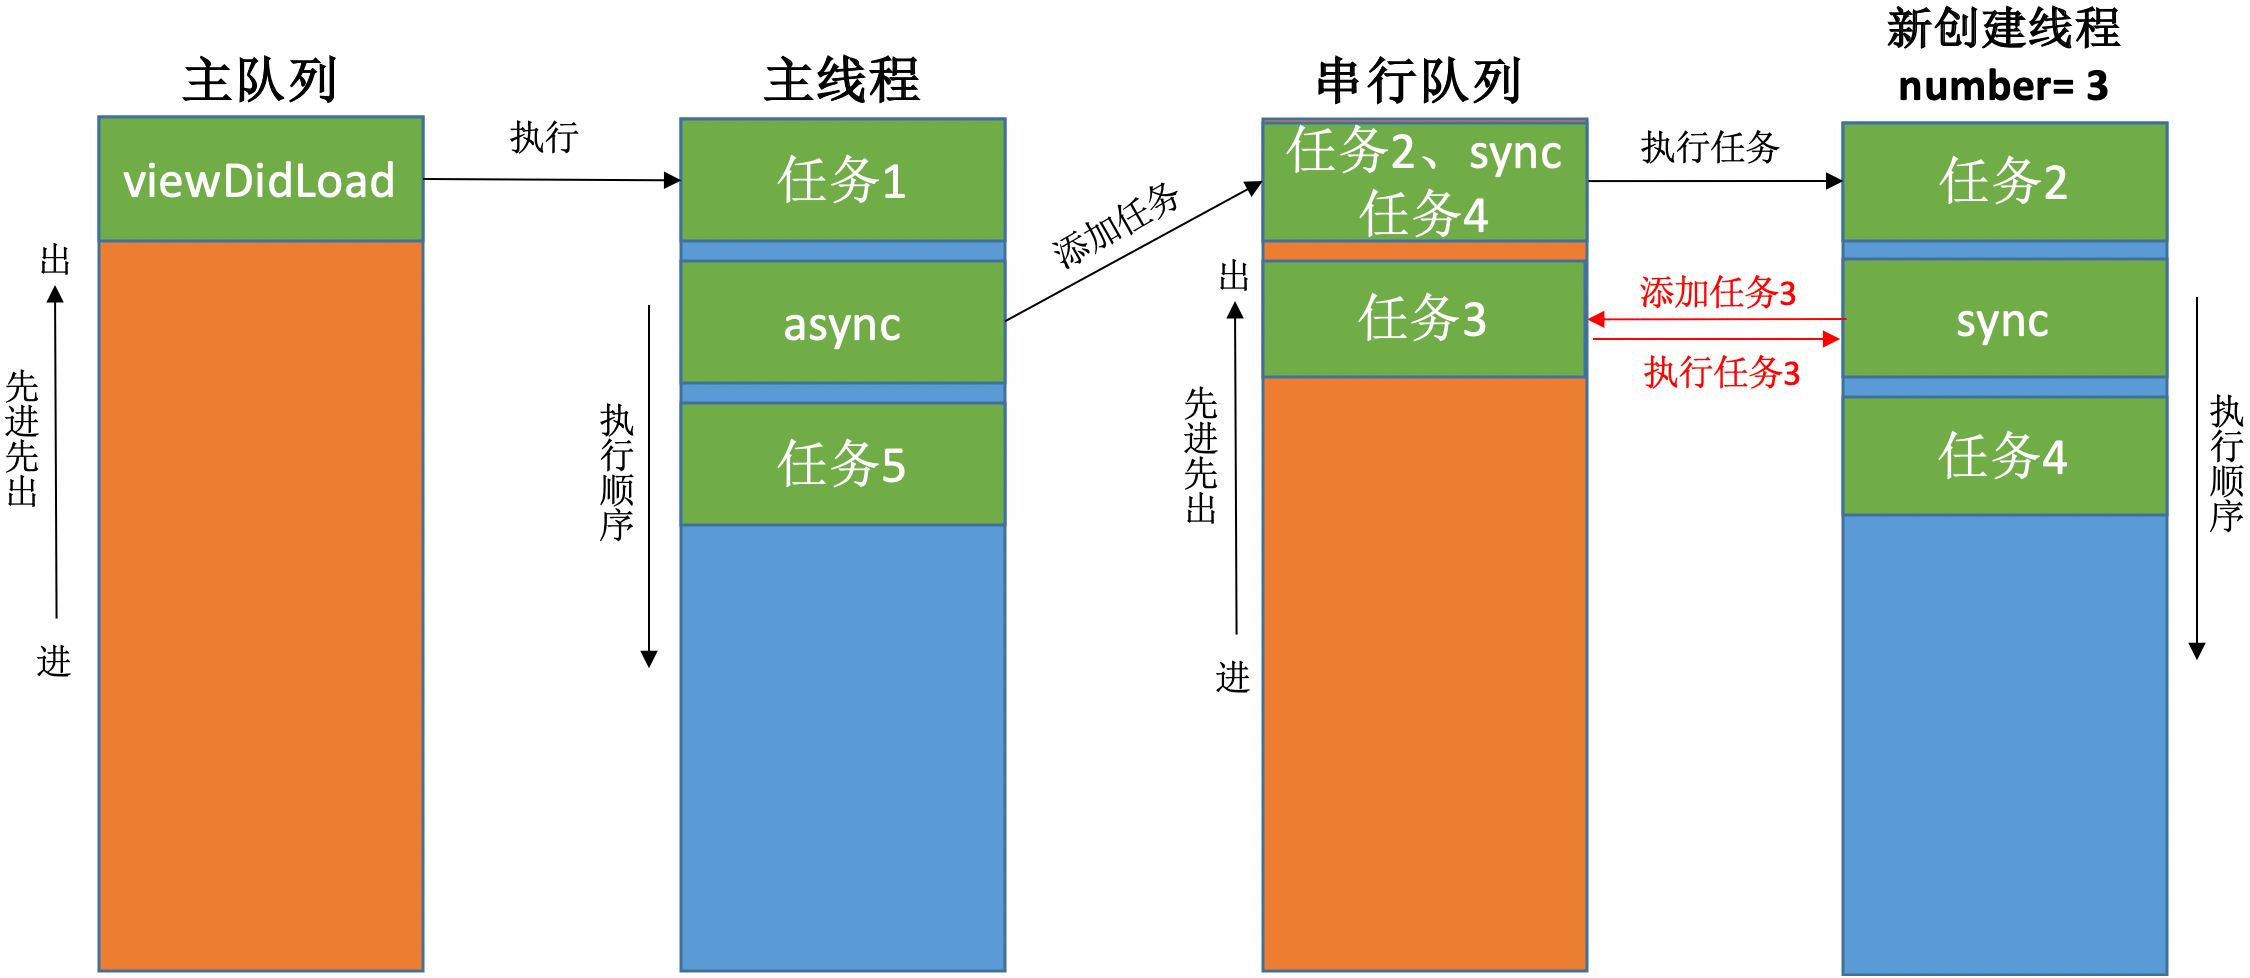
死锁二:
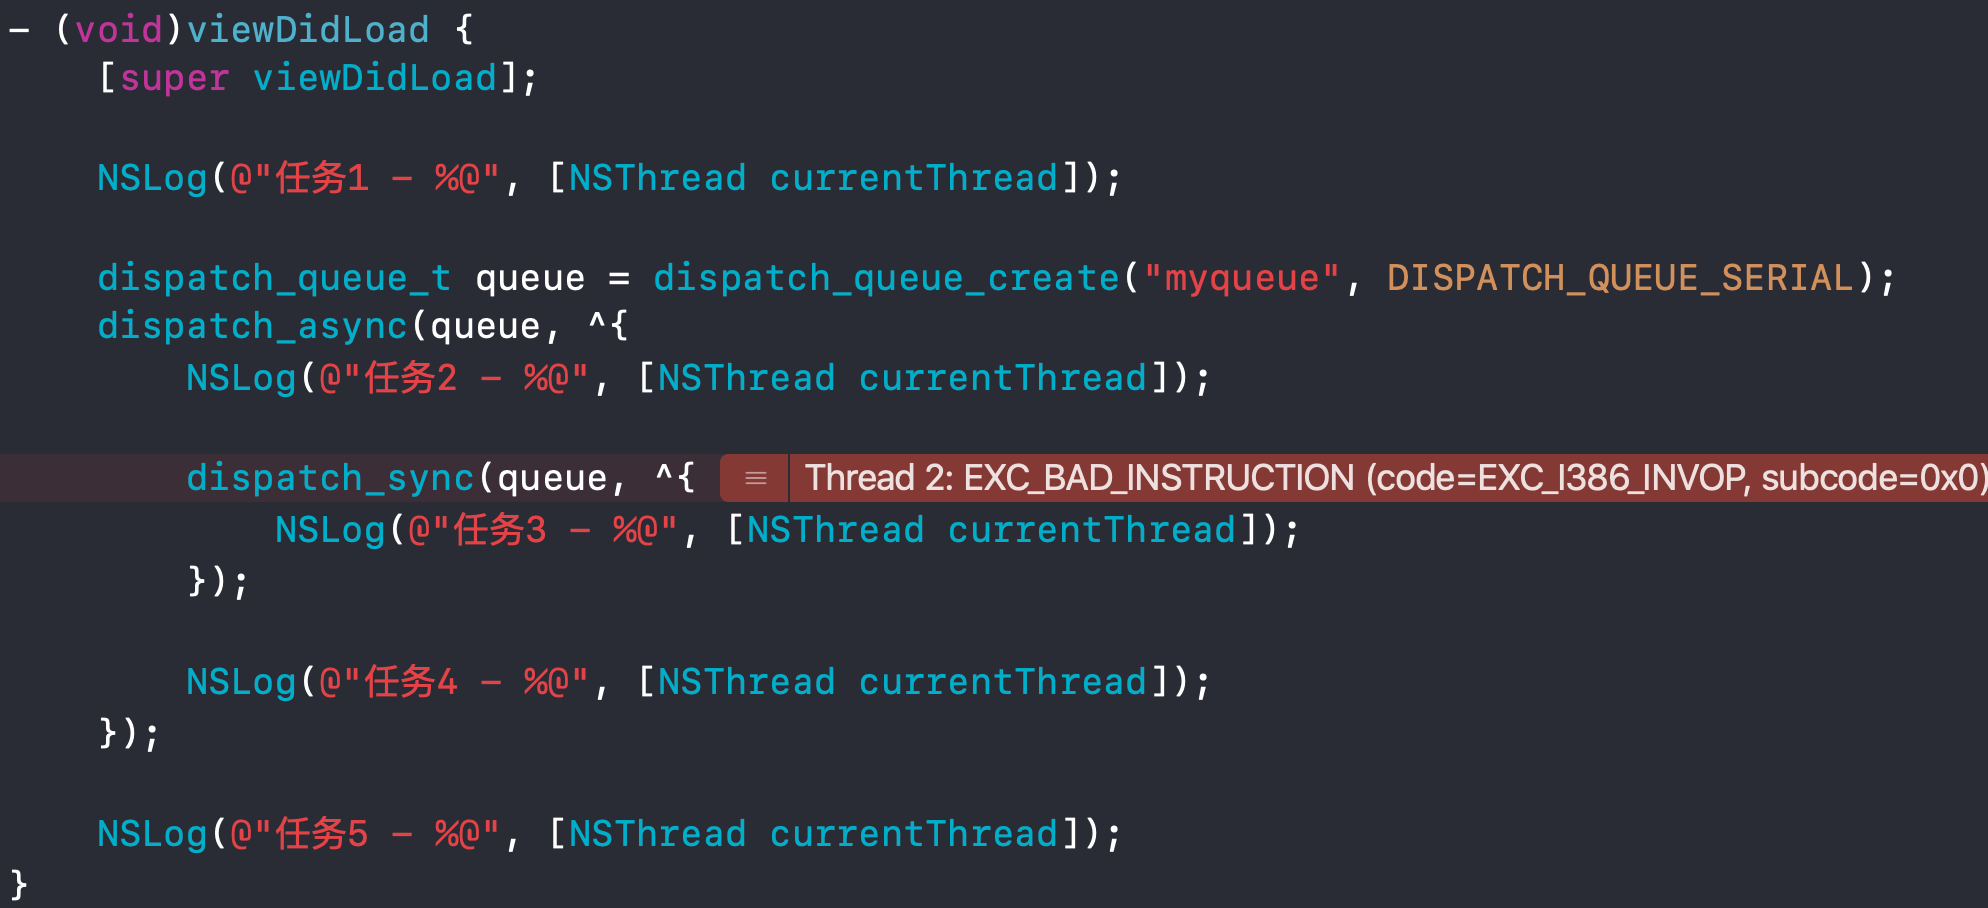
多线程08

问题分析:
多线程09

performSelector:withObject:afterDelay:

在子线程里调用 performSelector:withObject:afterDelay: 方法:

1
2
3
4
5
6
7
8
9
10
11
12
13
14
- (void)test
{
NSLog(@"执行任务2 - %@ - %@", [NSThread currentThread], [NSOperationQueue currentQueue]);
}
- (void)touchesBegan:(NSSet<UITouch *> *)touches withEvent:(UIEvent *)event
{
dispatch_queue_t queue = dispatch_get_global_queue(0, 0);
dispatch_async(queue, ^{
NSLog(@"1");
[self performSelector:@selector(test) withObject:nil afterDelay:.0];
NSLog(@"3");
});
}

打印结果:

1
2
1
3

从打印结果可以看到,performSelector:withObject:afterDelay: 方法并没有起作用。这是因为 performSelector:withObject:afterDelay: 方法内部使用了 timer,而子线程默认没有 RunLoop,所以 performSelector:withObject:afterDelay: 方法内部的 TImer 无法调用。1和3可以打印是因为 NSLog() 方法是普通的代码,不需要 RunLoop。

解决方案 👉 手动添加 RunLoop:

1
2
3
4
5
6
7
8
9
10
11
12
13
14
15
16
- (void)test
{
NSLog(@"执行任务2 - %@ - %@", [NSThread currentThread], [NSOperationQueue currentQueue]);
}
- (void)touchesBegan:(NSSet<UITouch *> *)touches withEvent:(UIEvent *)event
{
dispatch_queue_t queue = dispatch_get_global_queue(0, 0);
dispatch_async(queue, ^{
NSLog(@"1");
[self performSelector:@selector(test) withObject:nil afterDelay:.0];
NSLog(@"3");
[[NSRunLoop currentRunLoop] runMode:NSDefaultRunLoopMode beforeDate:[NSDate distantFuture]];
});
}

打印结果:

1
2
3
1
执行任务2 - <NSThread: 0x600001ad0cc0>{number = 6, name = (null)} - (null)
3

从打印结果可以看到,performSelector:withObject:afterDelay: 方法可以正常调用了。这是因为手动为子线程添加了 RunLoop,所以 performSelector:withObject:afterDelay: 方法内部的 timer 可以正常运行了。

猜想:performSelector:withObject:afterDelay: 方法的本质是往 RunLoop 中添加定时器:

1
2
3
4
5
6
7
8
9
10
11
12
13
14
15
16
17
18
19
20
21
22
23
24
25
26
27
28
29
30
31
32
33
34
35
36
37
38
39
40
41
42
- (void)viewDidLoad {
[super viewDidLoad];
CFRunLoopObserverRef observer = CFRunLoopObserverCreateWithHandler(kCFAllocatorDefault, kCFRunLoopAllActivities, YES, 0, ^(CFRunLoopObserverRef observer, CFRunLoopActivity activity) {
switch (activity) {
case kCFRunLoopEntry:
NSLog(@"kCFRunLoopEntry");
break;
case kCFRunLoopBeforeTimers:
NSLog(@"kCFRunLoopBeforeTimers");
break;
case kCFRunLoopBeforeSources:
NSLog(@"kCFRunLoopBeforeSources");
break;
case kCFRunLoopBeforeWaiting:
NSLog(@"kCFRunLoopBeforeWaiting");
break;
case kCFRunLoopAfterWaiting:
NSLog(@"kCFRunLoopAfterWaiting");
break;
case kCFRunLoopExit:
NSLog(@"kCFRunLoopExit");
break;
default:
break;
}
});
CFRunLoopAddObserver(CFRunLoopGetCurrent(), observer, kCFRunLoopCommonModes);
CFRelease(observer);
}
- (void)test
{
NSLog(@"执行任务2 - %@ - %@", [NSThread currentThread], [NSOperationQueue currentQueue]);
}
- (void)touchesBegan:(NSSet<UITouch *> *)touches withEvent:(UIEvent *)event
{
NSLog(@"1");
[self performSelector:@selector(test) withObject:nil afterDelay:.0];
NSLog(@"3");
}

打印结果:

1
2
3
4
5
6
7
8
9
kCFRunLoopAfterWaiting
kCFRunLoopBeforeTimers
kCFRunLoopBeforeSources
1
3
kCFRunLoopBeforeTimers
kCFRunLoopBeforeSources
执行任务2 - <NSThread: 0x600000b5cd40>{number = 1, name = main} - <NSOperationQueue: 0x7fb3f0006020>{name = 'NSOperationQueue Main Queue'}
... ...

从打印结果可以看到,performSelector:withObject:afterDelay: 方法的调用是一个 timers 事件:RunLoop 先处理了 Sources0 事件,再处理的 Timers。

GNUstep

GNUstep 是 GNU 计划的项目之一,它将 Cocoa 的 OC 库重新开源实现了一遍。虽然 GNUstep 不是苹果官方源码,但还是具有一定的参考价值。👉 源码地址

找到 NSRunLoop.m 文件查看 performSelector:withObject:afterDelay: 方法源码:

1
2
3
4
5
6
7
8
9
10
11
12
13
14
15
16
- (void) performSelector: (SEL)aSelector
withObject: (id)argument
afterDelay: (NSTimeInterval)seconds
{
NSRunLoop *loop = [NSRunLoop currentRunLoop];
GSTimedPerformer *item;
//根据传入参数生成一个 GSTimedPerformer 对象(内含 NSTimer 定时器),作为 Timers 事件添加到 RunLoop 中。
item = [[GSTimedPerformer alloc] initWithSelector: aSelector
target: self
argument: argument
delay: seconds];
[[loop _timedPerformers] addObject: item];
RELEASE(item);
[loop addTimer: item->timer forMode: NSDefaultRunLoopMode];
}

通过源码可以得出结论:performSelector:withObject:afterDelay: 方法内部根据传入参数生成一个 GSTimedPerformer 对象(内含 NSTimer 定时器),作为 Timers 事件添加到 RunLoop 中。

performSelector:withObject:

performSelector:withObject: 方法跟 performSelector:withObject:afterDelay: 方法的实现原理不同,performSelector:withObject:afterDelay: 是定义在 RunLoop.h 文件里的 API,内部实现的本质是往 RunLoop 中添加定时器。而 performSelector:withObject: 方法的本质是调用 objc_msgSend() 方法。可以在 runtime 源码 objc4-781 里看到具体实现,找到 NSObjec.m 文件:

1
2
3
4
- (id)performSelector:(SEL)sel withObject:(id)obj {
if (!sel) [self doesNotRecognizeSelector:sel];
return ((id(*)(id, SEL, id))objc_msgSend)(self, sel, obj);
}

队列组的使用

异步并发执行任务1、任务2,在任务1、任务2都执行完毕后,再回到主线程执行任务3:

1
2
3
4
5
6
7
8
9
10
11
12
13
14
15
16
- (void)viewDidLoad {
[super viewDidLoad];
dispatch_group_t group = dispatch_group_create();
dispatch_queue_t queue = dispatch_queue_create("myQueue", DISPATCH_QUEUE_CONCURRENT);
dispatch_group_async(group, queue, ^{
sleep(1);
NSLog(@"任务1");
});
dispatch_group_async(group, queue, ^{
NSLog(@"任务2");
});
dispatch_group_notify(group, dispatch_get_main_queue(), ^{
NSLog(@"任务3");
});
}

打印结果:

1
2
3
任务2
任务1
任务3

任务3会等到任务1和任务2都执行完成之后再执行。

GCD源码分析

dispatch_async()

在 queue.h 文件找到 dispatch_async() 方法的定义

1
2
3
4
API_AVAILABLE(macos(10.6), ios(4.0))
DISPATCH_EXPORT DISPATCH_NONNULL_ALL DISPATCH_NOTHROW
void
dispatch_async(dispatch_queue_t queue, dispatch_block_t block);

在 queue.c 文件找到 dispatch_async() 方法的实现:

1
2
3
4
5
6
7
8
9
10
11
12
13
void
dispatch_async(dispatch_queue_t dq, dispatch_block_t work)
{
//将任务 work 打包成 dispatch_continuation_t 类型
dispatch_continuation_t dc = _dispatch_continuation_alloc();
//设置标志位
uintptr_t dc_flags = DC_FLAG_CONSUME;
dispatch_qos_t qos;
//进行block初始化
qos = _dispatch_continuation_init(dc, dq, work, 0, dc_flags);
_dispatch_continuation_async(dq, dc, qos, dc->dc_flags);
}

在 inline_internal.h 文件找到 _dispatch_continuation_async() 方法的实现:

1
2
3
4
5
6
7
8
9
10
11
12
13
14
DISPATCH_ALWAYS_INLINE
static inline void
_dispatch_continuation_async(dispatch_queue_class_t dqu,
dispatch_continuation_t dc, dispatch_qos_t qos, uintptr_t dc_flags)
{
#if DISPATCH_INTROSPECTION
if (!(dc_flags & DC_FLAG_NO_INTROSPECTION)) {
_dispatch_trace_item_push(dqu, dc); //将任务添加到队列中
}
#else
(void)dc_flags;
#endif
return dx_push(dqu._dq, dc, qos);
}

在 trace.h 文件找到 _dispatch_trace_item_push 方法的实现:

1
2
#define _dispatch_trace_item_push(dq, dou) \
do { (void)(dq); (void)(dou); } while(0)

dispatch_sync()

多线程的安全隐患

资源共享:1块资源可能会被多个线程共享,也就是多个线程可能会访问同一块资源,比如多个线程访问同一个对象、同一个变量、同一个文件。

当多个线程访问同一块资源时,很容易引发数据错乱和数据安全问题。

多线程安全隐患示例

卖票

1
2
3
4
5
6
7
8
9
10
11
12
13
14
15
16
17
18
19
20
21
22
23
24
25
26
27
28
29
30
31
32
33
34
35
36
37
38
39
40
41
42
43
44
45
46
47
48
@interface ViewController ()
@property (assign, nonatomic) int ticketsCount;
@end
@implementation ViewController
- (void)viewDidLoad {
[super viewDidLoad];
[self ticketTest];
}
- (void)ticketTest
{
self.ticketsCount = 15;
dispatch_queue_t queue = dispatch_get_global_queue(0, 0);
dispatch_async(queue, ^{
for (int i = 0; i < 5; i++) {
[self saleTicket];
}
});
dispatch_async(queue, ^{
for (int i = 0; i < 5; i++) {
[self saleTicket];
}
});
dispatch_async(queue, ^{
for (int i = 0; i < 5; i++) {
[self saleTicket];
}
});
}
//卖1张票
- (void)saleTicket
{
int oldTicketsCount = self.ticketsCount;
sleep(.2);
oldTicketsCount--;
self.ticketsCount = oldTicketsCount;
NSLog(@"还剩%d张票 - %@", oldTicketsCount, [NSThread currentThread]);
}
@end

打印结果:

1
2
3
4
5
6
7
8
9
10
11
12
13
14
15
还剩14张票 - <NSThread: 0x600000db4040>{number = 5, name = (null)}
还剩14张票 - <NSThread: 0x600000da81c0>{number = 4, name = (null)}
还剩14张票 - <NSThread: 0x600000d91a80>{number = 6, name = (null)}
还剩13张票 - <NSThread: 0x600000da81c0>{number = 4, name = (null)}
还剩12张票 - <NSThread: 0x600000d91a80>{number = 6, name = (null)}
还剩11张票 - <NSThread: 0x600000db4040>{number = 5, name = (null)}
还剩10张票 - <NSThread: 0x600000da81c0>{number = 4, name = (null)}
还剩9张票 - <NSThread: 0x600000d91a80>{number = 6, name = (null)}
还剩9张票 - <NSThread: 0x600000db4040>{number = 5, name = (null)}
还剩8张票 - <NSThread: 0x600000da81c0>{number = 4, name = (null)}
还剩7张票 - <NSThread: 0x600000da81c0>{number = 4, name = (null)}
还剩6张票 - <NSThread: 0x600000d91a80>{number = 6, name = (null)}
还剩5张票 - <NSThread: 0x600000d91a80>{number = 6, name = (null)}
还剩4张票 - <NSThread: 0x600000db4040>{number = 5, name = (null)}
还剩3张票 - <NSThread: 0x600000db4040>{number = 5, name = (null)}

可以看到,刚开始三个线程都卖了1张票,结果还是下14张票。在三个线程走完后总共卖了15张票,但是最后还剩3张票。无论是在卖票过程中,还是最后剩余的票数都出现了异常。
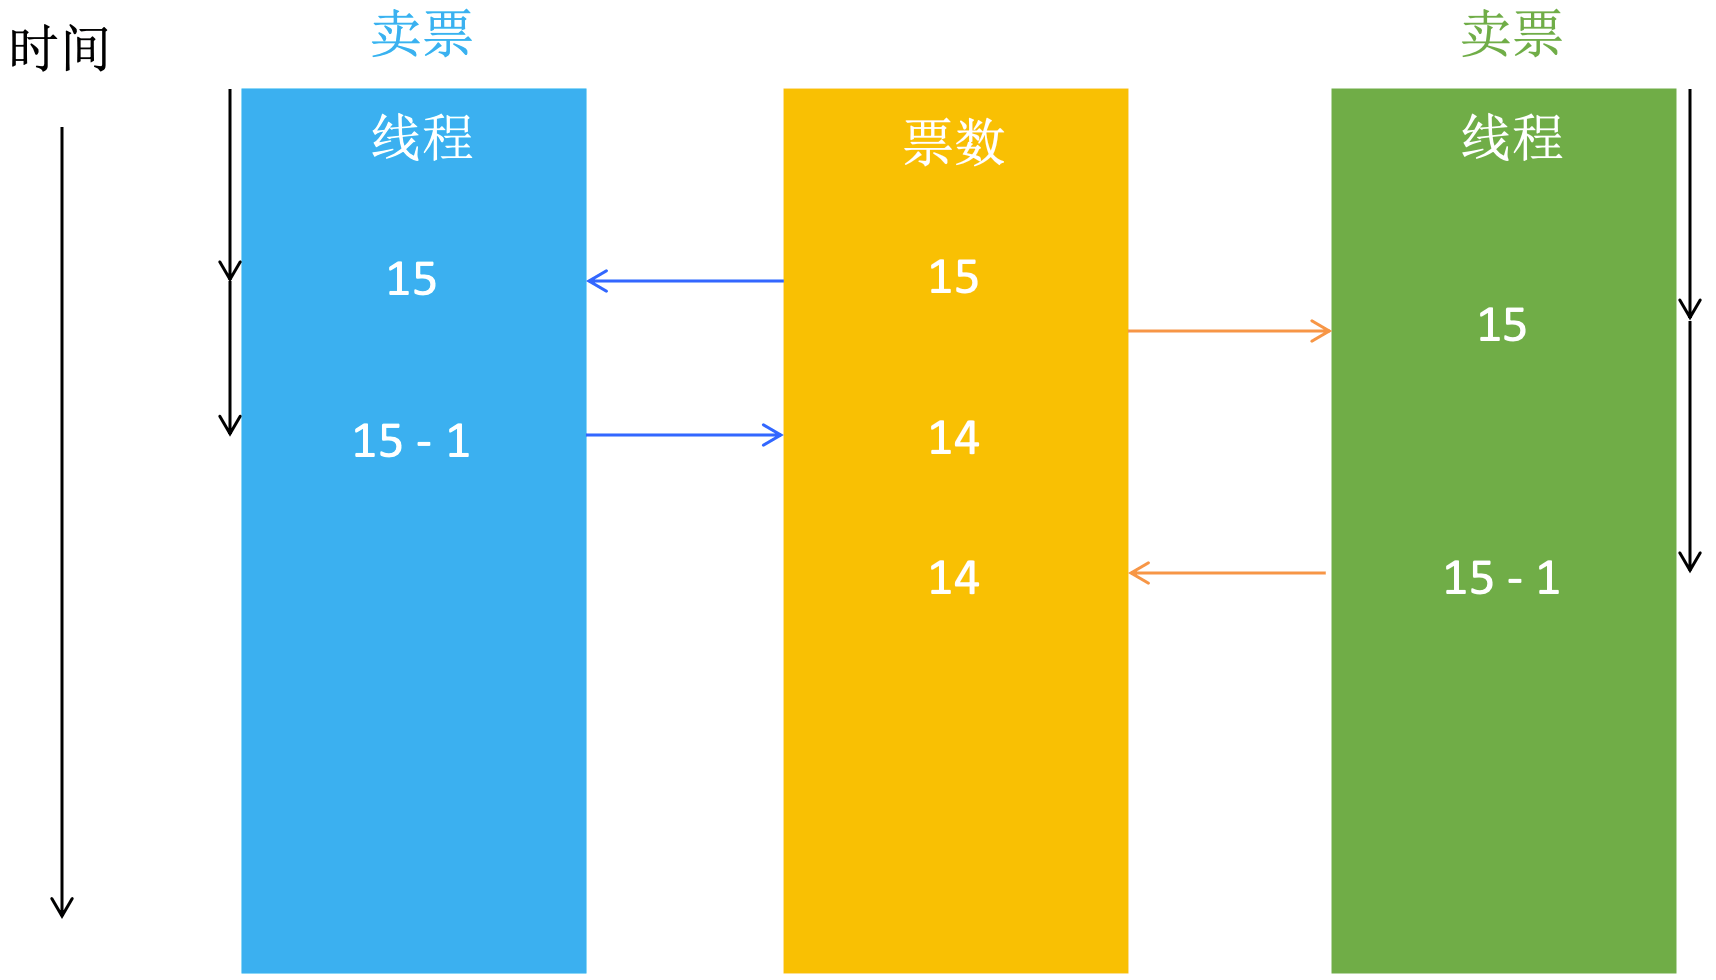
多线程10
总共15张票,两个线程同时卖票,每个线程都是拿15减1,得到的手势14张票。不同的线程拿到同一个变量进行修改,就会出现问题。

存钱取钱

1
2
3
4
5
6
7
8
9
10
11
12
13
14
15
16
17
18
19
20
21
22
23
24
25
26
27
28
29
30
31
32
33
34
35
36
37
38
39
40
41
42
43
44
45
46
47
48
49
50
51
52
53
@interface ViewController ()
@property (assign, nonatomic) int money;
@end
@implementation ViewController
- (void)viewDidLoad {
[super viewDidLoad];
[self moneyTest];
}
- (void)moneyTest
{
self.money = 100;
dispatch_queue_t queue = dispatch_get_global_queue(0, 0);
dispatch_async(queue, ^{
for (int i = 0; i < 10; i++) {
[self saveMoney];
}
});
dispatch_async(queue, ^{
for (int i = 0; i < 10; i++) {
[self drawMoney];
}
});
}
/// 存钱
- (void)saveMoney
{
int oldMoney = self.money;
sleep(.2);
oldMoney += 50;
self.money = oldMoney;
NSLog(@"存50,还剩%d元 - %@", oldMoney, [NSThread currentThread]);
}
/// 取钱
- (void)drawMoney
{
int oldMoney = self.money;
sleep(.2);
oldMoney -= 20;
self.money = oldMoney;
NSLog(@"取20,还剩%d元 - %@", oldMoney, [NSThread currentThread]);
}
@end

打印结果:

1
2
3
4
5
6
7
8
9
10
11
12
13
14
15
16
17
18
19
20
50,还剩150元 - <NSThread: 0x60000094bf40>{number = 5, name = (null)}
20,还剩80元 - <NSThread: 0x600000928a80>{number = 3, name = (null)}
20,还剩110元 - <NSThread: 0x600000928a80>{number = 3, name = (null)}
50,还剩130元 - <NSThread: 0x60000094bf40>{number = 5, name = (null)}
20,还剩90元 - <NSThread: 0x600000928a80>{number = 3, name = (null)}
50,还剩140元 - <NSThread: 0x60000094bf40>{number = 5, name = (null)}
20,还剩120元 - <NSThread: 0x600000928a80>{number = 3, name = (null)}
50,还剩170元 - <NSThread: 0x60000094bf40>{number = 5, name = (null)}
20,还剩150元 - <NSThread: 0x600000928a80>{number = 3, name = (null)}
50,还剩200元 - <NSThread: 0x60000094bf40>{number = 5, name = (null)}
20,还剩180元 - <NSThread: 0x600000928a80>{number = 3, name = (null)}
50,还剩230元 - <NSThread: 0x60000094bf40>{number = 5, name = (null)}
20,还剩210元 - <NSThread: 0x600000928a80>{number = 3, name = (null)}
50,还剩260元 - <NSThread: 0x60000094bf40>{number = 5, name = (null)}
20,还剩240元 - <NSThread: 0x600000928a80>{number = 3, name = (null)}
50,还剩290元 - <NSThread: 0x60000094bf40>{number = 5, name = (null)}
20,还剩270元 - <NSThread: 0x600000928a80>{number = 3, name = (null)}
50,还剩320元 - <NSThread: 0x60000094bf40>{number = 5, name = (null)}
20,还剩300元 - <NSThread: 0x600000928a80>{number = 3, name = (null)}
50,还剩350元 - <NSThread: 0x60000094bf40>{number = 5, name = (null)}

从打印结果可以看到,最后还剩350。代码中,原本有100,存了500,取了200,所以结果应该是400。
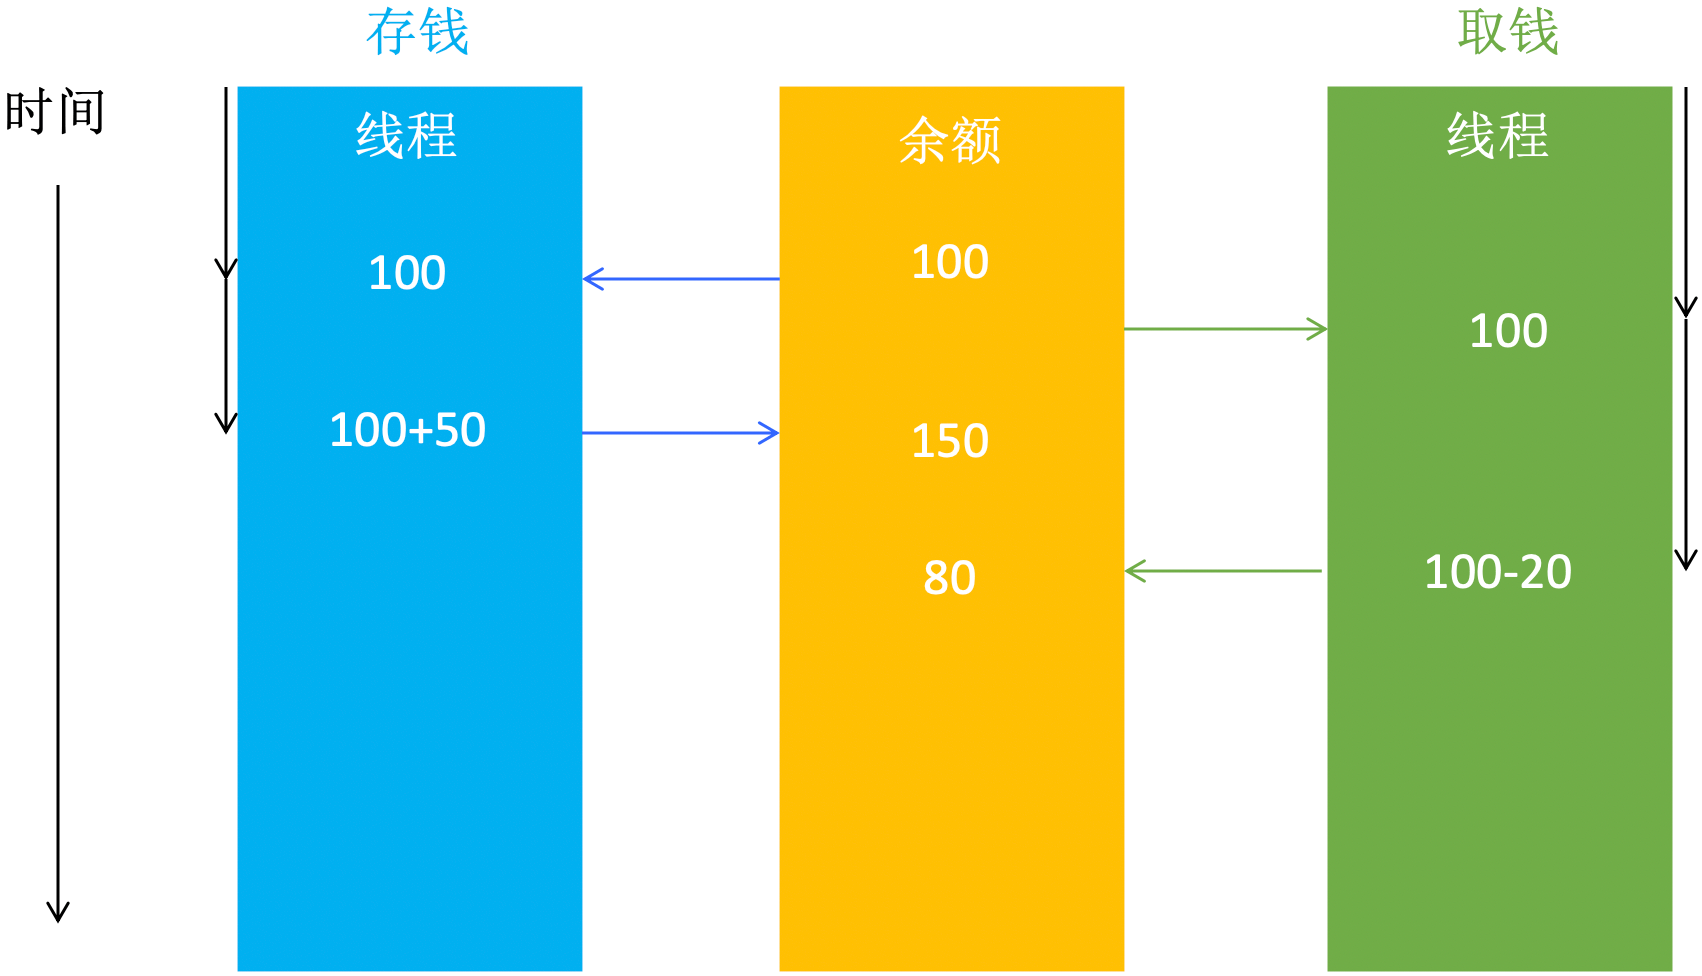
多线程11
总共100元,两个线程同时拿到100元,第一个线程存了50元后余额还剩150元,第二个线程去了20元余额还剩80元。不同的线程拿到同一个变量进行修改,就会出现问题。

多线程安全隐患分析

线程A先取到变量的值17,线程B后取到变量的值17。线程A对取到的值加一(17+1=18),线程B对取到的值加一(17+1=18)。线程A将处理后的值赋值给变量(18),线程B也将处理后的值赋值给变量(18)。虽然修改了两次变量(+1),但是结果都是18:
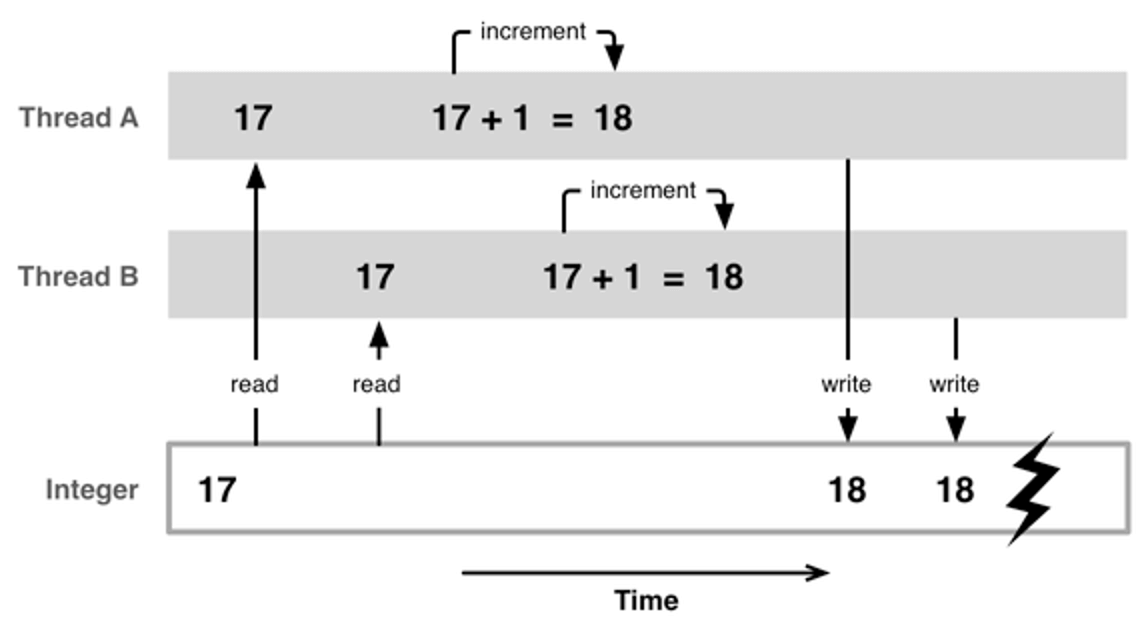
多线程12

多线程安全隐患的解决方案

解决方案:使用线程同步技术(同步,就是协同步调,按预定的先后次序进行)。
常见的线程同步技术是:加锁。
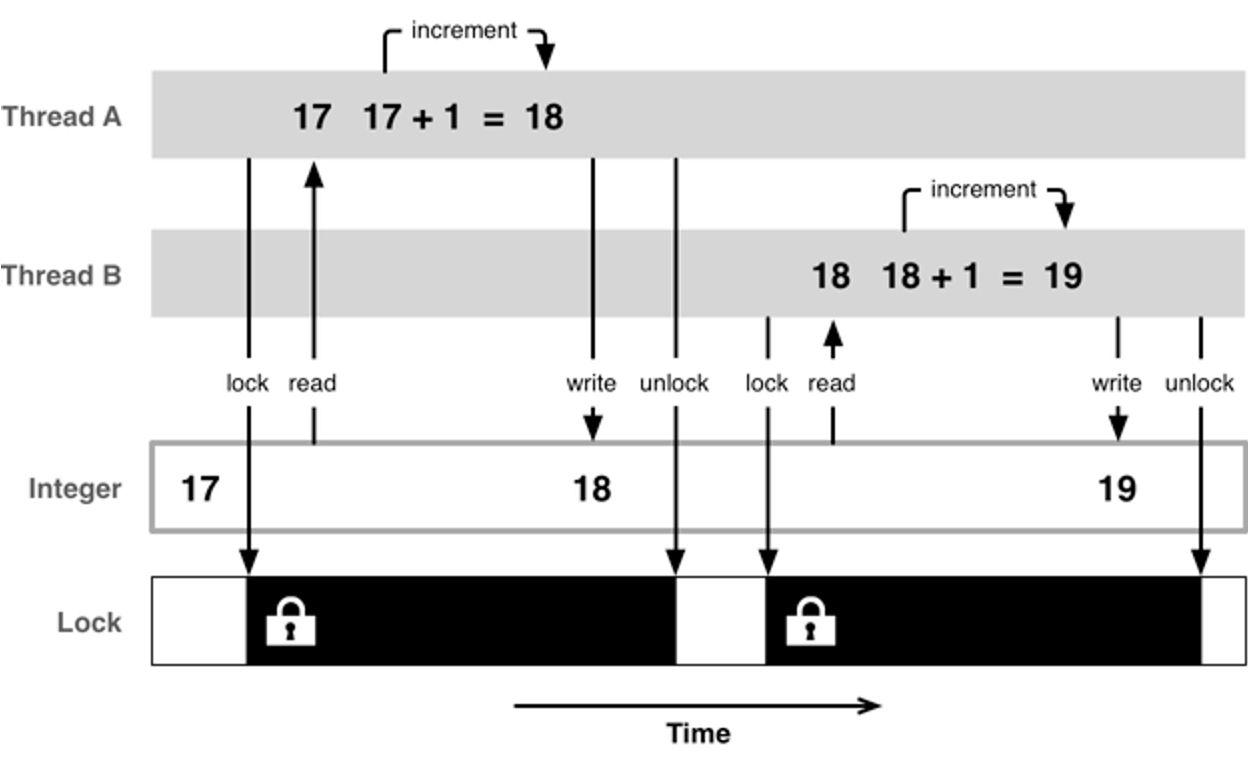
多线程13

iOS中的线程同步方案

同步方案 简介
OSSpinLock 自旋锁
os_unfair_lock 用于取代不安全的OSSpinLock
pthread_mutex 互斥锁
dispatch_semaphore 信号量
dispatch_queue(DISPATCH_QUEUE_SERIAL) 串行队列
NSLock 对mutex普通锁的封装
NSRecursiveLock 对mutex递归锁的封装,API跟NSLock基本一致
NSCondition 对mutex和cond的封装
NSConditionLock 对NSCondition的进一步封装,可以设置具体的条件值
@synchronized 对mutex递归锁的封装

将卖票和存钱取钱测试代码封装起来:

1
2
3
4
5
6
7
8
9
10
11
12
13
14
15
16
17
18
19
20
21
22
23
24
25
26
27
28
29
30
31
32
33
34
35
36
37
38
39
40
41
42
43
44
45
46
47
48
49
50
51
52
53
54
55
56
57
58
59
60
61
62
63
64
65
66
67
68
69
70
71
72
73
74
75
76
77
78
79
80
81
82
83
84
85
86
87
88
89
90
91
92
93
94
95
@interface BaseLockDemo : NSObject
/// 存钱取钱
- (void)moneyTest;
/// 卖票
- (void)ticketTest;
#pragma mark - 暴露给子类去使用
- (void)__saveMoney;
- (void)__drawMoney;
- (void)__saleTicket;
@end
@interface BaseLockDemo()
@property (assign, nonatomic) int money;
@property (assign, nonatomic) int ticketsCount;
@end
@implementation BaseLockDemo
///------ 存钱、取钱 ------
- (void)moneyTest
{
self.money = 100;
dispatch_queue_t queue = dispatch_get_global_queue(0, 0);
dispatch_async(queue, ^{
for (int i = 0; i < 10; i++) {
[self __saveMoney];
}
});
dispatch_async(queue, ^{
for (int i = 0; i < 10; i++) {
[self __drawMoney];
}
});
}
/// 存钱
- (void)__saveMoney
{
int oldMoney = self.money;
sleep(.2);
oldMoney += 50;
self.money = oldMoney;
NSLog(@"存50,还剩%d元 - %@", oldMoney, [NSThread currentThread]);
}
/// 取钱
- (void)__drawMoney
{
int oldMoney = self.money;
sleep(.2);
oldMoney -= 20;
self.money = oldMoney;
NSLog(@"取20,还剩%d元 - %@", oldMoney, [NSThread currentThread]);
}
///------ 卖票 ------
- (void)ticketTest
{
self.ticketsCount = 15;
dispatch_queue_t queue = dispatch_get_global_queue(0, 0);
dispatch_async(queue, ^{
for (int i = 0; i < 5; i++) {
[self __saleTicket];
}
});
dispatch_async(queue, ^{
for (int i = 0; i < 5; i++) {
[self __saleTicket];
}
});
dispatch_async(queue, ^{
for (int i = 0; i < 5; i++) {
[self __saleTicket];
}
});
}
/// 卖1张票
- (void)__saleTicket
{
int oldTicketsCount = self.ticketsCount;
sleep(.2);
oldTicketsCount--;
self.ticketsCount = oldTicketsCount;
NSLog(@"还剩%d张票 - %@", oldTicketsCount, [NSThread currentThread]);
}
@end

OSSpinLock

OSSpinLock 叫做”自旋锁”,等待锁的线程会处于忙等(busy-wait)状态,一直占用着CPU资源。目前已经不再安全,可能会出现优先级反转问题(如果等待锁的线程优先级较高,它会一直占用着CPU资源,优先级低的线程就无法释放锁)。需要导入头文件 #import <libkern/OSAtomic.h>

忙等状态可以理解为一个 do-while 循环,不停的监测着是否解锁,这个状态下的线程会一直占用着CPU资源。正因为是处于忙等状态,所以 OSSpinLock 的效率要比其它锁都高,一旦解锁立刻就能监测到并继续执行。不再安全的原因是优先级较高的线程在等待锁时(忙等),CPU不再分配资源给其它线程,那么上锁的线程负责解锁,由于CPU没有分配资源也无法解锁,导致优先级较高的线程一直在这里等待。

  • 线程调度
    计算机通常只有一个CPU,在任意时刻只能执行一条机器指令,每个线程只有获得CPU的使用权才能执行指令。所谓多线程的并发运行,其实是指从宏观上看,各个线程轮流获得CPU的使用权,分别执行各自的任务。在运行池中,会有多个处于就绪状态的线程在等待CPU,JAVA虚拟机的一项任务就是负责线程的调度,线程调度是指按照特定机制为多个线程分配CPU的使用权。
  • 时间片轮转调度
    时间片轮转调度是一种最古老,最简单,最公平且使用最广的算法。每个进程被分配一个时间段,称作它的时间片,即该进程允许运行的时间。如果在时间片结束时进程还在运行,则CPU将被剥夺并分配给另一个进程。如果进程在时间片结束前阻塞或结束,则CPU当即进行切换。调度程序所要做的就是维护一张就绪进程列表,当进程用完它的时间片后,它被移到队列的末尾。

常用API

1
2
3
4
5
6
7
8
/// 初始化
OSSpinLock lock = OS_SPINLOCK_INIT;
/// 尝试加锁(如果需要等待就不加锁,直接返回false;如果不需要等待就加锁,返回true)
bool result = OSSpinLockTry(&lock);
/// 加锁
OSSpinLockLock(&lock);
/// 解锁
OSSpinLockUnlock(&lock);

解决卖票和存钱取钱问题

定义 OSSpinLockDemo 继承自 LockBaseDemo。

1
2
3
4
5
6
7
8
9
10
11
12
13
14
15
16
17
18
19
20
21
22
23
24
25
26
27
28
29
30
31
32
33
34
35
36
37
38
39
40
41
42
43
44
45
46
47
48
49
50
51
52
53
54
55
56
#import <libkern/OSAtomic.h>
@interface OSSpinLockDemo()
@property (assign, nonatomic) OSSpinLock moneyLock;
@property (assign, nonatomic) OSSpinLock ticketLock;
@end
@implementation OSSpinLockDemo
- (instancetype)init
{
if (self = [super init]) {
self.moneyLock = OS_SPINLOCK_INIT;
self.ticketLock = OS_SPINLOCK_INIT;
}
return self;
}
/// 取钱
- (void)__drawMoney
{
OSSpinLockLock(&_moneyLock);
[super __drawMoney];
OSSpinLockUnlock(&_moneyLock);
}
/// 存钱
- (void)__saveMoney
{
OSSpinLockLock(&_moneyLock);
[super __saveMoney];
OSSpinLockUnlock(&_moneyLock);
}
/// 卖票
- (void)__saleTicket
{
OSSpinLockLock(&_ticketLock);
[super __saleTicket];
OSSpinLockUnlock(&_ticketLock);
}
@end
@implementation ViewController
- (void)viewDidLoad {
[super viewDidLoad];
BaseLockDemo *demo = [[OSSpinLockDemo alloc] init];
[demo ticketTest];
[demo moneyTest];
}
@end

调用 -(void)moneyTest 打印结果:

1
2
3
4
5
6
7
8
9
10
11
12
13
14
15
16
17
18
19
20
50,还剩150元 - <NSThread: 0x600000471080>{number = 4, name = (null)}
50,还剩200元 - <NSThread: 0x600000471080>{number = 4, name = (null)}
50,还剩250元 - <NSThread: 0x600000471080>{number = 4, name = (null)}
50,还剩300元 - <NSThread: 0x600000471080>{number = 4, name = (null)}
50,还剩350元 - <NSThread: 0x600000471080>{number = 4, name = (null)}
50,还剩400元 - <NSThread: 0x600000471080>{number = 4, name = (null)}
50,还剩450元 - <NSThread: 0x600000471080>{number = 4, name = (null)}
50,还剩500元 - <NSThread: 0x600000471080>{number = 4, name = (null)}
50,还剩550元 - <NSThread: 0x600000471080>{number = 4, name = (null)}
50,还剩600元 - <NSThread: 0x600000471080>{number = 4, name = (null)}
20,还剩580元 - <NSThread: 0x600000463ec0>{number = 3, name = (null)}
20,还剩560元 - <NSThread: 0x600000463ec0>{number = 3, name = (null)}
20,还剩540元 - <NSThread: 0x600000463ec0>{number = 3, name = (null)}
20,还剩520元 - <NSThread: 0x600000463ec0>{number = 3, name = (null)}
20,还剩500元 - <NSThread: 0x600000463ec0>{number = 3, name = (null)}
20,还剩480元 - <NSThread: 0x600000463ec0>{number = 3, name = (null)}
20,还剩460元 - <NSThread: 0x600000463ec0>{number = 3, name = (null)}
20,还剩440元 - <NSThread: 0x600000463ec0>{number = 3, name = (null)}
20,还剩420元 - <NSThread: 0x600000463ec0>{number = 3, name = (null)}
20,还剩400元 - <NSThread: 0x600000463ec0>{number = 3, name = (null)}

调用 -(void)ticketTest 打印结果:

1
2
3
4
5
6
7
8
9
10
11
12
13
14
15
还剩14张票 - <NSThread: 0x600003a39ec0>{number = 3, name = (null)}
还剩13张票 - <NSThread: 0x600003a39ec0>{number = 3, name = (null)}
还剩12张票 - <NSThread: 0x600003a39ec0>{number = 3, name = (null)}
还剩11张票 - <NSThread: 0x600003a39ec0>{number = 3, name = (null)}
还剩10张票 - <NSThread: 0x600003a39ec0>{number = 3, name = (null)}
还剩9张票 - <NSThread: 0x600003a6c2c0>{number = 6, name = (null)}
还剩8张票 - <NSThread: 0x600003a6c2c0>{number = 6, name = (null)}
还剩7张票 - <NSThread: 0x600003a6c2c0>{number = 6, name = (null)}
还剩6张票 - <NSThread: 0x600003a6c2c0>{number = 6, name = (null)}
还剩5张票 - <NSThread: 0x600003a6c2c0>{number = 6, name = (null)}
还剩4张票 - <NSThread: 0x600003a4a700>{number = 5, name = (null)}
还剩3张票 - <NSThread: 0x600003a4a700>{number = 5, name = (null)}
还剩2张票 - <NSThread: 0x600003a4a700>{number = 5, name = (null)}
还剩1张票 - <NSThread: 0x600003a4a700>{number = 5, name = (null)}
还剩0张票 - <NSThread: 0x600003a4a700>{number = 5, name = (null)}

因为要修改的有两个变量,一个是存钱取钱里的余额,一个是卖票里的剩余票数,所以要有两把锁分别对应这两个变量。一旦有线程对 OSSpinLock 上锁后,其它线程再遇到 OSSpinLock 时会阻塞住,等待 OSSpinLock 解锁在继续向下执行。

上面👆的例子是将 OSSpinLock 锁对象放到了实例对象里,也可以将 OSSpinLock 锁对象放到类对象里:

1
2
3
4
5
6
7
8
static OSSpinLock moneyLock_;
+ (void)initialize
{
static dispatch_once_t onceToken;
dispatch_once(&onceToken, ^{
moneyLock_ = 0;
});
}

类方法 + (void)initialize 只会被系统调用一次,但是允许被开发者调用,所以使用 dispatch_once 保证类对象的 moneyLock_ 锁只初始化一次。

或者:

1
2
3
4
5
6
7
8
9
10
- (void)__saleTicket
{
static OSSpinLock ticketLock = OS_SPINLOCK_INIT;
OSSpinLockLock(&ticketLock);
[super __saleTicket];
OSSpinLockUnlock(&ticketLock);
}

使用 static 关键字,将 ticketLock 锁保存在全局区,保证只初始化一次。

OSSpinLock 汇编分析

  • 相关汇编代码:
    jne:j 是 jump,ne 是条件。
    callq:函数调用。
    syscall:系统调用。

  • lldb 指令:
    setp:执行一行OC代码。
    stepi:stepinstruction 的简写,执行一行汇编代码,也可以简写为 si。(如果敲的过快可能会出现异常)
    next:执行一行OC代码。
    nexti:执行一行汇编代码。
    stepi 和 nexti 的区别:在遇到函数调用是,stepi 会进入调用的函数,nexti 不会进入。
    c:continue 的简写,继续执行。

(重复敲回车会执行上一个 lldb 指令)

查看汇编代码方法

👉 修改 LockBaseDemo 类里的 - (void)__saleTicket 方法,设置睡眠时间为 60s,这样可以有足够的时间查看第二次加锁时的汇编代码。修改 - (void)ticketTest 方法,创建十条线程调用 - (void)__saleTicket 方法:

1
2
3
4
5
6
7
8
9
10
11
12
13
14
15
16
17
18
- (void)ticketTest
{
self.ticketsCount = 15;
for (int i=0; i<10; i++) {
[[[NSThread alloc] initWithTarget:self selector:@selector(__saleTicket) object:nil] start];
}
}
/// 卖票
- (void)__saleTicket
{
int oldTicketsCount = self.ticketsCount; //断点
sleep(60.2);
oldTicketsCount--;
self.ticketsCount = oldTicketsCount;
NSLog(@"还剩%d张票 - %@", oldTicketsCount, [NSThread currentThread]);
}

第一次加锁后,在第二次尝试加锁时,就可以有足够多的时间查看其汇编代码,在断点处查看 Debug -> Debug Workflow -> Always Show Disassembly。

查看 OSSpinLock 汇编代码

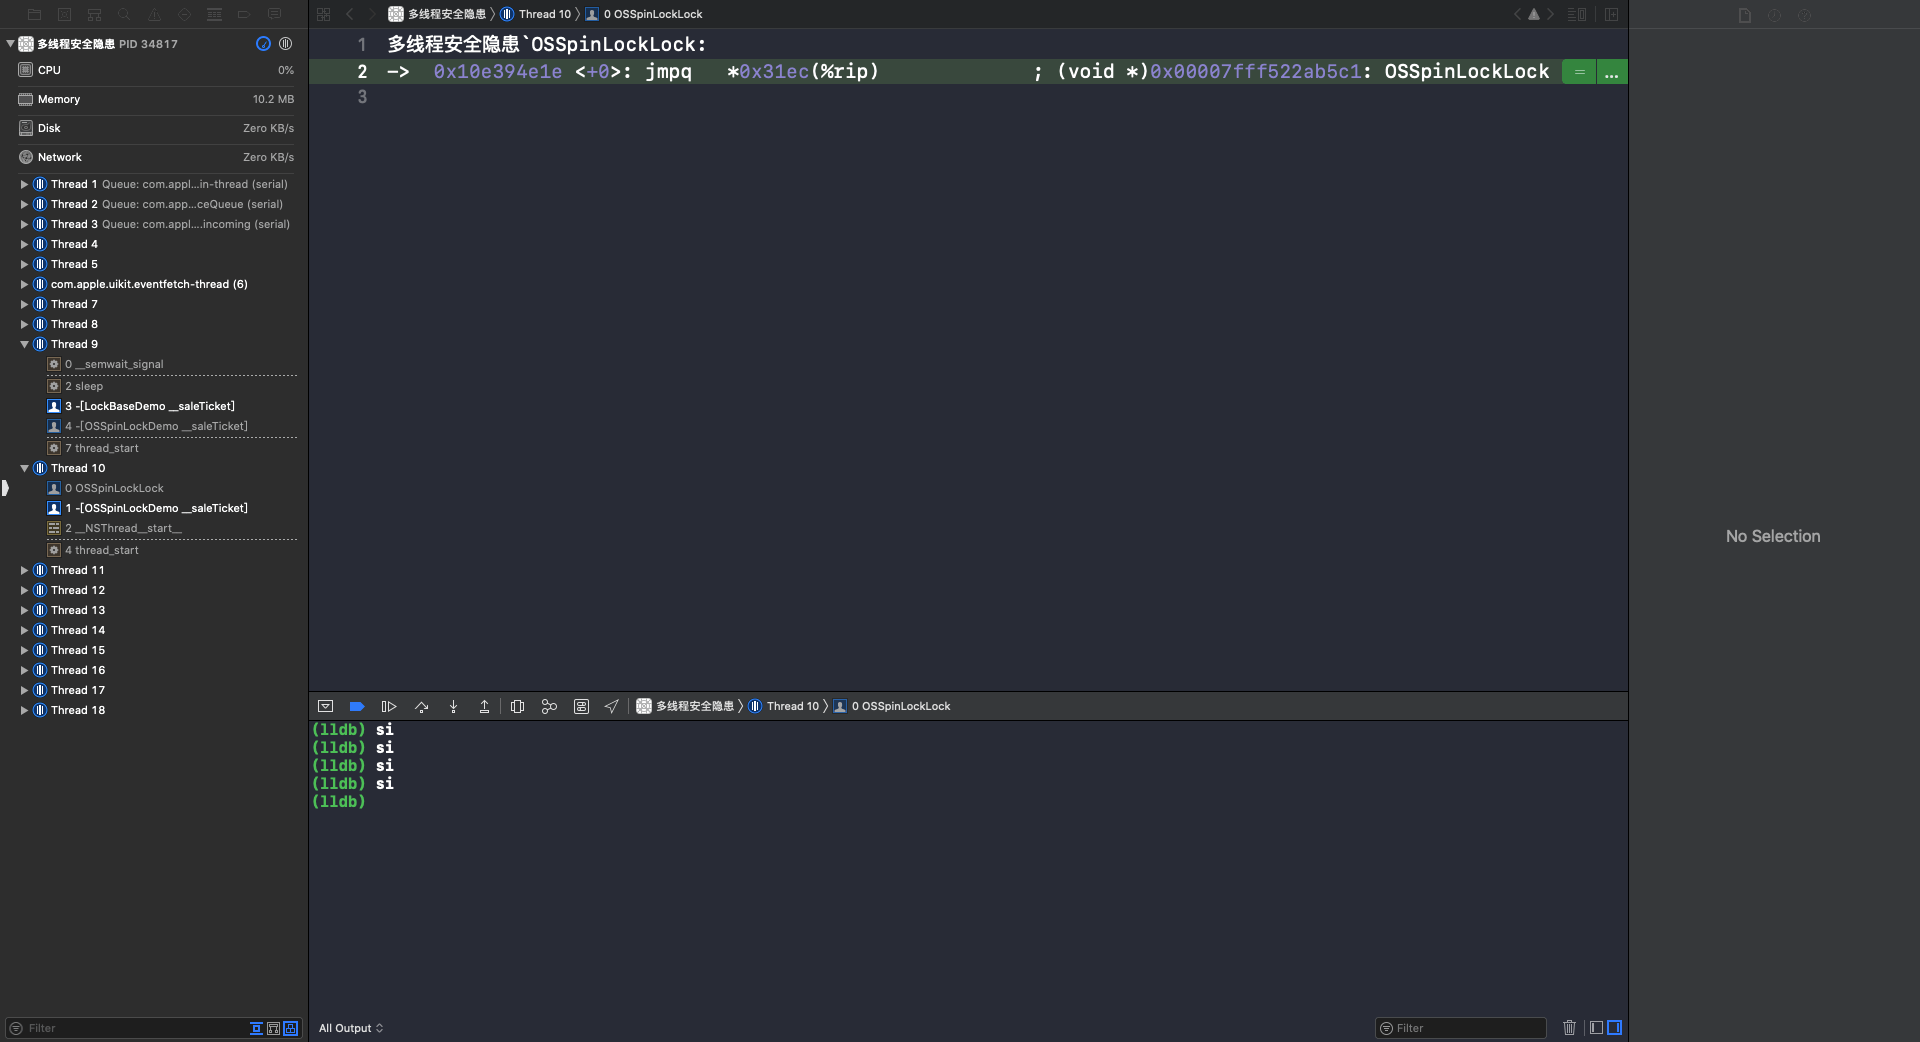
可以看到第一次调用 - (void)__saleTicket 方法是在 Thread 9 并加锁。第二次调用 - (void)__saleTicket 方法是在 Thread 10,因为此时的自旋锁处于上锁状态,所以 Thread 10 处于等待锁的状态。重复执行 si 指令,到第11行时会调用 OSSpinLocklock 函数:
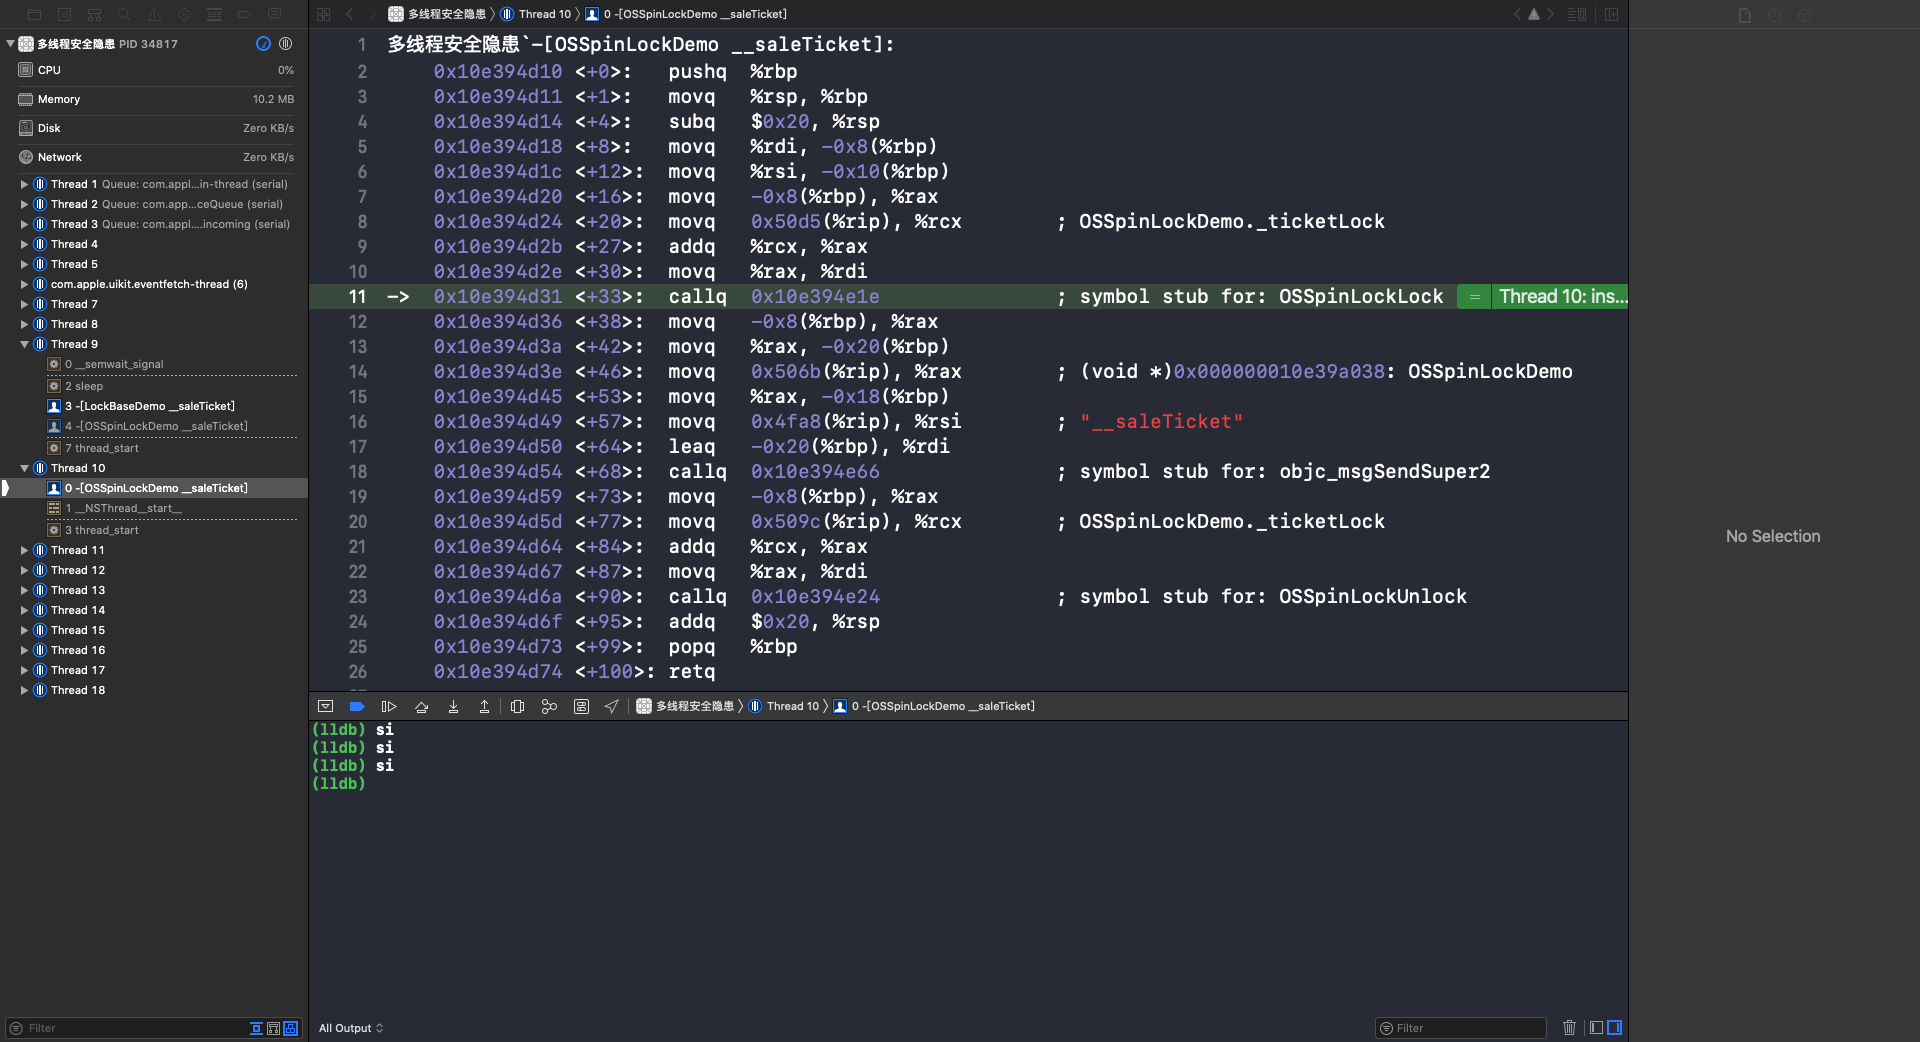
多线程15
使用 si 指令进入到调用函数:
多线程16
重复执行 si 指令,在第6行通过 jne 跳转到 _OSSpinLockLockSlow 函数:
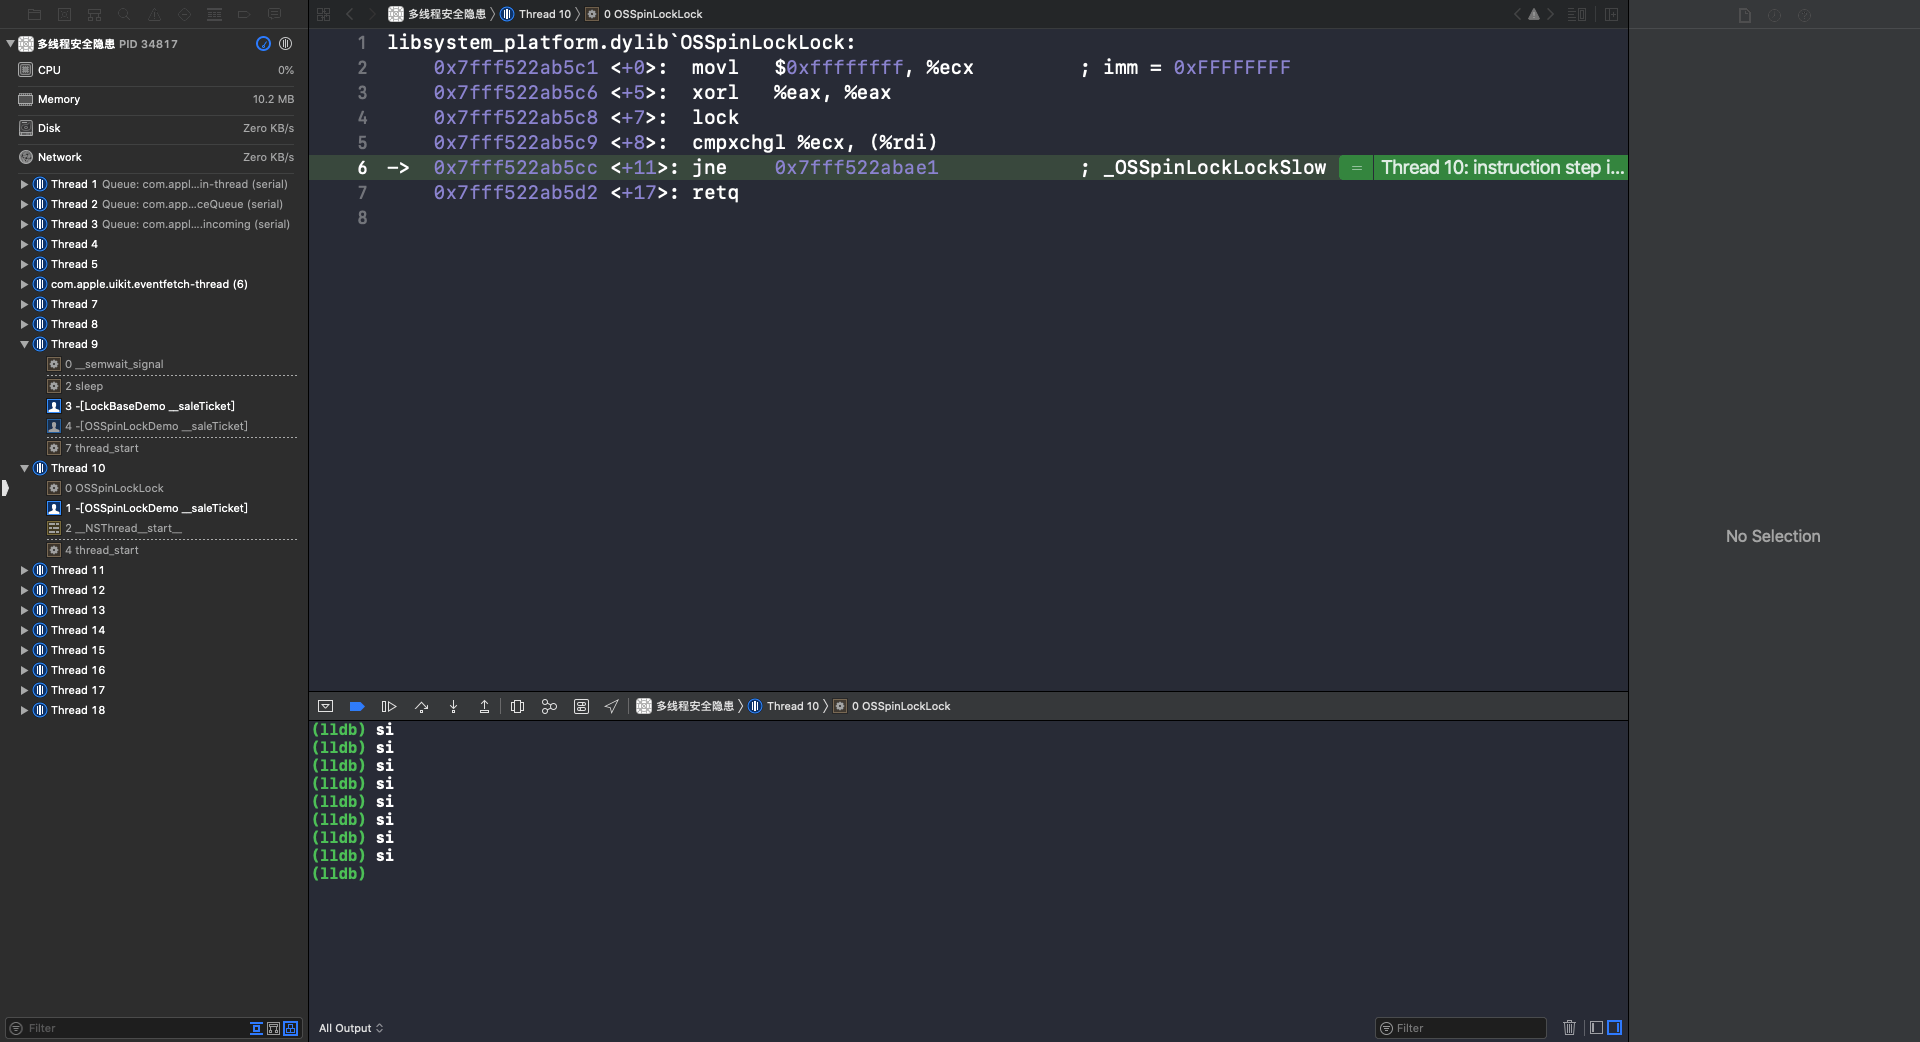
多线程17
_OSSpinLockLockSlow 函数是自旋锁的核心代码,从第6行到第19行是一个 while 循环(🔎自旋锁标志)。因为 Thread 9 已经加过锁并且还没有解锁,所以这里会一直循环执行,等待 Thread 9 解锁。可以看到第14行和第16行是跳出 while 循环的判断:
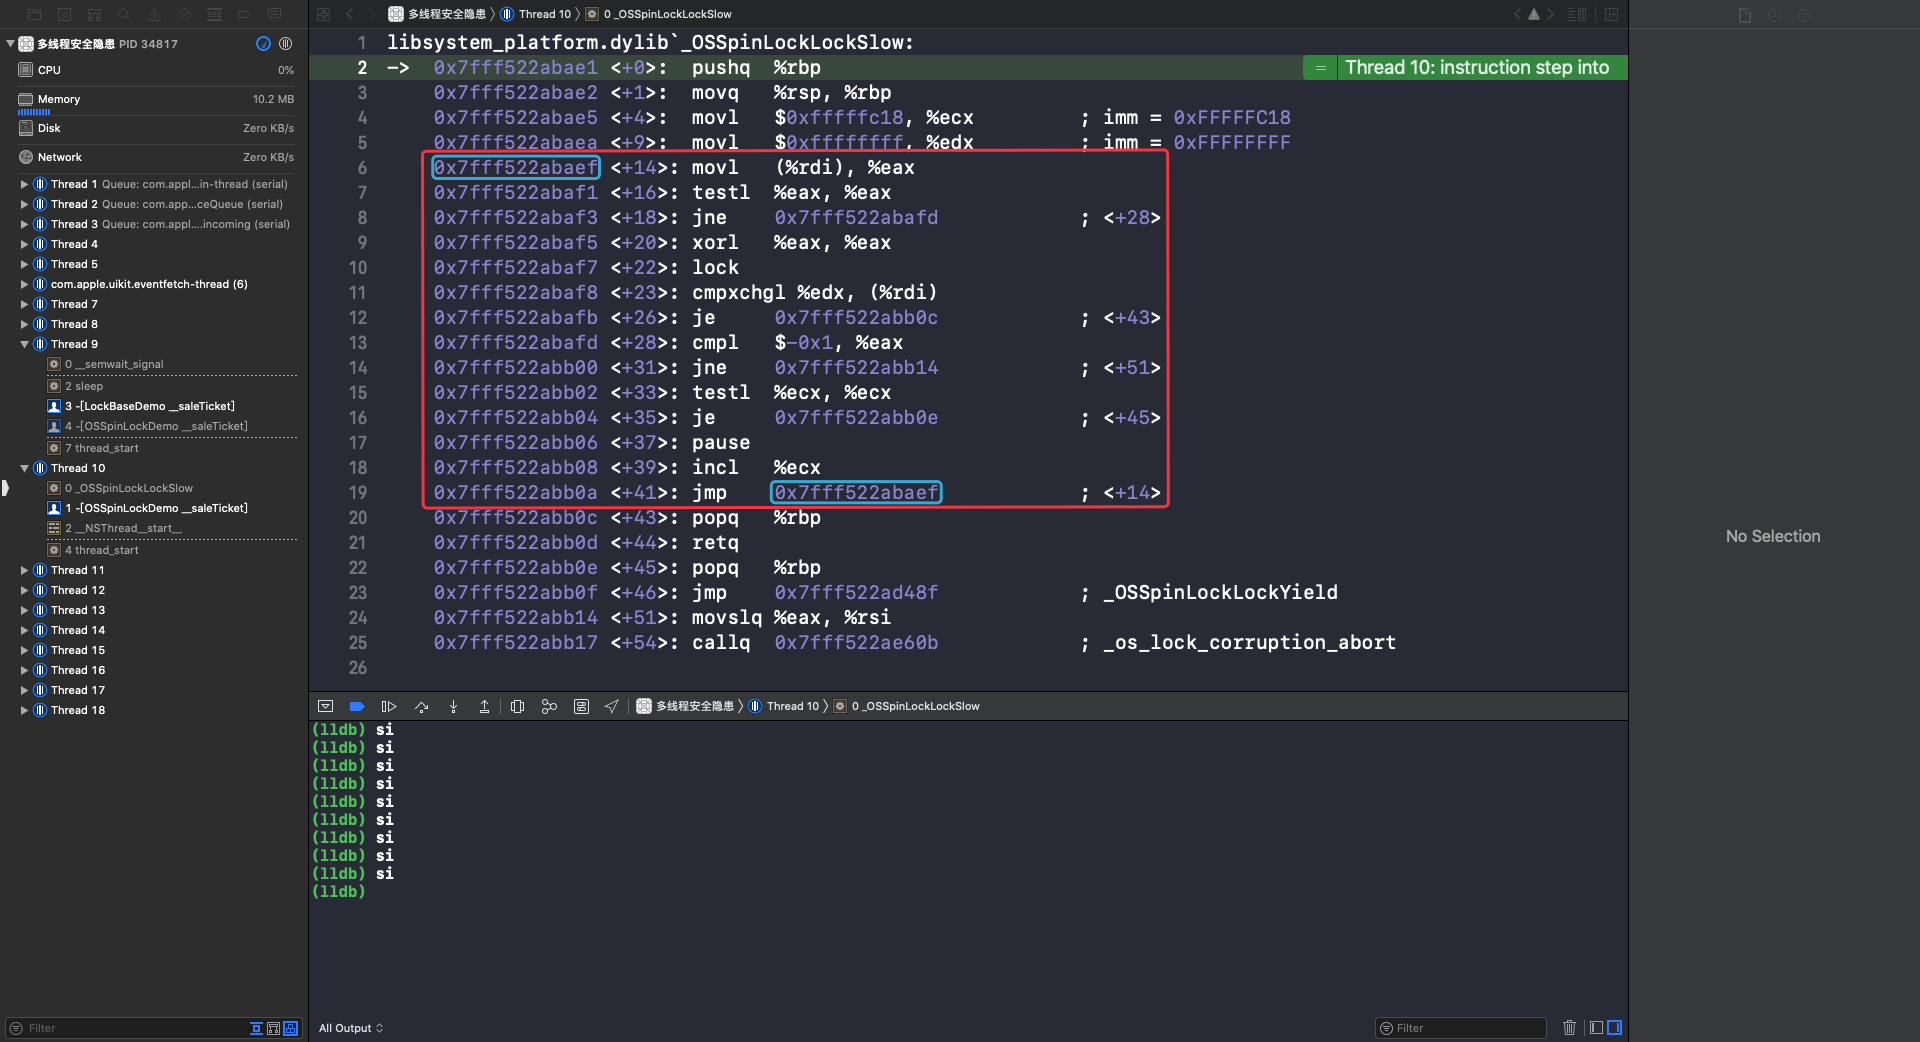
多线程18

os_unfair_lock

OSSpinLock 在以前是性能最高的一种锁,但是由于不再安全(优先级反转问题),苹果已经不建议使用了,从 iOS10 开始推出了替代它的 os_unfair_lock。需要导入头文件 #import <os/lock.h>

常用API

1
2
3
4
5
6
7
8
/// 初始化
os_unfair_lock lock = OS_UNFAIR_LOCK_INIT;
/// 尝试加锁
os_unfair_lock_trylock(&lock);
/// 加锁
os_unfair_lock_lock(&lock);
/// 解锁
os_unfair_lock_unlock(&lock);

解决卖票和存钱取钱问题

定义 OSUnfairLockDemo 继承自 LockBaseDemo。

1
2
3
4
5
6
7
8
9
10
11
12
13
14
15
16
17
18
19
20
21
22
23
24
25
26
27
28
29
30
31
32
33
34
35
36
37
38
39
40
41
42
43
44
45
46
47
48
#import <libkern/OSAtomic.h>
@interface OSUnfairLockDemo()
@property (nonatomic, assign) os_unfair_lock moneyLock;
@property (nonatomic, assign) os_unfair_lock ticketLock;
@end
@implementation OSUnfairLockDemo
- (instancetype)init
{
self = [super init];
if (self) {
self.moneyLock = OS_UNFAIR_LOCK_INIT;
self.ticketLock = OS_UNFAIR_LOCK_INIT;
}
return self;
}
/// 取钱
- (void)__drawMoney
{
os_unfair_lock_lock(&_moneyLock);
[super __drawMoney];
os_unfair_lock_unlock(&_moneyLock);
}
/// 存钱
- (void)__saveManey
{
os_unfair_lock_lock(&_moneyLock);
[super __saveManey];
os_unfair_lock_unlock(&_moneyLock);
}
/// 卖票
- (void)__saleTicket
{
os_unfair_lock_lock(&_ticketLock);
[super __saleTicket];
os_unfair_lock_unlock(&_ticketLock);
}

打印结果同 OSSpinLock。

  • 死锁
    如果加锁后没有解锁,其它线程就会进入等待,永远无法往下继续执行。这种由于没有解锁造成的其它线程的等待叫做死锁。

os_unfair_lock 汇编分析

根据“查看汇编代码方法”查看 os_unfair_lock 第二次尝试加锁的汇编代码。

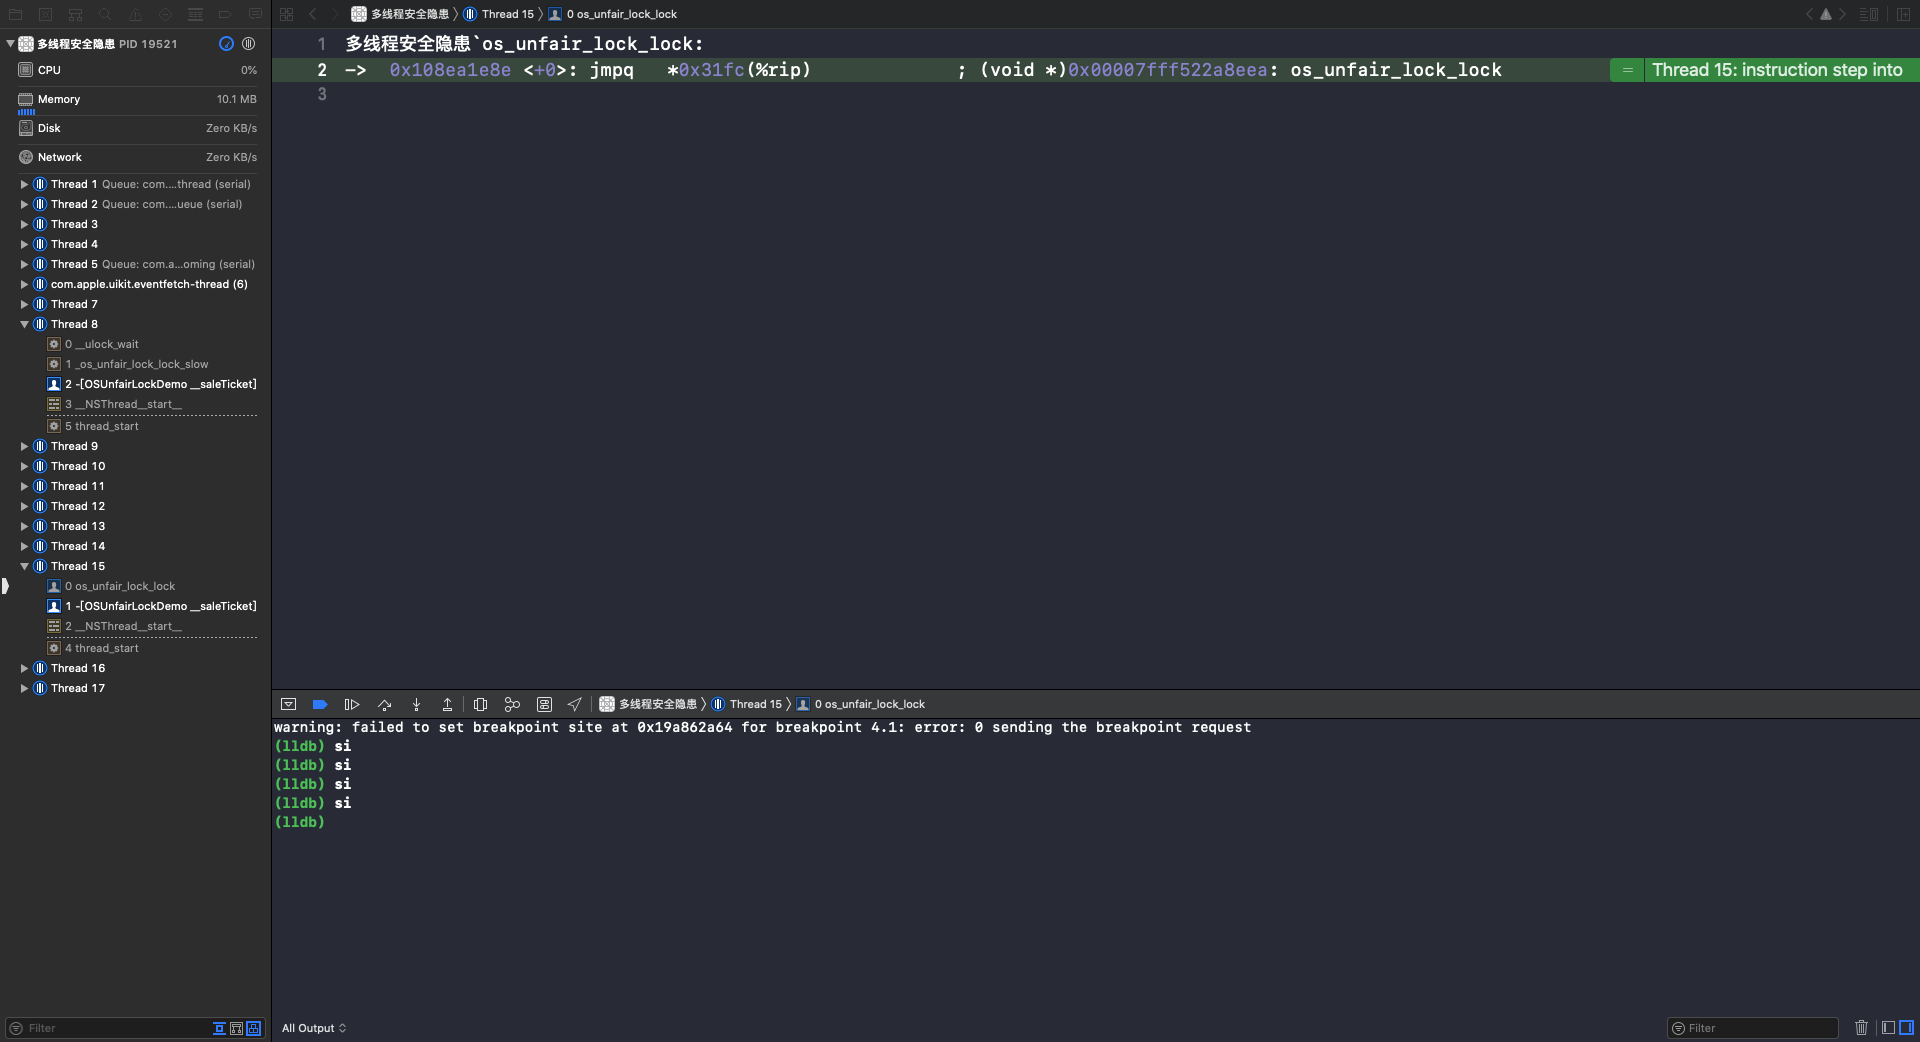
可以看到第一次调用 - (void)__saleTicket 方法是在 Thread 8 并加锁。第二次调用 - (void)__saleTicket 方法是在 Thread 15,因为此时的自旋锁处于上锁状态,所以 Thread 15 处于等待锁的状态。重复执行 si 指令,到第11行时会调用 os_unfair_lock_lock 函数:
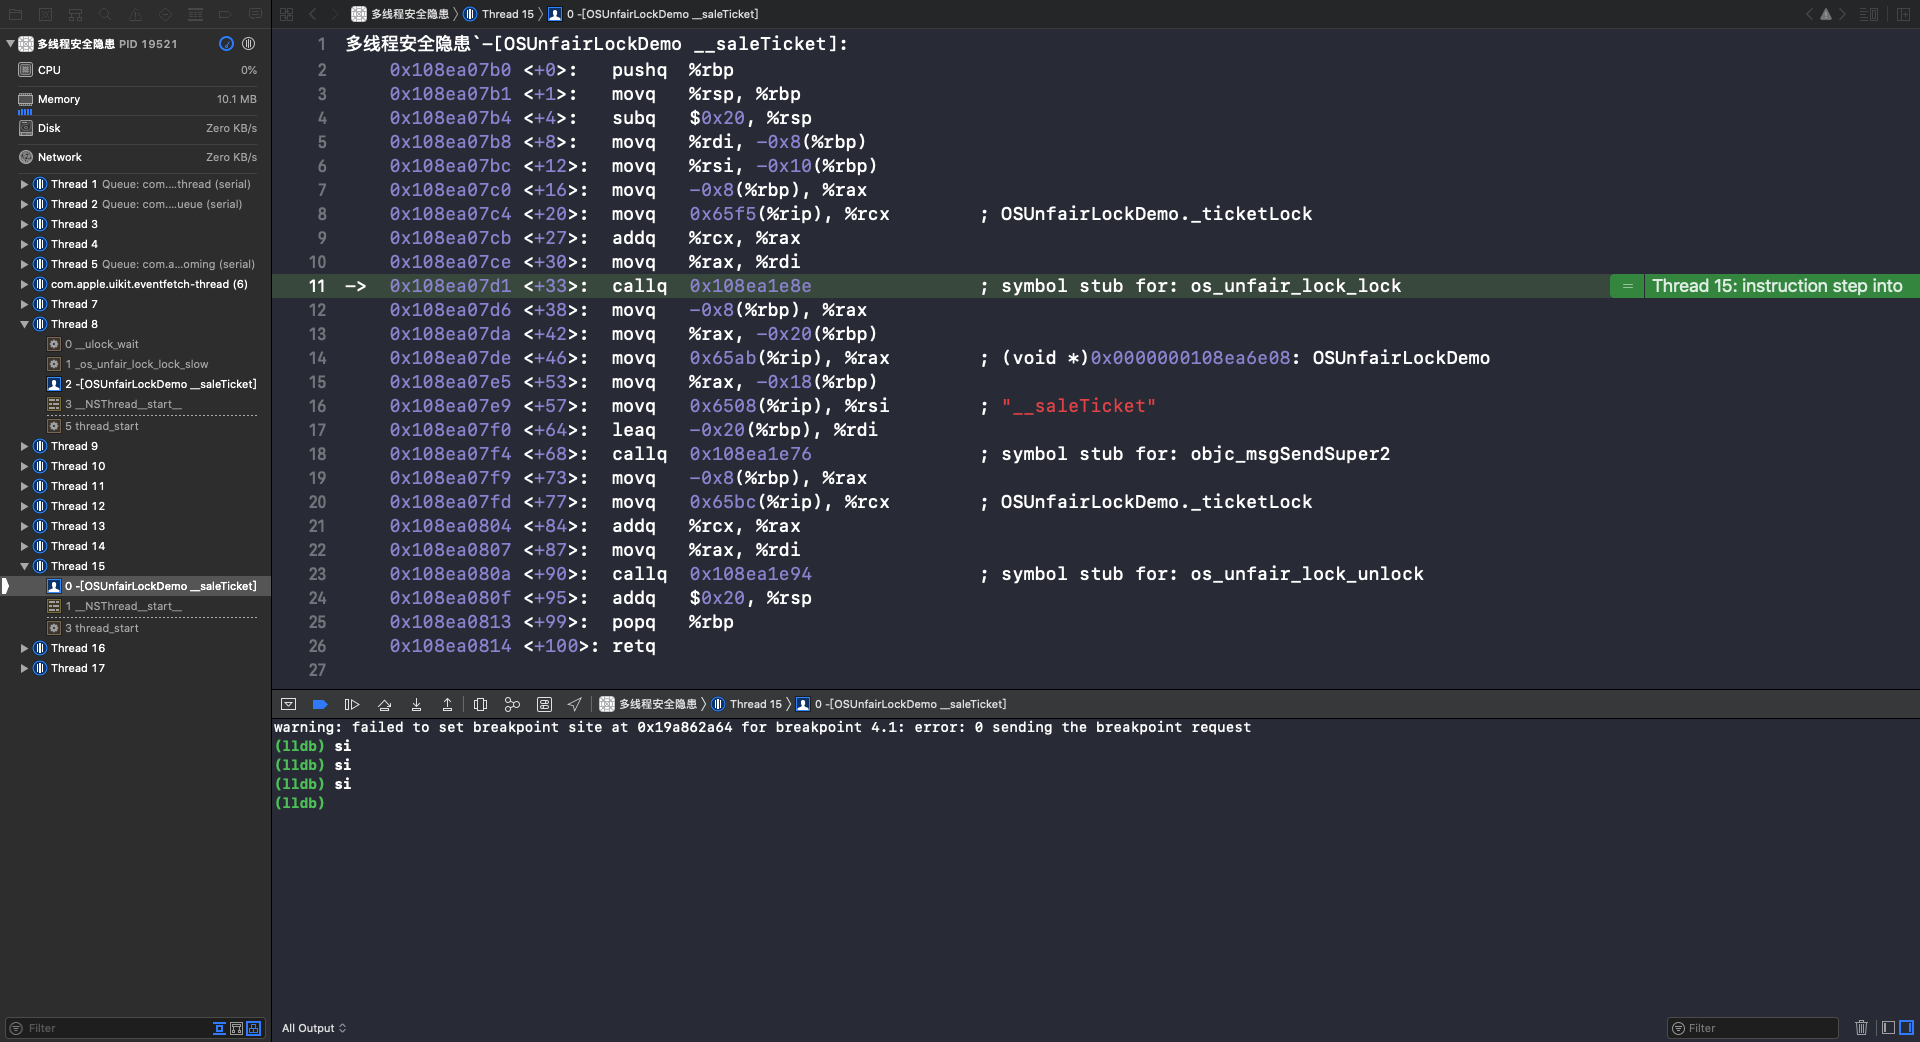
多线程26
使用 si 指令进入到 os_unfair_lock_lock 函数:
多线程27
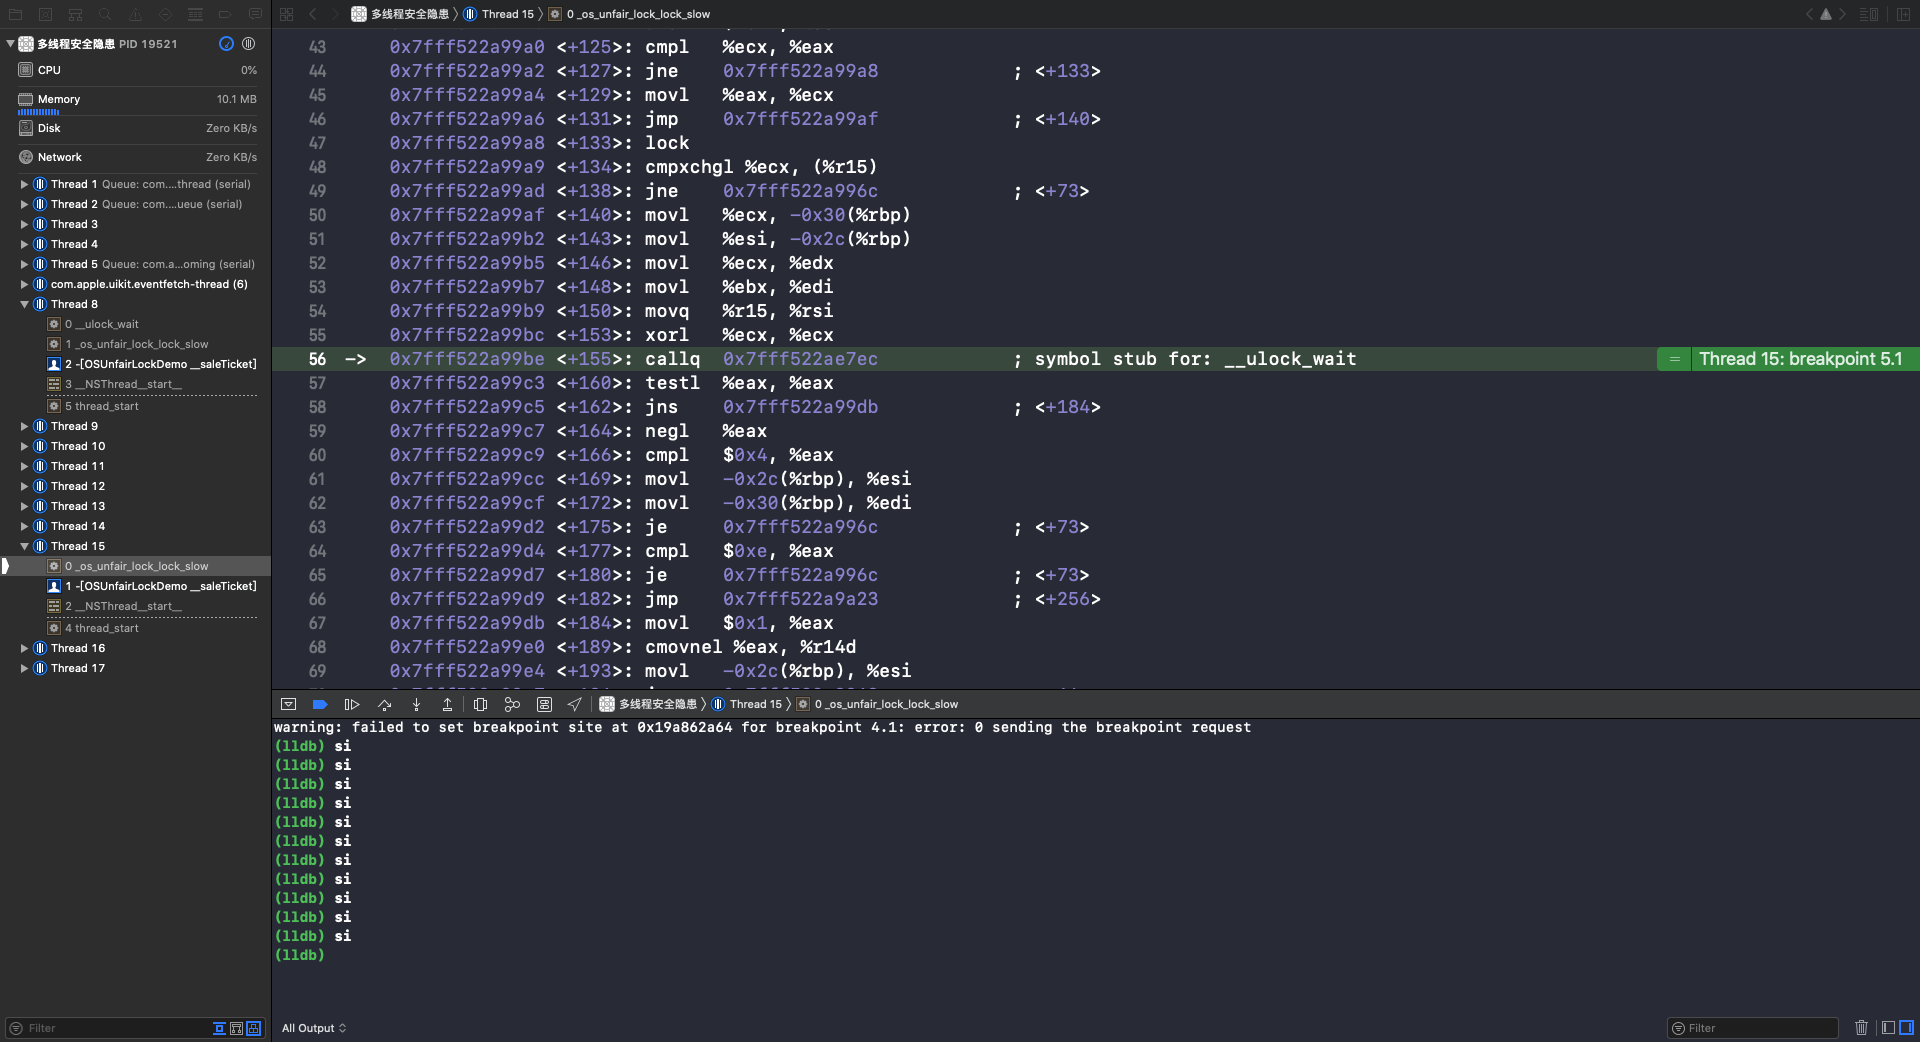
重复使用 si 指令,进入 _os_unfair_lock_lock_slow 函数:
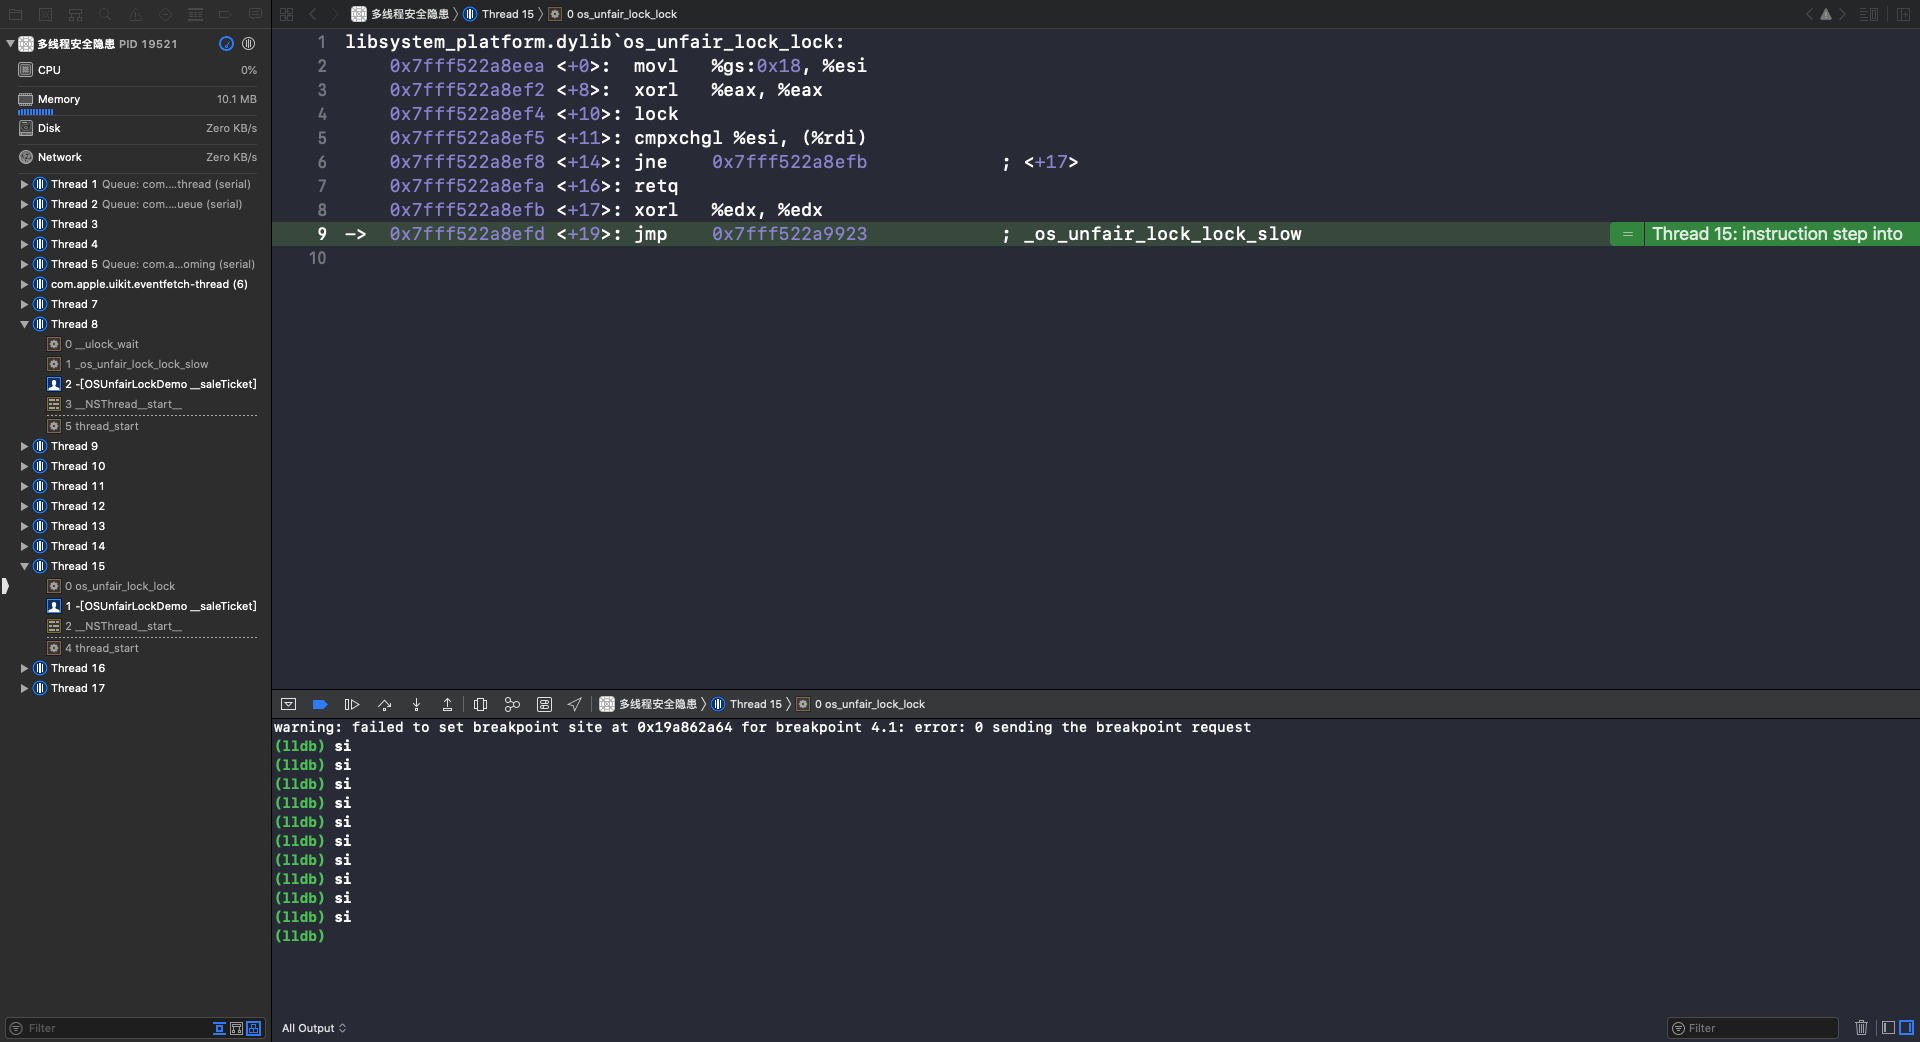
多线程28
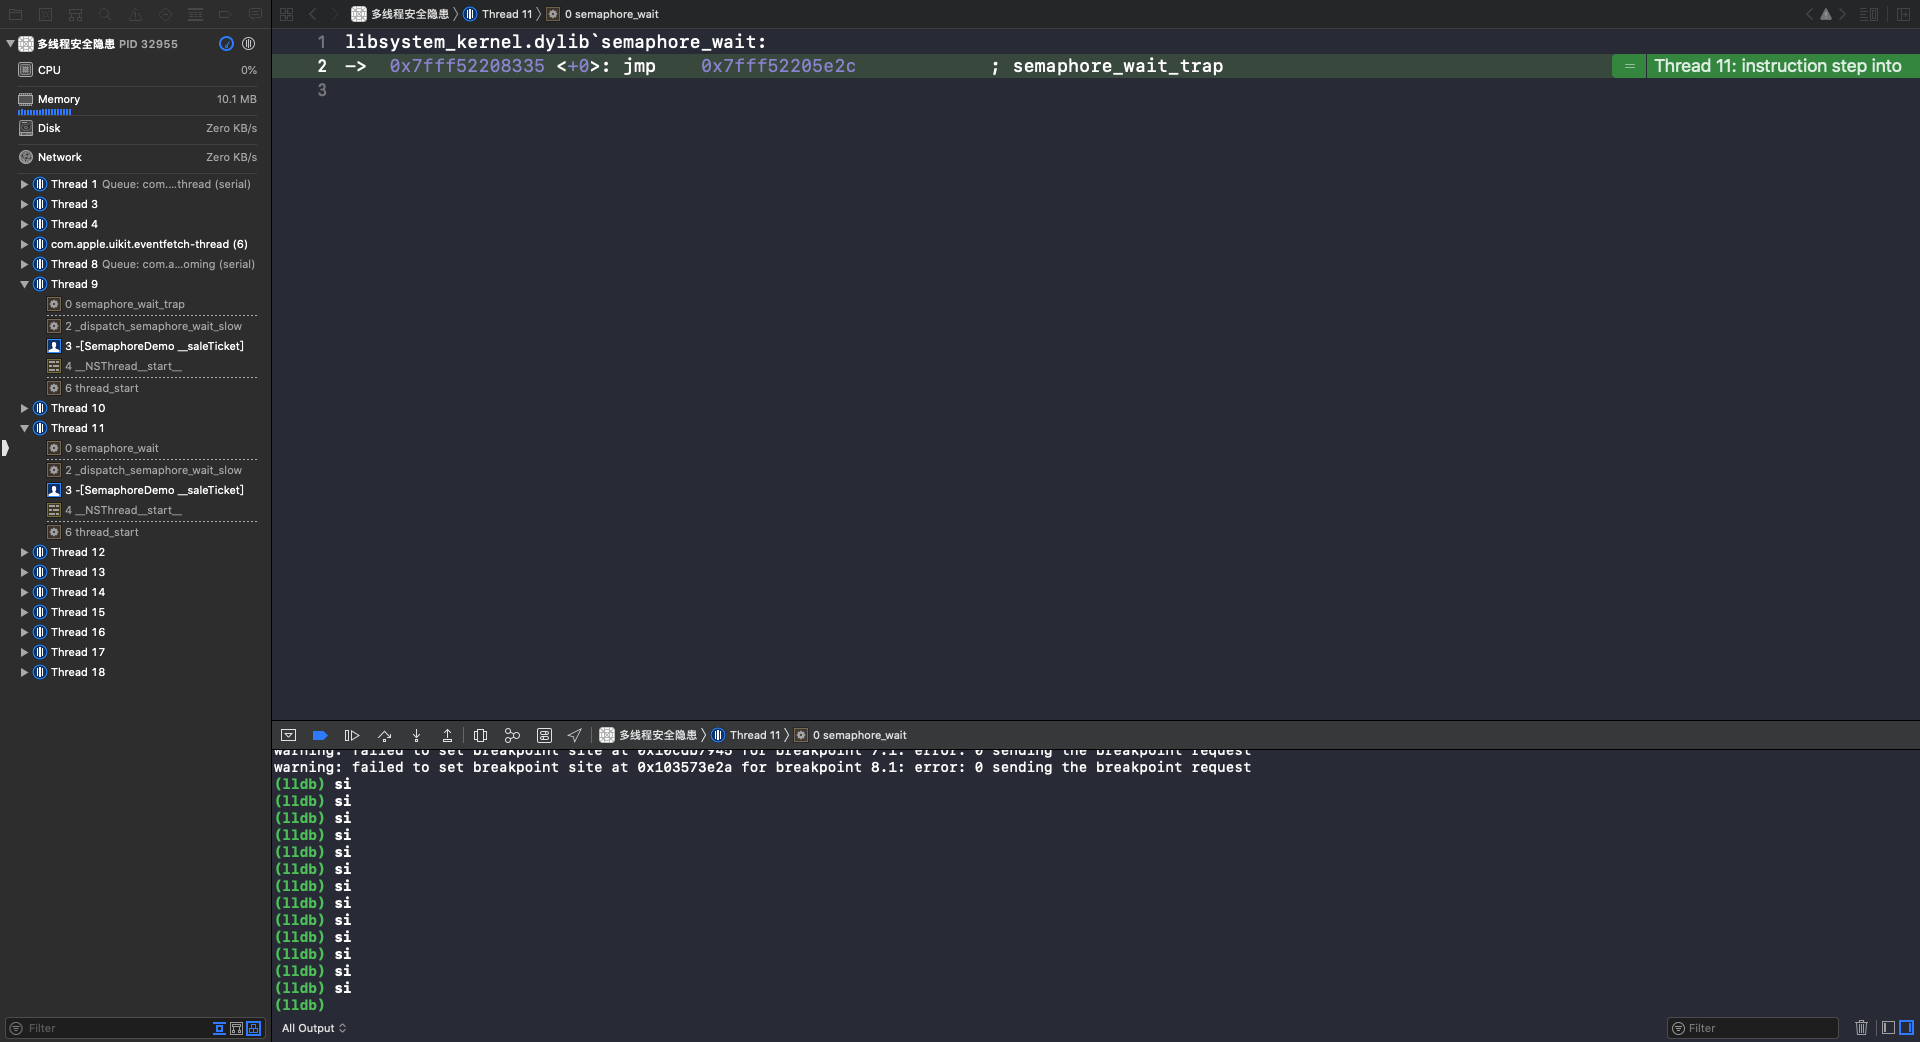
使用 si 指令,第56行会调用 __ulock_wait 函数:
多线程29
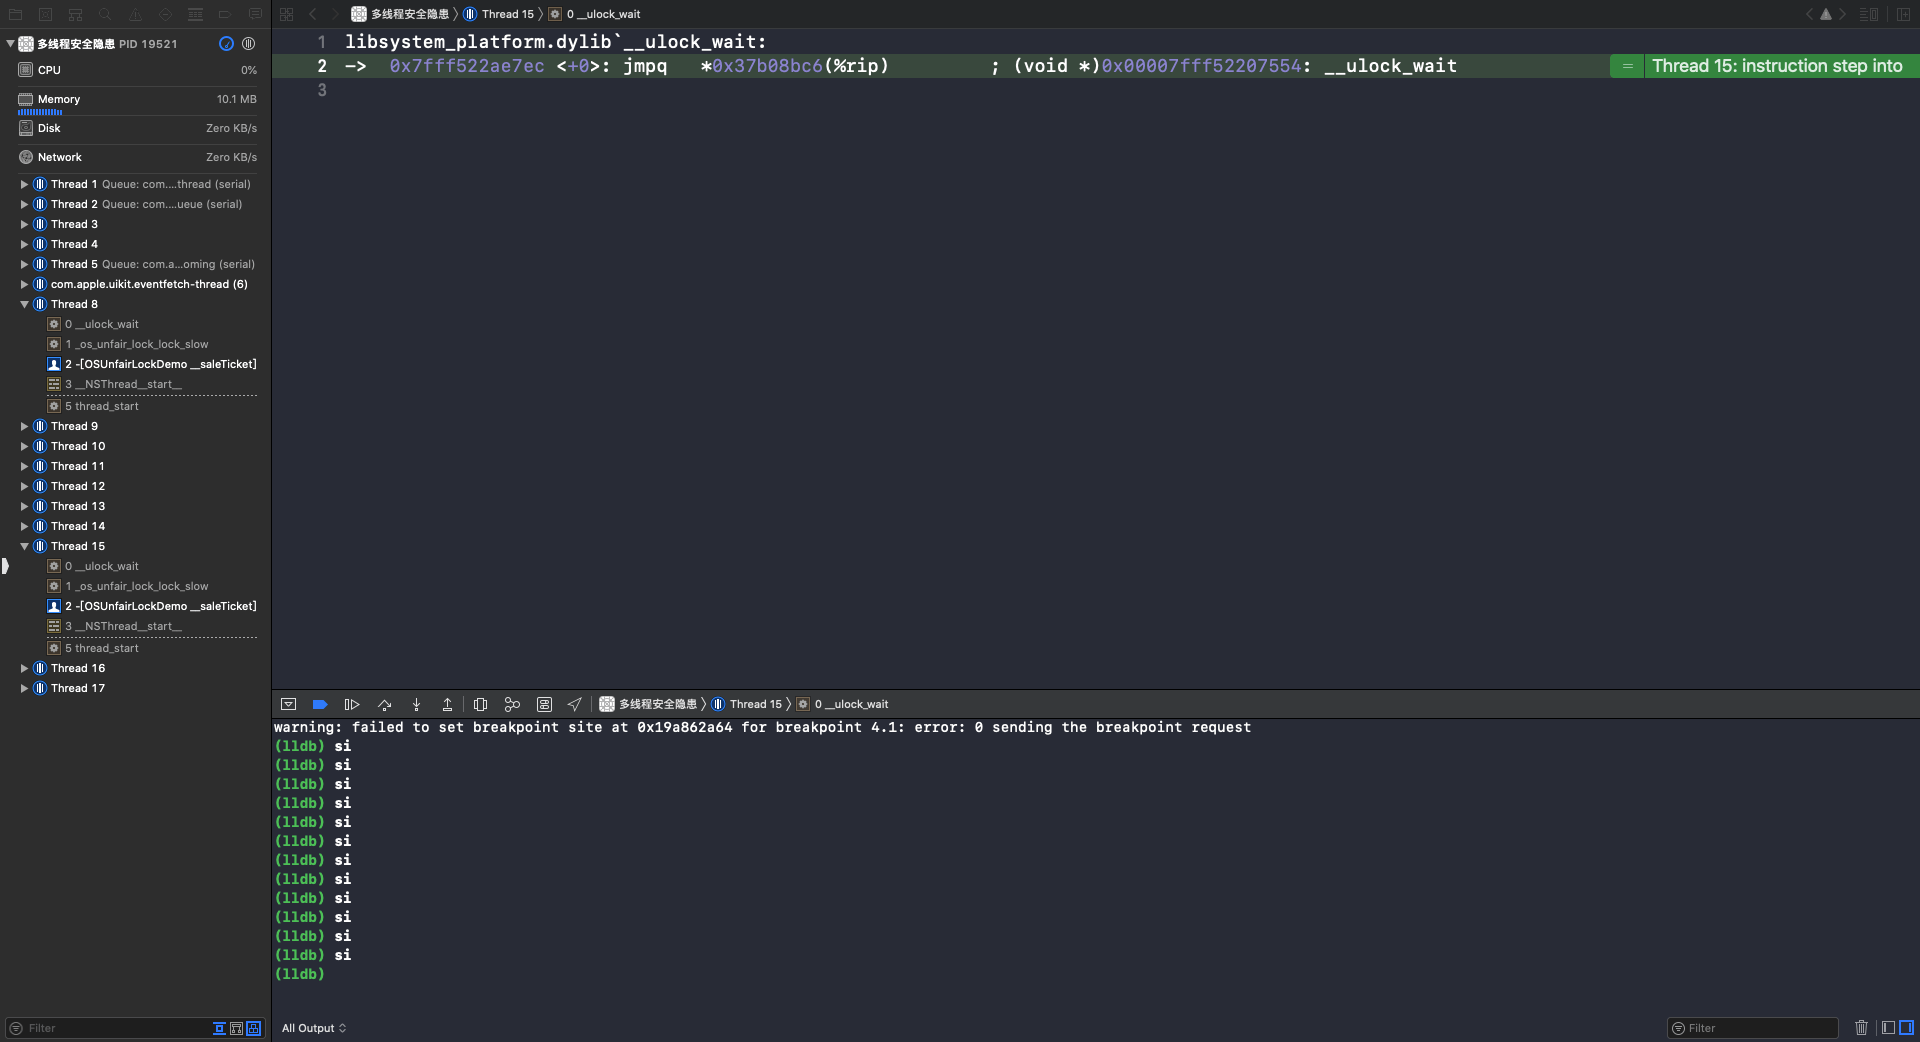
使用 si 指令,进入 __ulock_wait
多线程30
第4行 syscall 是系统调用,这个函数调用完成后,XCode 就又回到了OC代码页面,线程就进入休眠状态了(🔎 互斥锁标志):
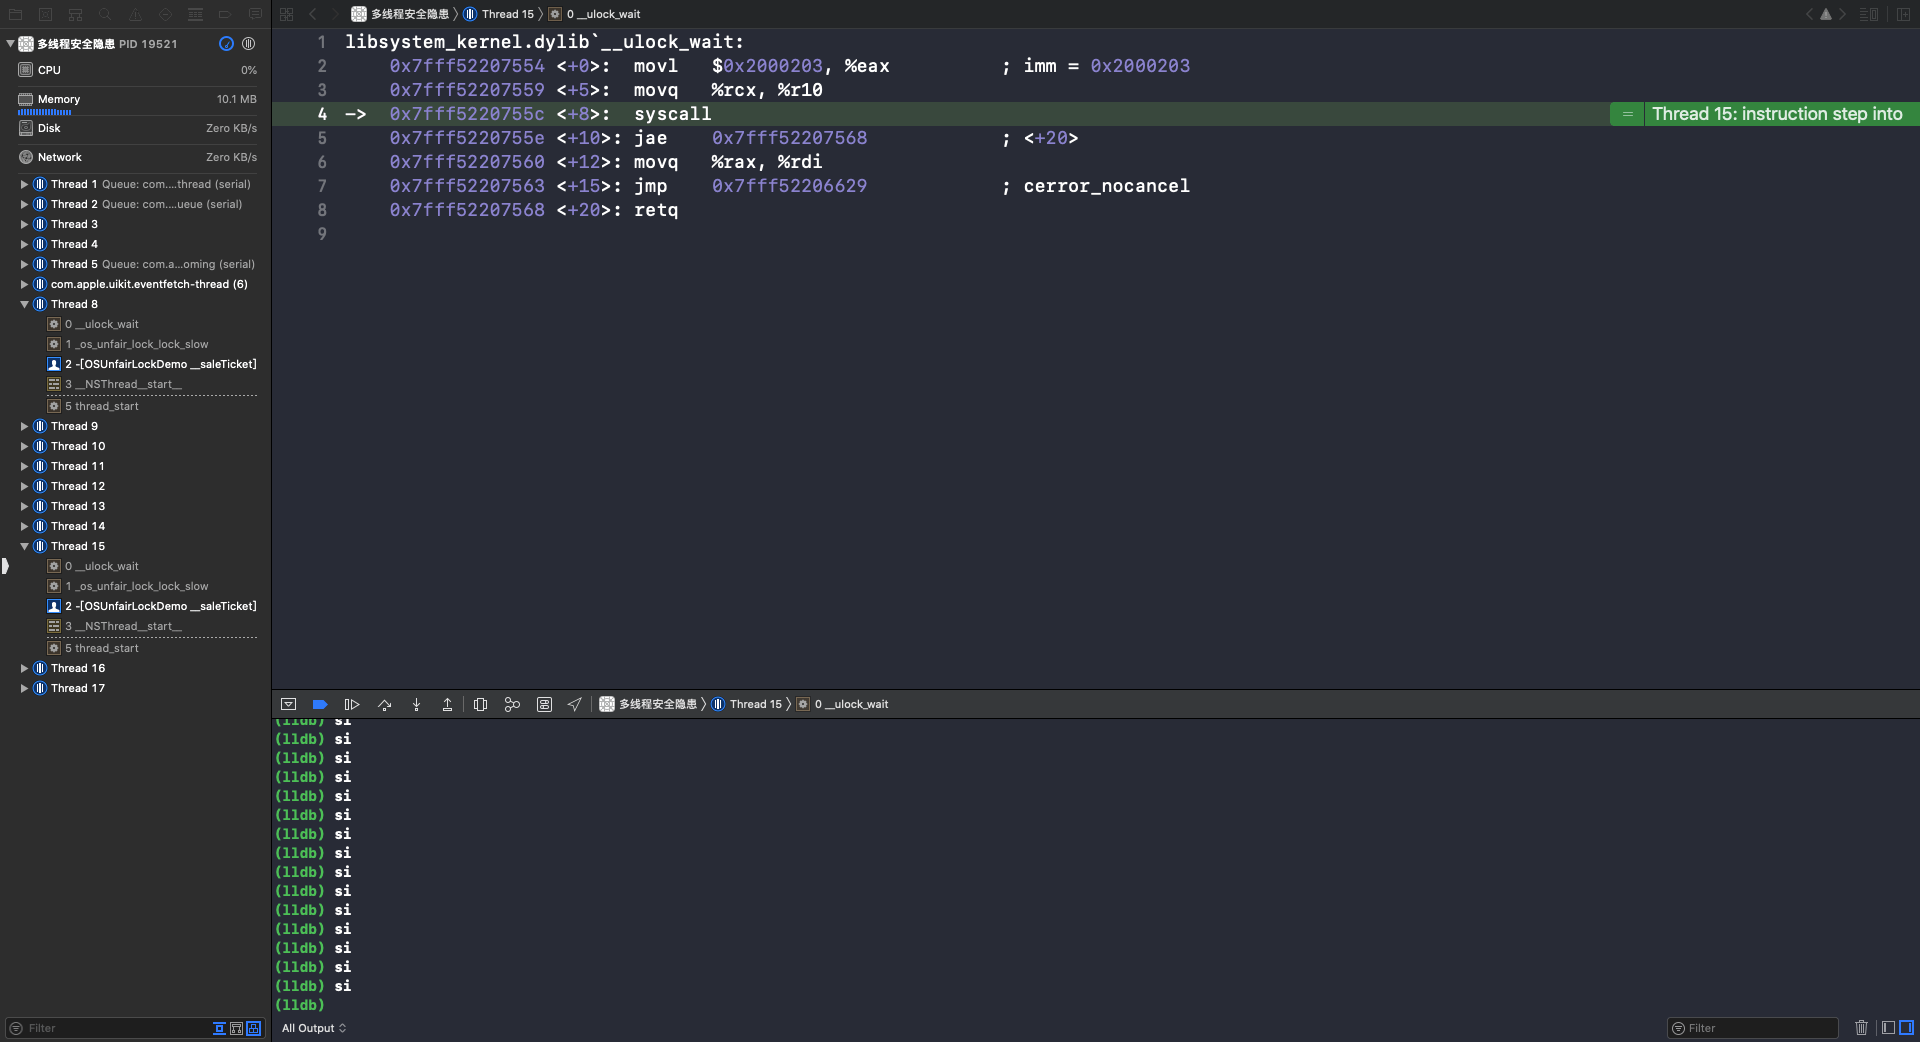
多线程31

从上面👆对 os_unfair_lock 的汇编分析,可以看出 os_unfair_lock 是一个互斥锁。在 os_unfair_lock 的头文件 lock.h 里的注释可以看到一个单词 Low-level(低级锁),低级锁的特点就是休眠。自旋锁 OSSpinLock 是一个高级锁。

pthread_mutex

mutex 叫做”互斥锁”,等待锁的线程会处于休眠状态。需要导入头文件 #import <pthread.h>

常用API

1
2
3
4
5
6
7
8
9
10
11
12
13
14
15
16
/// 初始化锁的属性
pthread_mutexattr_t attr;
pthread_mutexattr_init(&attr);
pthread_mutexattr_settype(&attr, PTHREAD_MUTEX_NORMAL);
/// 初始化锁
pthread_mutex_t mutex;
pthread_mutex_init(&mutex, &attr);
/// 尝试加锁
pthread_mutex_trylock(&mutex);
/// 加锁
pthread_mutex_lock(&mutex);
/// 解锁
pthread_mutex_unlock(&mutex);
/// 销毁相关资源
pthread_mutexattr_destroy(&attr);
pthread_mutex_destroy(&mutex);

锁定类型:

1
2
3
4
#define PTHREAD_MUTEX_NORMAL 0
#define PTHREAD_MUTEX_ERRORCHECK 1
#define PTHREAD_MUTEX_RECURSIVE 2
#define PTHREAD_MUTEX_DEFAULT PTHREAD_MUTEX_NORMAL

PTHREAD_MUTEX_INITIALIZER

1
2
3
4
/*
* Mutex variables
*/
#define PTHREAD_MUTEX_INITIALIZER {_PTHREAD_MUTEX_SIG_init, {0}}

可以看到,PTHREAD_MUTEX_INITIALIZER 是一个结构体,在使用 PTHREAD_MUTEX_INITIALIZER 初始化锁时,由于结构体语法的问题,需要进行静态初始化:

1
2
3
4
5
6
7
8
- (instancetype)init
{
self = [super init];
if (self) {
pthread_mutex_t mutex = PTHREAD_MUTEX_INITIALIZER;
}
return self;
}

如果使用 PTHREAD_MUTEX_INITIALIZER 动态初始化 pthread_mutex_t 会报错:
多线程14

pthread_mutexattr_t

初始化 pthread_mutex 锁:

1
2
3
4
5
6
7
8
9
10
11
12
13
14
15
- (instancetype)init
{
self = [super init];
if (self) {
/// 初始化属性
pthread_mutexattr_t attr;
pthread_mutexattr_init(&attr);
pthread_mutexattr_settype(&attr, PTHREAD_MUTEX_DEFAULT);
/// 初始化锁
pthread_mutex_init(&_moneyMutex, &attr);
/// 销毁属性
pthread_mutexattr_destroy(&attr);
}
return self;
}

上面👆初始化锁的代码比较繁琐,一般使用 pthread_mutex_init(&_moneyMutex, NULL) 方法进行初始化。pthread_mutex_init() 方法的第二参数传 NULL,就相当于设置了 PTHREAD_MUTEX_DEFAULT 类型的 pthread_mutexattr_t 属性。

解决卖票和存钱取钱问题

定义 PthreadMutexDemo 继承自 LockBaseDemo。

1
2
3
4
5
6
7
8
9
10
11
12
13
14
15
16
17
18
19
20
21
22
23
24
25
26
27
28
29
30
31
32
33
34
35
36
37
38
39
40
41
42
43
44
45
46
47
48
49
50
51
52
53
54
55
56
57
#import <pthread.h>
@interface PthreadMutexDemo()
@property (nonatomic, assign) pthread_mutex_t moneyMutex;
@property (nonatomic, assign) pthread_mutex_t ticketMutex;
@end
@implementation PthreadMutexDemo
- (instancetype)init
{
self = [super init];
if (self) {
pthread_mutex_init(&_moneyMutex, NULL);
pthread_mutex_init(&_ticketMutex, NULL);
}
return self;
}
/// 取钱
- (void)__drawMoney
{
pthread_mutex_lock(&_moneyMutex);
[super __drawMoney];
pthread_mutex_unlock(&_moneyMutex);
}
/// 存钱
- (void)__saveManey
{
pthread_mutex_lock(&_moneyMutex);
[super __saveManey];
pthread_mutex_unlock(&_moneyMutex);
}
/// 卖票
- (void)__saleTicket
{
pthread_mutex_lock(&_ticketMutex);
[super __saleTicket];
pthread_mutex_unlock(&_ticketMutex);
}
/// 销毁锁
- (void)dealloc
{
pthread_mutex_destroy(&_moneyMutex);
pthread_mutex_destroy(&_ticketMutex);
}
@end

打印结果同 OSSpinLock。

相对于 OSSpinLockos_unfair_lockpthread_mutex 的 API 里提供了销毁方法 pthread_mutex_destroy(),所以需要在 -(void)dealloc 方法里对锁进行销毁。

pthread_mutex 汇编分析

根据“查看汇编代码方法”查看 pthread_mutex 第二次尝试加锁的汇编代码。

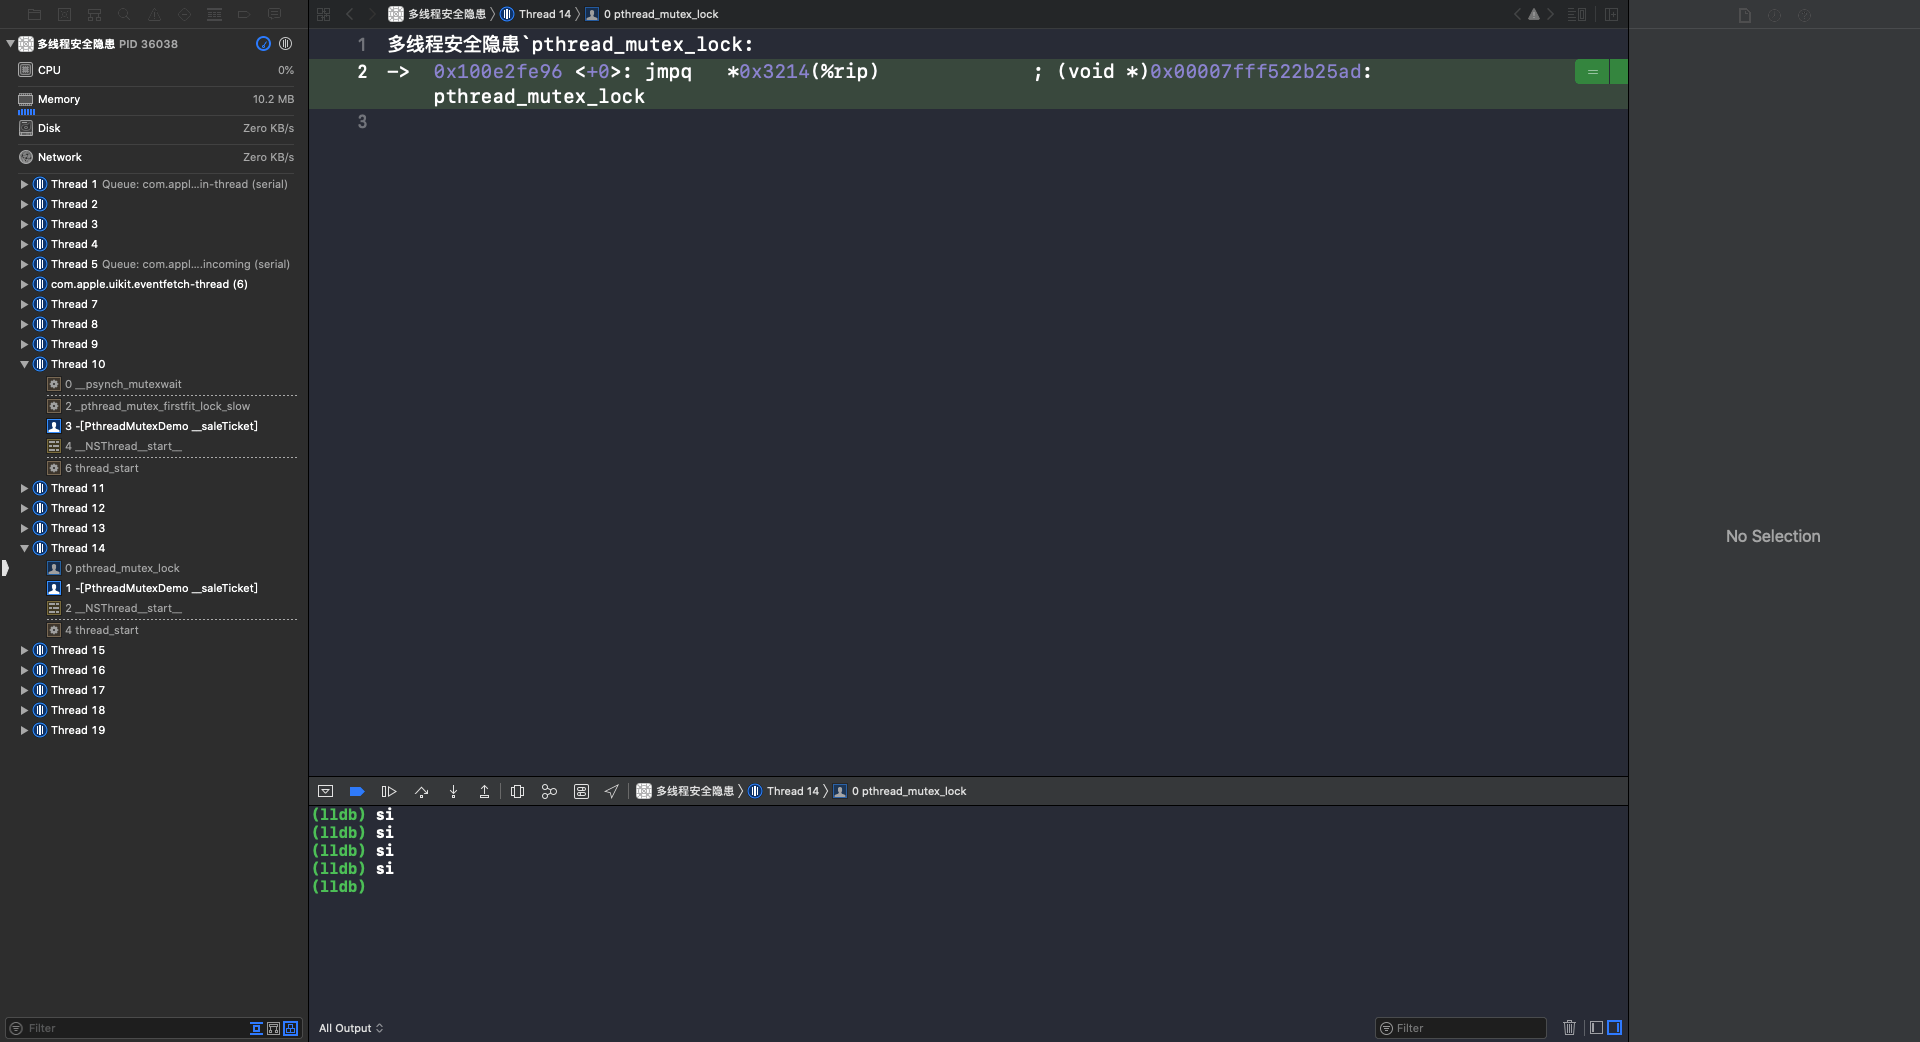
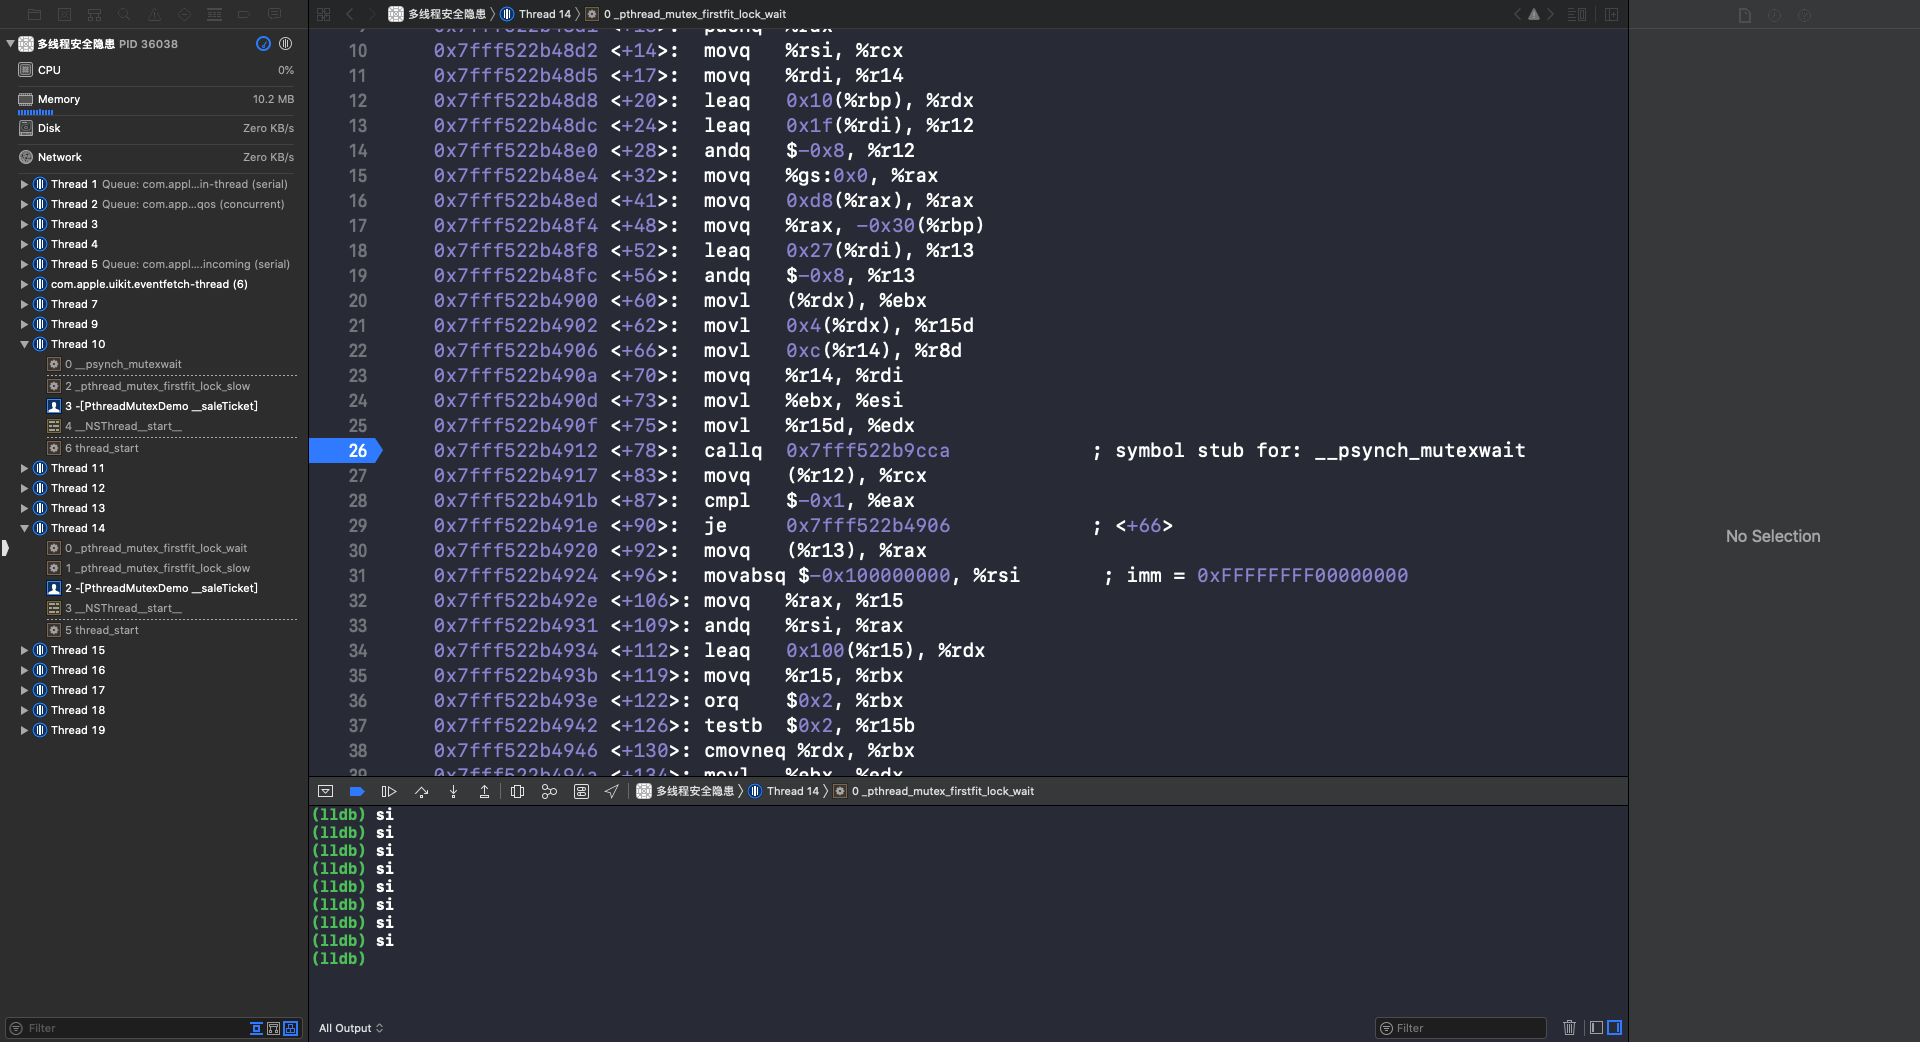
可以看到第一次调用 - (void)__saleTicket 方法是在 Thread 10 并加锁。第二次调用 - (void)__saleTicket 方法是在 Thread 14,因为此时的自旋锁处于上锁状态,所以 Thread 14 处于等待锁的状态。重复执行 si 指令,到第11行时会调用 phread_mutex_lock 函数:
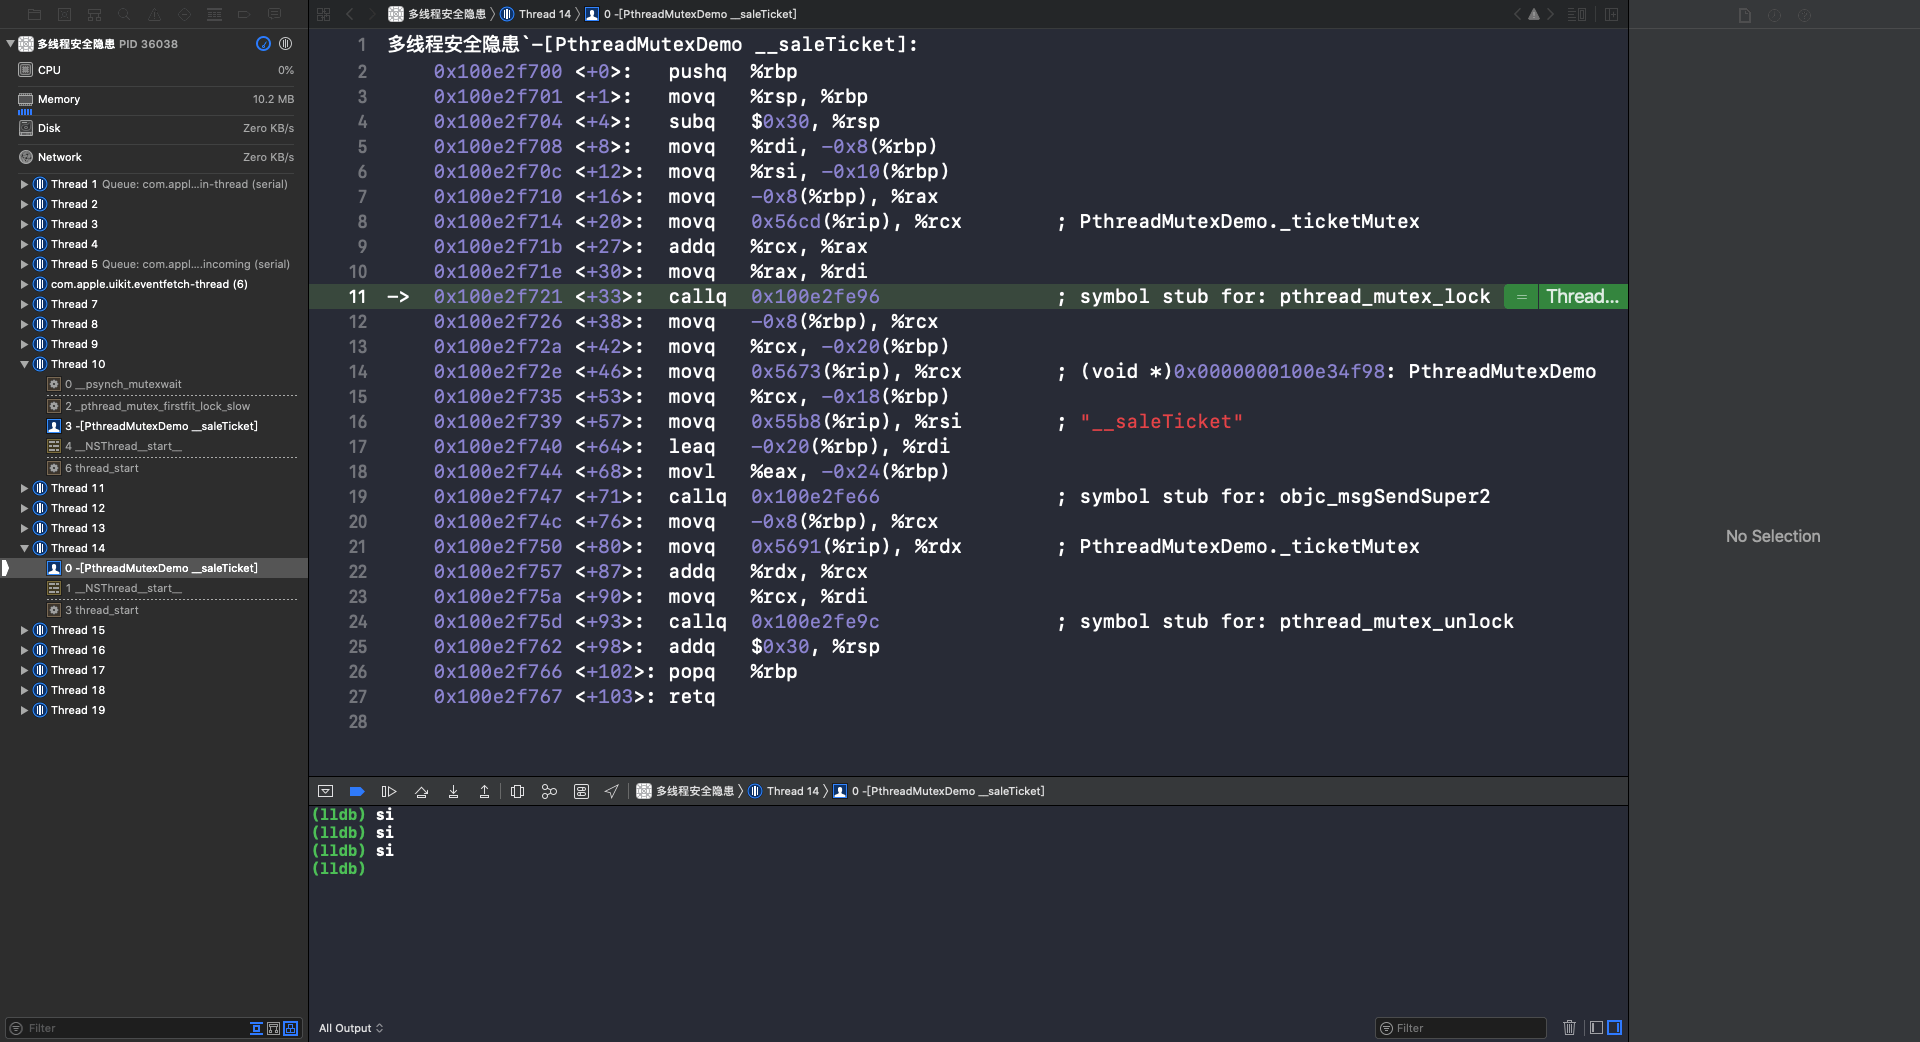
多线程19
使用 si 指令进入到 phread_mutex_lock 函数:
多线程20
重复使用 si 指令,进入 _pthread_mutex_firstfit_lock_slow 函数:
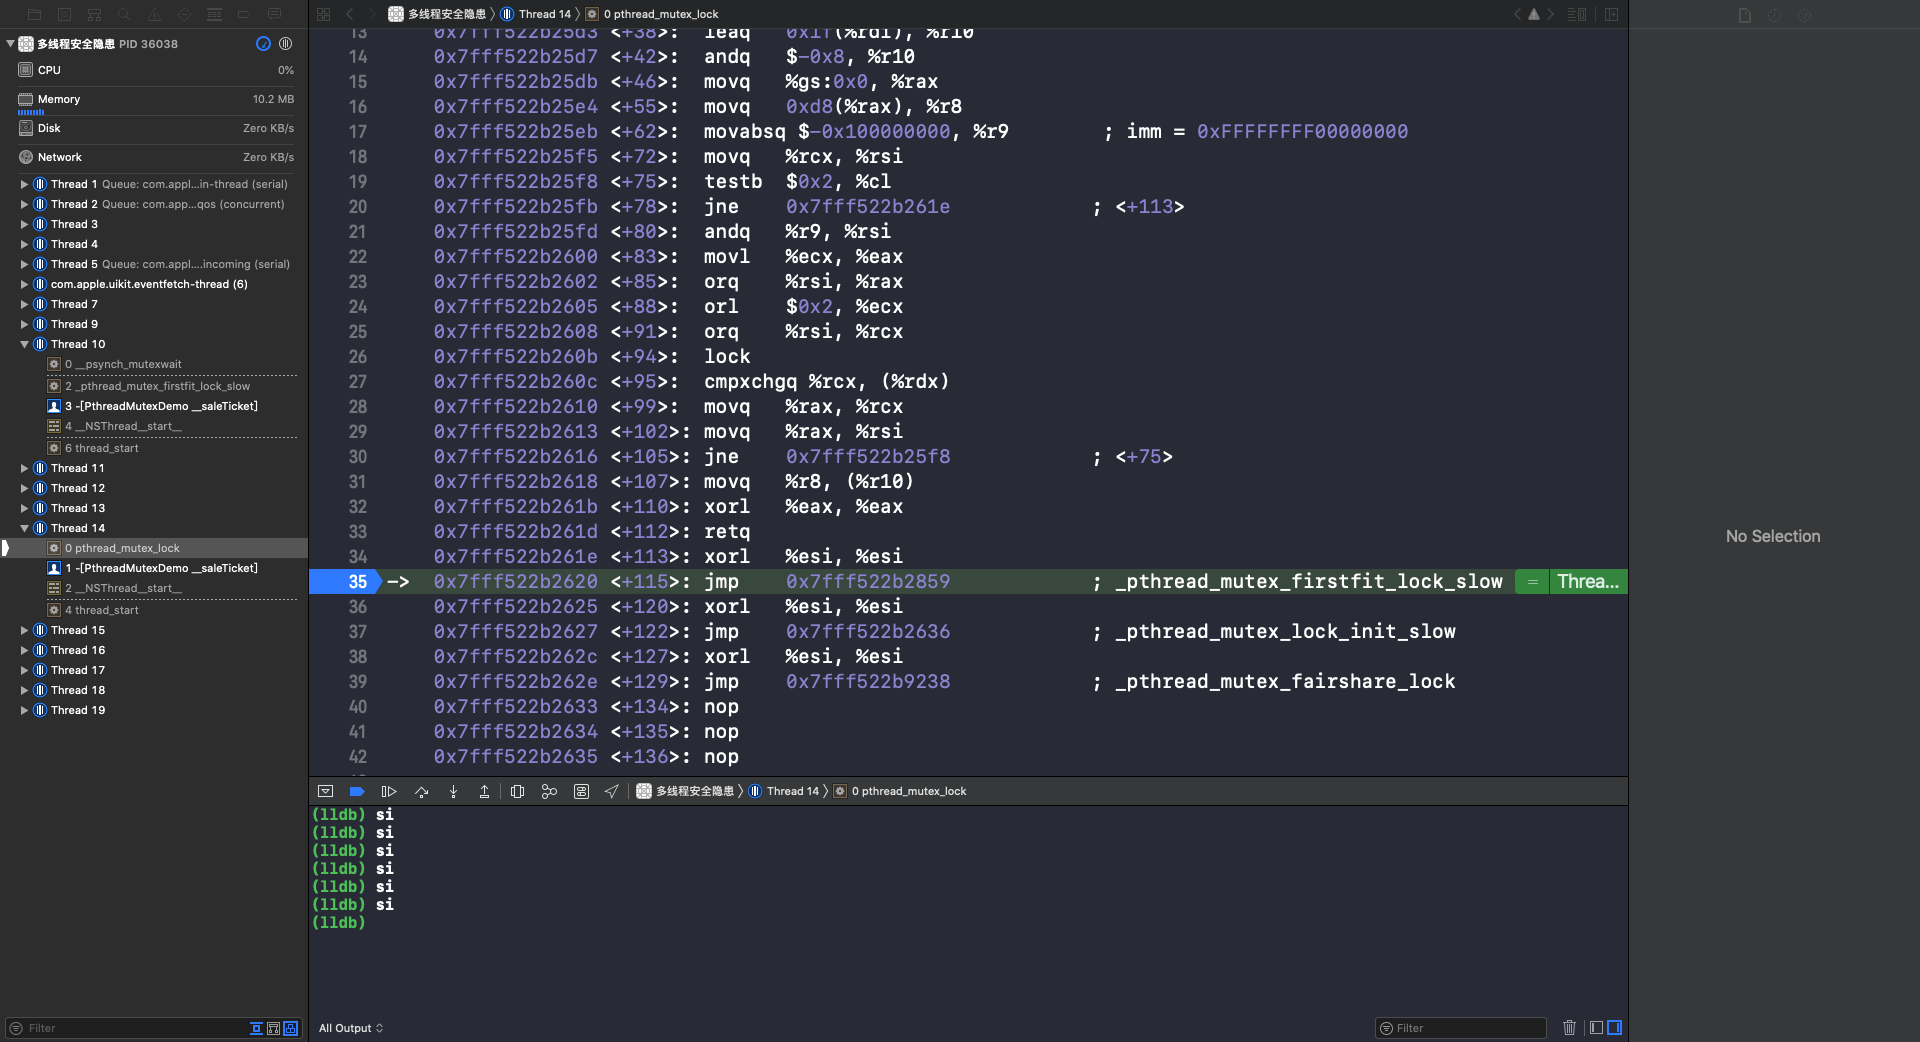
多线程21
重复使用 si 指令,进入 _pthread_mutex_firstfit_lock_wait 函数:
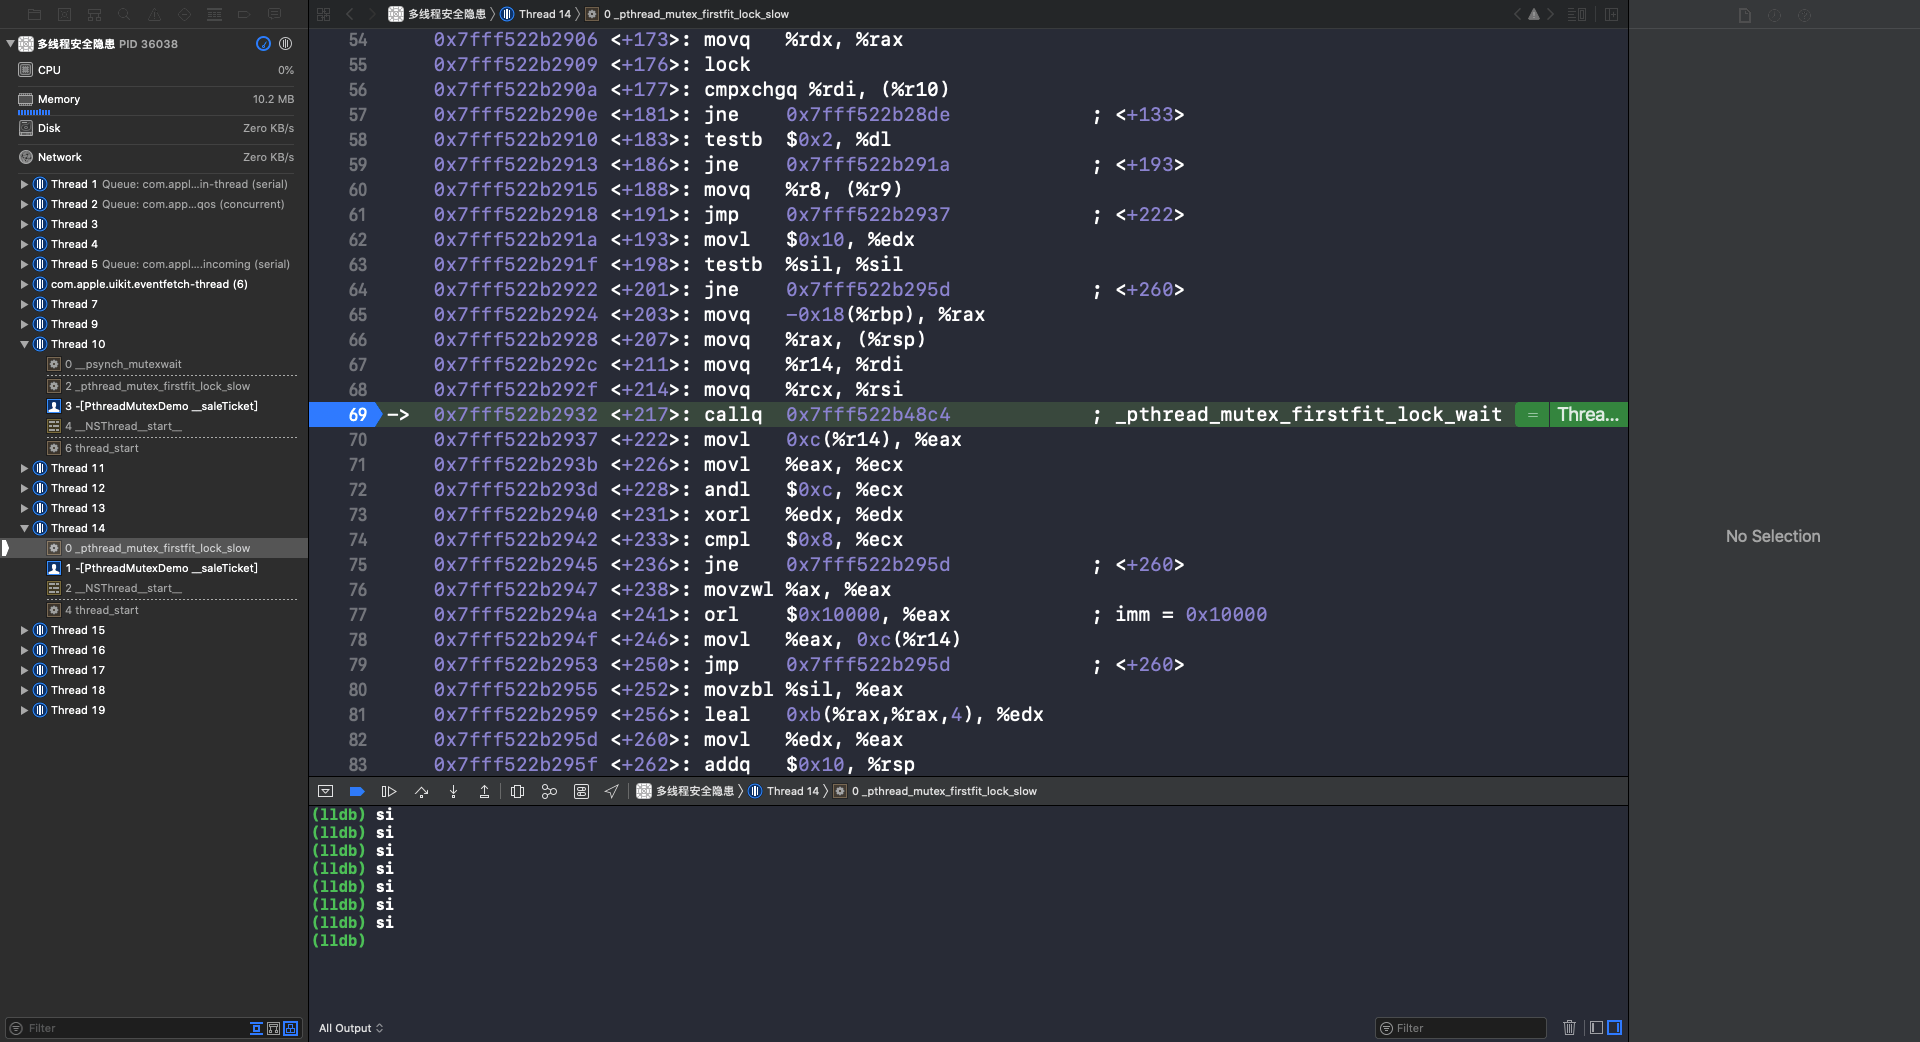
多线程22
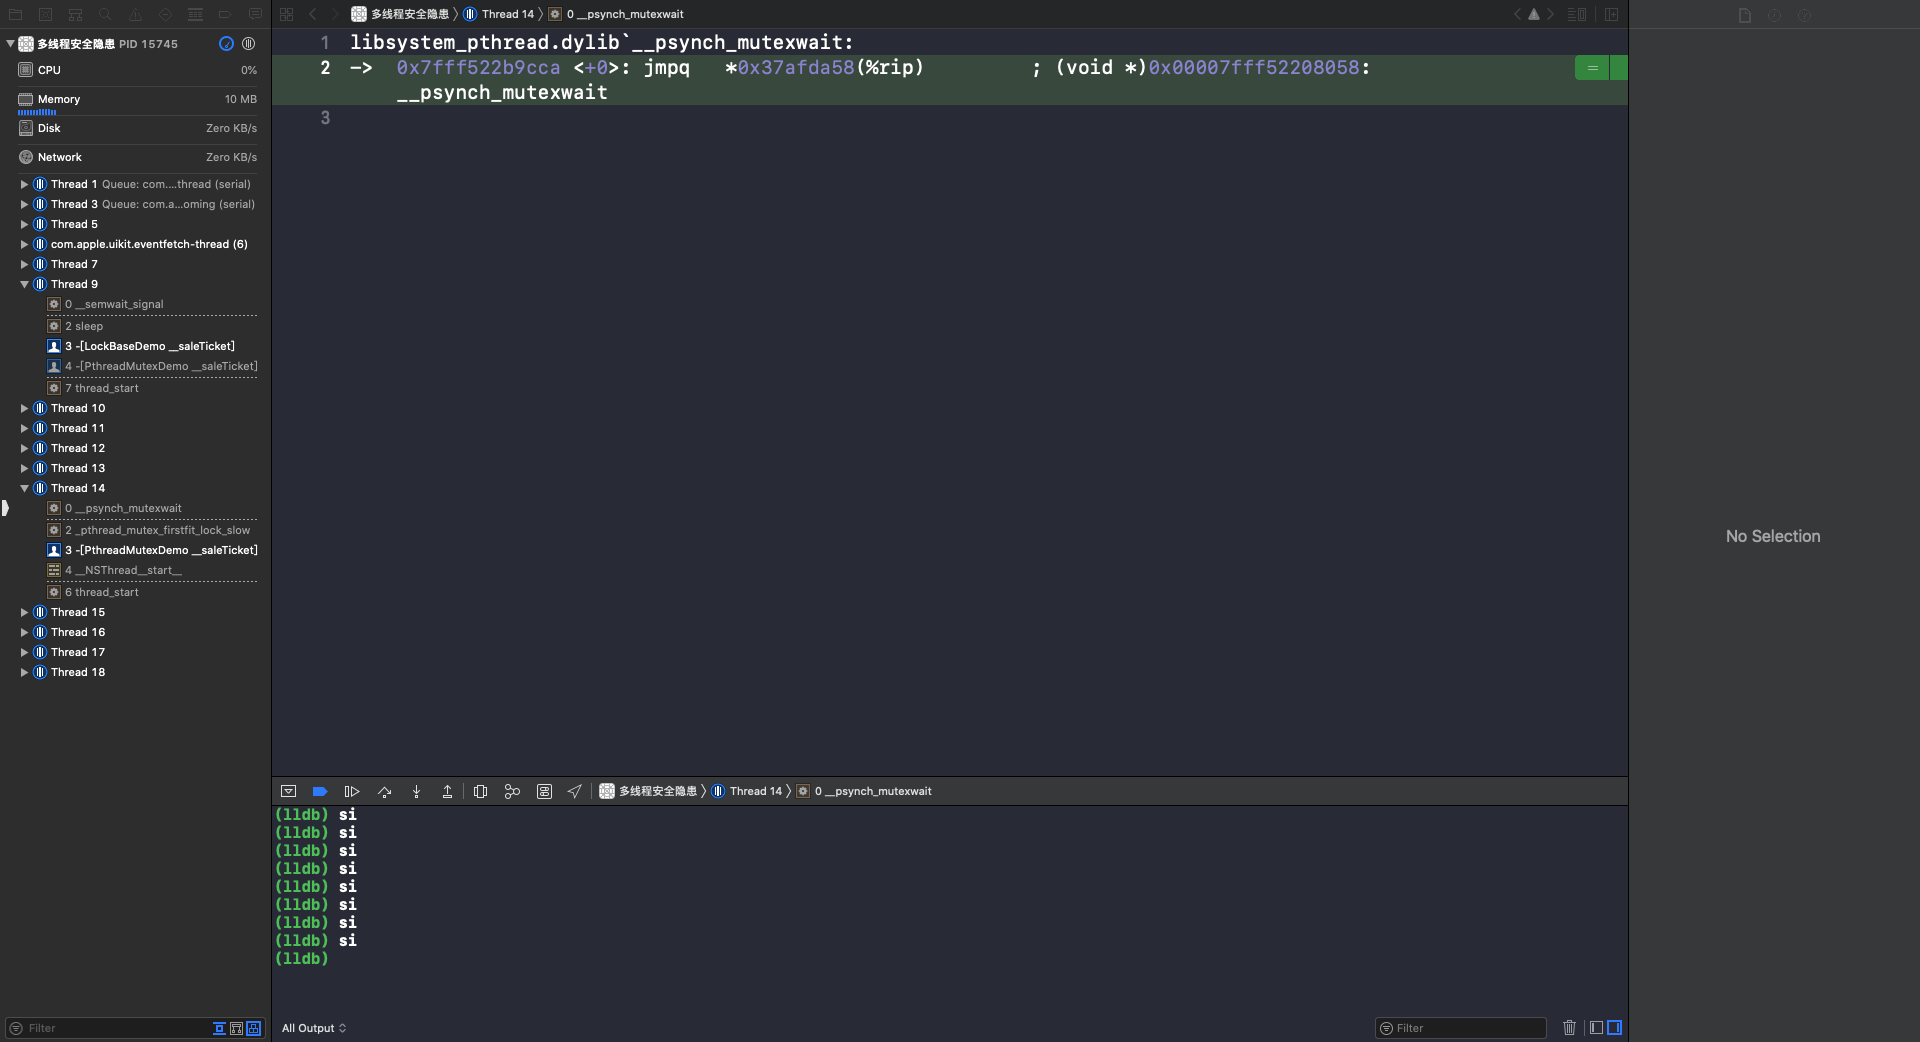
重复使用 si 指令,调用 __psynch_mutexwait
多线程23
使用 si 指令,进入 __psynch_mutexwait 函数:
多线程23
第4行 syscall 是系统调用,这个函数调用完成后,XCode 就又回到了OC代码页面,线程就进入休眠状态了(🔎互斥锁标志):
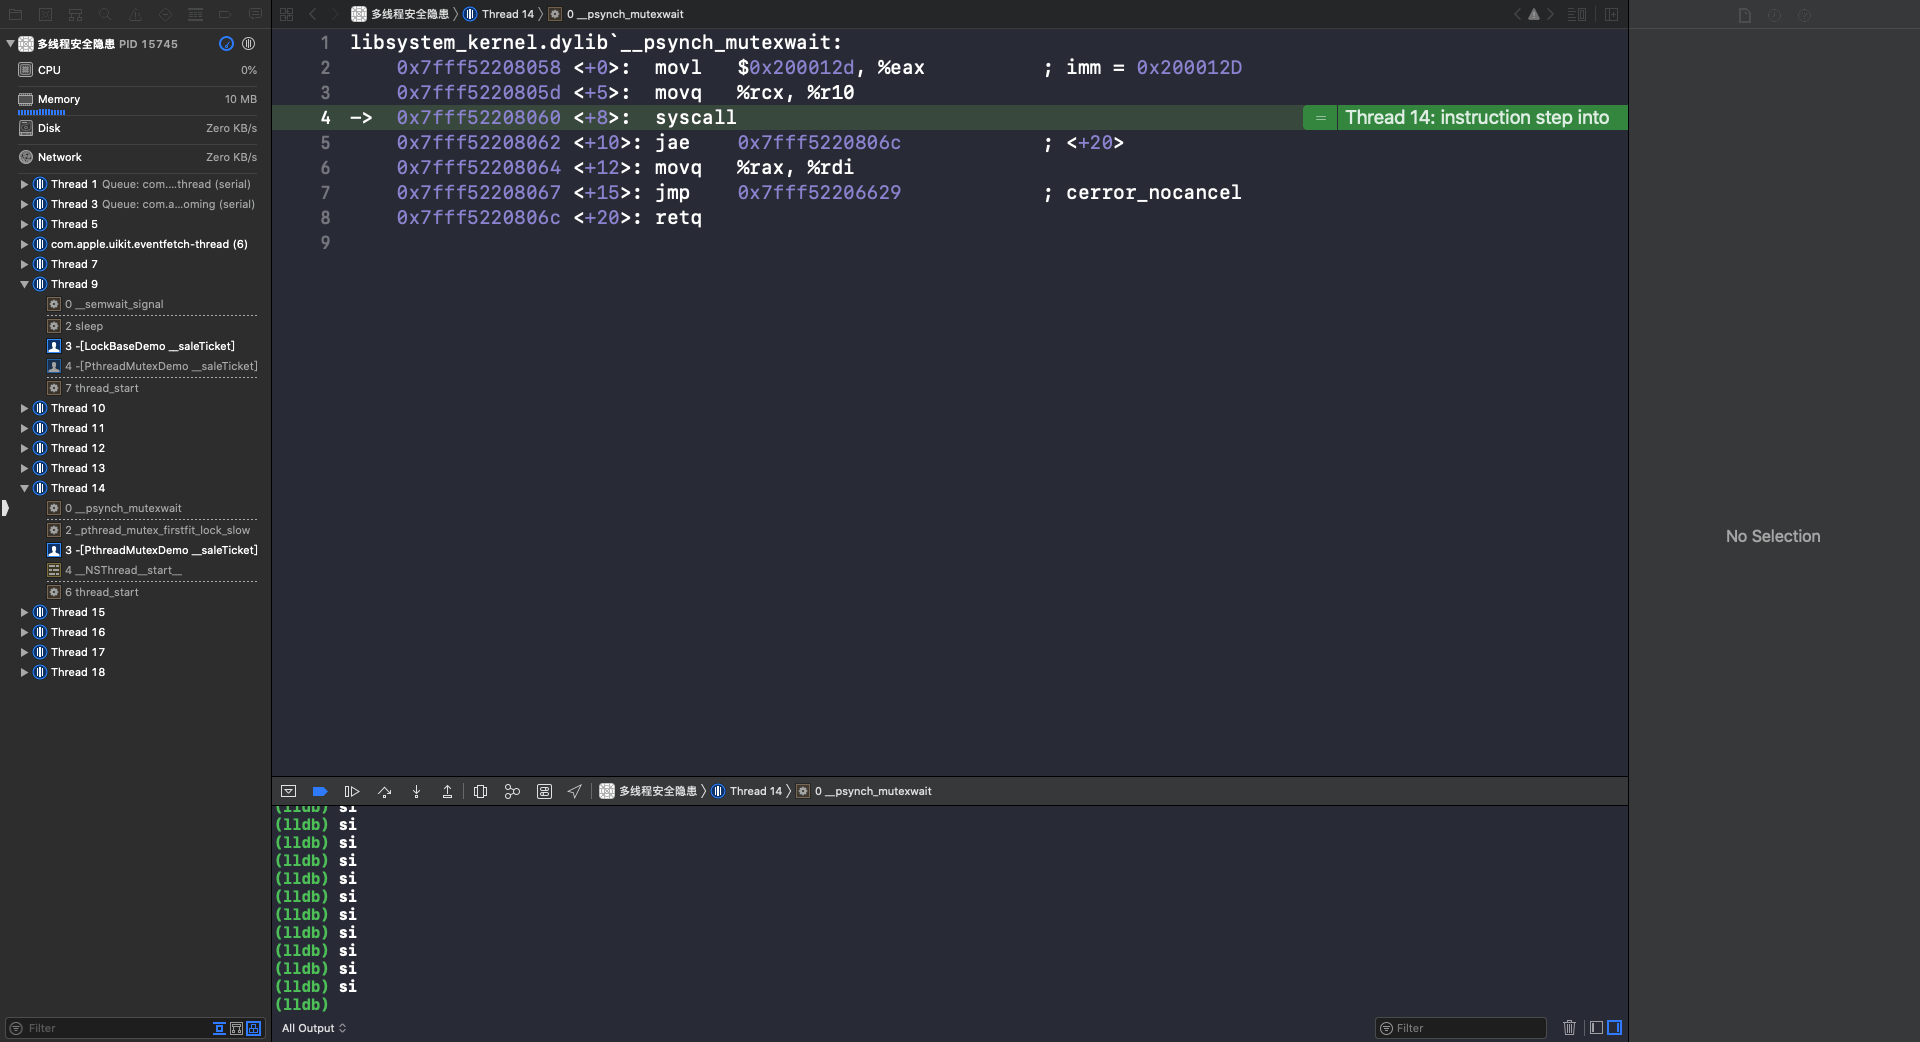
多线程23

从上面👆对 pthread_mutex 的汇编分析,可以看出 pthread_mutex 是一个互斥锁,也是一个低级锁。

pthread_mutex – 递归锁

初始化 pthread_mutex 递归锁:

1
2
3
4
5
6
7
8
9
10
11
12
13
14
15
- (instancetype)init
{
self = [super init];
if (self) {
/// 初始化属性
pthread_mutexattr_t attr;
pthread_mutexattr_init(&attr);
pthread_mutexattr_settype(&attr, PTHREAD_MUTEX_RECURSIVE);
/// 初始化锁
pthread_mutex_init(&_moneyMutex, &attr);
/// 销毁属性
pthread_mutexattr_destroy(&attr);
}
return self;
}

PTHREAD_MUTEX_RECURSIVE 类型定义的属性创建出来的 pthread_mutex 锁就是 pthread_mutex 递归锁。

死锁

在使用锁时如果出现了递归调用,或者在加锁后调用了一个使用同一把锁的方法,就会出现死锁的情况。与上面👆提到过的死锁的概念相同。

定义 PthreadMutexRecursiveDemo:

1
2
3
4
5
6
7
8
9
10
11
12
@interface PthreadMutexRecursiveDemo : LockBaseDemo
- (void)recursiveMutexTest;
@end
@implementation PthreadMutexRecursiveDemo
- (void)recursiveMutexTest
{
NSLog(@"%s", __func__);
/// 递归调用
[self recursiveMutexTest];
}
@end

打印结果:

1
2
3
4
5
-[PthreadMutexRecursiveDemo recursiveMutexTest]
......

死锁情况一:递归调用

1
2
3
4
5
6
7
8
9
10
11
12
13
14
15
16
17
18
19
20
21
22
23
24
25
26
27
28
29
30
31
32
33
34
@interface PthreadMutexRecursiveDemo : LockBaseDemo
- (void)recursiveMutexTest;
@end
@interface PthreadMutexRecursiveDemo()
@property (nonatomic, assign) pthread_mutex_t mutex;
@end
@implementation PthreadMutexRecursiveDemo
- (instancetype)init
{
self = [super init];
if (self) {
pthread_mutex_init(&_mutex, NULL);
}
return self;
}
- (void)recursiveMutexTest
{
pthread_mutex_lock(&_mutex);
NSLog(@"%s", __func__);
/// 递归调用
[self recursiveMutexTest];
pthread_mutex_unlock(&_mutex);
}
- (void)dealloc
{
pthread_mutex_destroy(&_mutex);
}
@end

打印结果:

1
-[PthreadMutexRecursiveDemo recursiveMutexTest]

可以看到打印结果里只有一条打印信息,这是因为加锁后再次调用 -(void)recursiveMutexTest 方法,会发现 _mutex 已经上锁了,进入休眠等待解锁。

死锁情况二:函数间互相调用

1
2
3
4
5
6
7
8
9
10
11
12
13
14
15
16
17
18
19
20
21
22
23
24
25
26
27
28
29
30
31
32
33
34
35
36
37
38
39
40
41
42
43
@interface PthreadMutexRecursiveDemo : LockBaseDemo
- (void)recursiveMutexTest;
@end
@interface PthreadMutexRecursiveDemo()
@property (nonatomic, assign) pthread_mutex_t mutex;
@end
@implementation PthreadMutexRecursiveDemo
- (instancetype)init
{
self = [super init];
if (self) {
pthread_mutex_init(&_mutex, NULL);
}
return self;
}
- (void)recursiveMutexTest
{
pthread_mutex_lock(&_mutex);
NSLog(@"%s", __func__);
/// 递归调用
[self recursiveMutexTest2];
pthread_mutex_unlock(&_mutex);
}
- (void)recursiveMutexTest2
{
pthread_mutex_lock(&_mutex);
NSLog(@"%s", __func__);
pthread_mutex_unlock(&_mutex);
}
- (void)dealloc
{
pthread_mutex_destroy(&_mutex);
}
@end

打印结果:

1
-[PthreadMutexRecursiveDemo recursiveMutexTest]

可以看到打印结果里只有一条打印信息,这是因为两个方法使用的是同一把锁,在 - (void)recursiveMutexTest 方法加锁后再去调用 - (void)recursiveMutexTest2 方法时,会发现 _mutex 已经上锁了,进入休眠等待解锁。

递归锁

因为递归锁允许在同一个线程里重复加锁,所以递归锁可以解决上面出现的死锁情况。

解决死锁情况一:递归调用

1
2
3
4
5
6
7
8
9
10
11
12
13
14
15
16
17
18
19
20
21
22
23
24
25
26
27
28
29
30
31
32
33
34
35
36
37
38
39
40
41
42
43
44
45
46
@interface PthreadMutexRecursiveDemo : LockBaseDemo
- (void)recursiveMutexTest;
@end
@interface PthreadMutexRecursiveDemo()
@property (nonatomic, assign) pthread_mutex_t mutex;
@end
@implementation PthreadMutexRecursiveDemo
- (void)initMutex:(pthread_mutex_t *)mutex
{
/// 初始化属性
pthread_mutexattr_t attr;
pthread_mutexattr_init(&attr);
pthread_mutexattr_settype(&attr, PTHREAD_MUTEX_RECURSIVE);
/// 初始化锁
pthread_mutex_init(mutex, &attr);
/// 销毁属性
pthread_mutexattr_destroy(&attr);
}
- (instancetype)init
{
self = [super init];
if (self) {
[self initMutex:&_mutex];
}
return self;
}
- (void)recursiveMutexTest
{
pthread_mutex_lock(&_mutex);
NSLog(@"%s", __func__);
/// 递归调用
[self recursiveMutexTest];
pthread_mutex_unlock(&_mutex);
}
- (void)dealloc
{
pthread_mutex_destroy(&_mutex);
}
@end

打印结果:

1
2
3
4
5
-[PthreadMutexRecursiveDemo recursiveMutexTest]
......

解决死锁情况二:函数间互相调用

1
2
3
4
5
6
7
8
9
10
11
12
13
14
15
16
17
18
19
20
21
22
23
24
25
26
27
28
29
30
31
32
33
34
35
36
37
38
39
40
41
42
43
44
45
46
47
48
49
50
51
52
53
54
55
56
@interface PthreadMutexRecursiveDemo : LockBaseDemo
- (void)recursiveMutexTest;
@end
@interface PthreadMutexRecursiveDemo()
@property (nonatomic, assign) pthread_mutex_t mutex;
@end
@implementation PthreadMutexRecursiveDemo
- (void)initMutex:(pthread_mutex_t *)mutex
{
/// 初始化属性
pthread_mutexattr_t attr;
pthread_mutexattr_init(&attr);
pthread_mutexattr_settype(&attr, PTHREAD_MUTEX_RECURSIVE);
/// 初始化锁
pthread_mutex_init(mutex, &attr);
/// 销毁属性
pthread_mutexattr_destroy(&attr);
}
- (instancetype)init
{
self = [super init];
if (self) {
[self initMutex:&_mutex];
}
return self;
}
- (void)recursiveMutexTest
{
pthread_mutex_lock(&_mutex);
NSLog(@"%s", __func__);
/// 递归调用
[self recursiveMutexTest2];
pthread_mutex_unlock(&_mutex);
}
- (void)recursiveMutexTest2
{
pthread_mutex_lock(&_mutex);
NSLog(@"%s", __func__);
pthread_mutex_unlock(&_mutex);
}
- (void)dealloc
{
pthread_mutex_destroy(&_mutex);
}
@end

打印结果:

1
2
-[PthreadMutexRecursiveDemo recursiveMutexTest]
-[PthreadMutexRecursiveDemo recursiveMutexTest2]

使用递归锁后,死锁的问题不存在了。但是,加了递归锁后的打印结果跟没加锁一样,这样被加锁的代码块还安全吗?其实,递归锁只可以在当前线程重复加锁。也就是说,当前线程加锁后,在当前线程再次调用 - (void)recursiveMutexTest 方法还可以重复加锁,而其它线程在此时调用 - (void)recursiveMutexTest 方法时判断到已经加过锁了就不再加锁了,会进入休眠等待解锁。

pthread_mutex – 条件

相关API

1
2
3
4
5
6
7
8
9
10
11
12
13
14
15
16
/// 初始化锁
pthread_mutex_t mutex;
/// NULL代表使用默认属性
pthread_mutex_init(&mutex, NULL);
/// 初始化条件
pthread_cond_t condition;
pthread_cond_init(&condition, NULL);
/// 等待条件(进入休眠,放开mutex;被唤醒后,会再次对mutex加锁)
pthread_cond_wait(&condition, &mutex);
/// 激活一个等待该条件的线程
pthread_cond_signal(&condition);
/// 激活所有等待该条件的线程
pthread_cond_broadcast(&condition);
/// 销毁资源
pthread_mutex_destroy(&mutex);
pthread_cond_destroy(&condition);

应用场景

1
2
3
4
5
6
7
8
9
10
11
12
13
14
15
16
17
18
19
20
21
22
23
24
25
26
27
28
29
30
31
32
33
34
35
36
37
38
39
40
41
42
43
44
45
46
47
48
49
50
51
52
53
54
55
56
57
58
59
60
61
62
63
64
65
66
67
68
69
70
71
72
73
74
75
76
77
78
79
80
81
82
83
84
85
86
#import <pthread.h>
@interface PthreadMutexCondDemo()
@property (nonatomic, assign) pthread_mutex_t mutex;
@property (nonatomic, assign) pthread_cond_t cond;
@property (nonatomic, strong) NSMutableArray *data;
@end
@implementation PthreadMutexCondDemo
- (void)initMutex:(pthread_mutex_t *)mutex cond:(pthread_cond_t *)cond
{
/// 初始化属性
pthread_mutexattr_t attr;
pthread_mutexattr_init(&attr);
pthread_mutexattr_settype(&attr, PTHREAD_MUTEX_RECURSIVE);
/// 初始化锁
pthread_mutex_init(mutex, &attr);
/// 销毁属性
pthread_mutexattr_destroy(&attr);
/// 初始化条件
pthread_cond_init(cond, NULL);
}
- (instancetype)init
{
self = [super init];
if (self) {
[self initMutex:&_mutex cond:&_cond];
self.data = [NSMutableArray array];
}
return self;
}
- (void)otherTest
{
[[[NSThread alloc] initWithTarget:self selector:@selector(remove) object:nil] start];
sleep(2.);
[[[NSThread alloc] initWithTarget:self selector:@selector(add) object:nil] start];
}
/// 线程1
- (void)remove
{
pthread_mutex_lock(&_mutex);
NSLog(@"%s, 上锁", __func__);
if (self.data.count == 0) {
NSLog(@"%s, 等待信号", __func__);
pthread_cond_wait(&_cond, &_mutex);
NSLog(@"%s, 收到信号", __func__);
}
[self.data removeLastObject];
NSLog(@"%s, 删除", __func__);
pthread_mutex_unlock(&_mutex);
NSLog(@"%s, 解锁", __func__);
}
/// 线程2
- (void)add
{
pthread_mutex_lock(&_mutex);
NSLog(@"%s, 上锁", __func__);
[self.data addObject:@"test"];
NSLog(@"%s, 添加", __func__);
pthread_cond_signal(&_cond);
NSLog(@"%s, 发送信号", __func__);
pthread_mutex_unlock(&_mutex);
NSLog(@"%s, 解锁", __func__);
}
- (void)dealloc
{
pthread_mutex_destroy(&_mutex);
pthread_cond_destroy(&_cond);
}
@end

打印结果:

1
2
3
4
5
6
7
8
9
00:35:21.182042+0800 多线程安全隐患[7160:142356] -[PthreadMutexCondDemo remove], 上锁
00:35:21.182158+0800 多线程安全隐患[7160:142356] -[PthreadMutexCondDemo remove], 等待信号
00:35:23.182238+0800 多线程安全隐患[7160:142386] -[PthreadMutexCondDemo add], 上锁
00:35:23.182447+0800 多线程安全隐患[7160:142386] -[PthreadMutexCondDemo add], 添加
00:35:23.182614+0800 多线程安全隐患[7160:142386] -[PthreadMutexCondDemo add], 发送信号
00:35:23.182700+0800 多线程安全隐患[7160:142386] -[PthreadMutexCondDemo add], 解锁
00:35:23.182709+0800 多线程安全隐患[7160:142356] -[PthreadMutexCondDemo remove], 收到信号
00:35:23.182772+0800 多线程安全隐患[7160:142356] -[PthreadMutexCondDemo remove], 删除
00:35:23.182835+0800 多线程安全隐患[7160:142356] -[PthreadMutexCondDemo remove], 解锁

pthread_cond_wait() 方法调用后,线程1会解锁并进入等待消息状态(休眠)。线程2监听到 pthread_mutex_t 锁已经解锁开始正常执行,添加完数据后发送消息。线程1在收到消息后会判断 pthread_mutex_t 锁是否已经上锁,如果已经上锁了就继续等待其解锁(休眠),一旦解锁了(线程2)就立即向下执行下面的代码。

因为应用场景是不同线程的调用,所以初始化属性时传入的第二个的参数 PTHREAD_MUTEX_RECURSIVE 也可以是 PTHREAD_MUTEX_NORMAL

pthread_mutex 条件锁的应用场景比较少见,就算遇到了类似的场景,估计也不会选择用这种方式解决。它主要是解决优先及问题,上面👆代码中为了不对空数组进行删除操作,给锁添加了条件,保证了数组的删除操作在添加完数据后执行。

NSLock

NSLock 是对 mutex 普通锁的封装。

相关API

1
2
3
4
5
6
/// 初始化锁
NSLock *lock = [[NSLock alloc] init];
/// 加锁
[lock lock];
/// 解锁
[lock unlock];

应用

1
2
3
4
5
6
7
8
9
10
11
12
13
14
15
16
17
18
19
20
21
22
23
24
25
26
27
28
29
30
31
32
33
34
35
36
37
38
39
40
41
42
43
44
45
46
47
48
@interface NSLockDemo()
@property (nonatomic, strong) NSLock *moneyLock;
@property (nonatomic, strong) NSLock *ticketLock;
@end
@implementation NSLockDemo
- (instancetype)init
{
self = [super init];
if (self) {
self.moneyLock = [[NSLock alloc] init];
self.ticketLock = [[NSLock alloc] init];
}
return self;
}
/// 取钱
- (void)__drawMoney
{
[self.moneyLock lock];
[super __drawMoney];
[self.moneyLock unlock];
}
/// 存钱
- (void)__saveManey
{
[self.moneyLock lock];
[super __saveManey];
[self.moneyLock unlock];
}
/// 卖票
- (void)__saleTicket
{
[self.ticketLock lock];
[super __saleTicket];
[self.ticketLock unlock];
}
@end

打印结果同 OSSpinLock。

NSLock 实现原理

在 GNUstep 里的 source/Foundation 下面可以找到 NSLock.m 文件,在该文件里可以找到 NSLock 的具体实现:

1
2
3
4
5
6
7
8
9
10
11
12
13
14
15
16
17
18
19
20
21
22
23
24
25
26
27
28
29
30
31
32
33
34
35
36
37
38
39
40
41
42
43
44
45
46
47
48
49
50
51
52
53
54
55
56
57
58
59
60
61
62
63
64
65
66
67
68
69
70
71
72
73
74
75
76
77
78
79
80
81
82
83
84
85
86
87
88
89
90
......
/// NSLock.h文件(Foundation)
@protocol NSLocking
- (void)lock;
- (void)unlock;
@end
@interface NSLock : NSObject <NSLocking> {
@private
void *_priv;
}
/// 尝试加锁,返回YES表示加锁成功
- (BOOL)tryLock;
/// 尝试加锁,返回YES表示加锁成功,在终止时间(limt)前处于加锁状态,到了时间后,会自动解锁
- (BOOL)lockBeforeDate:(NSDate *)limit;
@property (nullable, copy) NSString *name API_AVAILABLE(macos(10.5), ios(2.0), watchos(2.0), tvos(9.0));
@end
/// NSLock.m文件(GNUstep)
@implementation NSLock
+ (id) allocWithZone: (NSZone*)z
{
if (self == baseLockClass && YES == traceLocks)
{
return class_createInstance(tracedLockClass, 0);
}
return class_createInstance(self, 0);
}
+ (void) initialize
{
static BOOL beenHere = NO;
if (beenHere == NO)
{
beenHere = YES;
pthread_mutexattr_init(&attr_normal);
pthread_mutexattr_settype(&attr_normal, PTHREAD_MUTEX_NORMAL);
pthread_mutexattr_init(&attr_reporting);
pthread_mutexattr_settype(&attr_reporting, PTHREAD_MUTEX_ERRORCHECK);
pthread_mutexattr_init(&attr_recursive);
pthread_mutexattr_settype(&attr_recursive, PTHREAD_MUTEX_RECURSIVE);
pthread_mutex_init(&deadlock, &attr_normal);
pthread_mutex_lock(&deadlock);
baseConditionClass = [NSCondition class];
baseConditionLockClass = [NSConditionLock class];
baseLockClass = [NSLock class];
baseRecursiveLockClass = [NSRecursiveLock class];
tracedConditionClass = [GSTracedCondition class];
tracedConditionLockClass = [GSTracedConditionLock class];
tracedLockClass = [GSTracedLock class];
tracedRecursiveLockClass = [GSTracedRecursiveLock class];
untracedConditionClass = [GSUntracedCondition class];
untracedConditionLockClass = [GSUntracedConditionLock class];
untracedLockClass = [GSUntracedLock class];
untracedRecursiveLockClass = [GSUntracedRecursiveLock class];
}
}
MDEALLOC
MDESCRIPTION
MFINALIZE
/* Use an error-checking lock. This is marginally slower, but lets us throw
* exceptions when incorrect locking occurs.
*/
- (id) init
{
if (nil != (self = [super init]))
{
if (0 != pthread_mutex_init(&_mutex, &attr_reporting))
{
DESTROY(self);
}
}
return self;
}
......

NSRecursiveLock

NSRecursiveLock 是对 mutex 递归锁的封装,API 跟 NSLock 基本一致。

常用API

1
2
3
4
5
6
/// 初始化
NSRecursiveLock *lock = [[NSRecursiveLock alloc] init];
/// 加锁
[lock lock];
/// 解锁
[lock unlock];

应用 - 递归调用

1
2
3
4
5
6
7
8
9
10
11
12
13
14
15
16
17
18
19
20
21
22
23
24
25
26
@interface NSRecursiveLockDemo()
@property (nonatomic, strong) NSRecursiveLock *lock;
@end
@implementation NSRecursiveLockDemo
- (instancetype)init
{
self = [super init];
if (self) {
self.lock = [[NSRecursiveLock alloc] init];
}
return self;
}
- (void)test
{
[self.lock lock];
NSLog(@"%s", __func__);
[self test];
[self.lock unlock];
}
@end

打印结果:

1
2
3
4
5
-[NSRecursiveLockDemo test]
......

应用 - 方法间调用

1
2
3
4
5
6
7
8
9
10
11
12
13
14
15
16
17
18
19
20
21
22
23
24
25
26
27
28
29
30
31
32
33
34
35
@interface NSRecursiveLockDemo()
@property (nonatomic, strong) NSRecursiveLock *lock;
@end
@implementation NSRecursiveLockDemo
- (instancetype)init
{
self = [super init];
if (self) {
self.lock = [[NSRecursiveLock alloc] init];
}
return self;
}
- (void)test
{
[self.lock lock];
NSLog(@"%s", __func__);
[self test2];
[self.lock unlock];
}
- (void)test2
{
[self.lock lock];
NSLog(@"%s", __func__);
[self.lock unlock];
}
@end

打印结果:

1
2
-[NSRecursiveLockDemo test]
-[NSRecursiveLockDemo test2]

NSRecursiveLock 实现原理

在 GNUstep 里的 source/Foundation 下面可以找到 NSLock.m 文件,在该文件里可以找到 NSRecursiveLock 的具体实现:

1
2
3
4
5
6
7
8
9
10
11
12
13
14
15
16
17
18
19
20
21
22
23
24
25
26
27
28
29
30
31
32
33
34
35
36
37
38
39
40
41
42
43
44
45
46
47
48
49
50
51
52
53
54
55
56
57
58
59
60
61
62
63
64
65
/// NSLock.h文件(Foundation)
@protocol NSLocking
- (void)lock;
- (void)unlock;
@end
@interface NSRecursiveLock : NSObject <NSLocking> {
@private
void *_priv;
}
/// 尝试加锁,返回YES表示加锁成功
- (BOOL)tryLock;
/// 尝试加锁,返�������������������������YES表示加锁成功,在终止时间(limt)前处于加锁状态,到了终止时间会自动解锁
- (BOOL)lockBeforeDate:(NSDate *)limit;
@property (nullable, copy) NSString *name API_AVAILABLE(macos(10.5), ios(2.0), watchos(2.0), tvos(9.0));
@end
/// NSLock.m文件(GNUstep)
static pthread_mutexattr_t attr_recursive;
@implementation NSRecursiveLock
+ (id) allocWithZone: (NSZone*)z
{
if (self == baseRecursiveLockClass && YES == traceLocks)
{
return class_createInstance(tracedRecursiveLockClass, 0);
}
return class_createInstance(self, 0);
}
+ (void) initialize
{
[NSLock class]; // Ensure mutex attributes are set up.
}
MDEALLOC
MDESCRIPTION
MFINALIZE
- (id) init
{
if (nil != (self = [super init]))
{
if (0 != pthread_mutex_init(&_mutex, &attr_recursive))
{
DESTROY(self);
}
}
return self;
}
MISLOCKED
MLOCK
MLOCKBEFOREDATE
MNAME
MSTACK
MTRYLOCK
MUNLOCK
@end

因为 NSRecursiveLock 是在 lock.m 文件定义的,所以 - (id)init 方法里的 attr_recursive 属性是在 + (void)initialize 方法👆里创建好的:

1
2
pthread_mutexattr_init(&attr_recursive);
pthread_mutexattr_settype(&attr_recursive, PTHREAD_MUTEX_RECURSIVE);

NSCondition

NSCondition 是对 mutex 和 cond 的封装。

相关API

1
2
3
4
5
6
7
8
9
10
/// 初始化
NSCondition *condition = [[NSCondition alloc] init];
/// 加锁
[condition lock];
/// 解锁
[condition unlock];
/// 等待
[condition wait];
/// 发信号
[condition signal];

应用

1
2
3
4
5
6
7
8
9
10
11
12
13
14
15
16
17
18
19
20
21
22
23
24
25
26
27
28
29
30
31
32
33
34
35
36
37
38
39
40
41
42
43
44
45
46
47
48
49
50
51
52
53
54
55
56
57
58
59
@interface NSConditionDemo()
@property (nonatomic, strong) NSCondition *condition;
@property (nonatomic, strong) NSMutableArray *data;
@end
@implementation NSConditionDemo
- (instancetype)init
{
self = [super init];
if (self) {
self.condition = [[NSCondition alloc] init];
self.data = [NSMutableArray array];
}
return self;
}
- (void)otherTest
{
[[[NSThread alloc] initWithTarget:self selector:@selector(remove) object:nil] start];
sleep(2.);
[[[NSThread alloc] initWithTarget:self selector:@selector(add) object:nil] start];
}
- (void)remove
{
[self.condition lock];
NSLog(@"%s, 上锁", __func__);
if (self.data.count == 0) {
NSLog(@"%s, 等待信号", __func__);
[self.condition wait];
NSLog(@"%s, 收到信号", __func__);
}
[self.data removeLastObject];
NSLog(@"%s, 删除", __func__);
[self.condition unlock];
NSLog(@"%s, 解锁", __func__);
}
- (void)add
{
[self.condition lock];
NSLog(@"%s, 上锁", __func__);
[self.data addObject:@"test"];
NSLog(@"%s, 添加", __func__);
[self.condition signal];
NSLog(@"%s, 发送信号", __func__);
[self.condition unlock];
NSLog(@"%s, 解锁", __func__);
}
@end

打印结果:

1
2
3
4
5
6
7
8
9
14:30:32.001876+0800 多线程安全隐患[26696:271952] -[NSConditionDemo remove], 上锁
14:30:32.002080+0800 多线程安全隐患[26696:271952] -[NSConditionDemo remove], 等待信号
14:30:34.002046+0800 多线程安全隐患[26696:271974] -[NSConditionDemo add], 上锁
14:30:34.002227+0800 多线程安全隐患[26696:271974] -[NSConditionDemo add], 添加
14:30:34.002313+0800 多线程安全隐患[26696:271974] -[NSConditionDemo add], 发送信号
14:30:34.002384+0800 多线程安全隐患[26696:271974] -[NSConditionDemo add], 解锁
14:30:34.002395+0800 多线程安全隐患[26696:271952] -[NSConditionDemo remove], 收到信号
14:30:34.002470+0800 多线程安全隐患[26696:271952] -[NSConditionDemo remove], 删除
14:30:34.002556+0800 多线程安全隐患[26696:271952] -[NSConditionDemo remove], 解锁

NSCondition 实现原理

在 GNUstep 里的 source/Foundation 下面可以找到 NSLock.m 文件,在该文件里可以找到 NSRecursiveLock 的具体实现:

1
2
3
4
5
6
7
8
9
10
11
12
13
14
15
16
17
18
19
20
21
22
23
24
25
26
27
28
29
30
31
32
33
34
35
36
37
38
39
40
41
42
43
44
45
46
47
48
49
50
51
52
53
54
55
56
57
58
59
60
61
62
63
64
65
66
67
68
69
70
71
72
73
74
75
76
77
78
79
80
81
82
83
84
85
86
87
88
89
90
91
92
93
94
95
96
97
98
99
100
101
102
103
104
105
106
107
108
109
110
111
112
113
114
115
116
117
118
119
120
121
122
123
124
125
/// NSLock.h文件(Foundation)
@protocol NSLocking
- (void)lock;
- (void)unlock;
@end
@interface NSCondition : NSObject <NSLocking> {
@private
void *_priv;
}
/// 添加等待,收到了 signal 就会唤醒线程
- (void)wait;
/// 等待条件(进入休眠,解锁;被唤醒后,加锁)。在终止时间(limt)前收到了 signal 就会唤醒线程。当到达终止时间的时候,即使没有收到 signal,也会直接唤醒线程
- (BOOL)waitUntilDate:(NSDate *)limit;
/// 激活一个等待该条件的线程
- (void)signal;
/// 激活所有等待该条件的线程
- (void)broadcast;
@property (nullable, copy) NSString *name API_AVAILABLE(macos(10.5), ios(2.0), watchos(2.0), tvos(9.0));
@end
/// NSLock.m文件(GNUstep)
@implementation NSCondition
+ (id) allocWithZone: (NSZone*)z
{
if (self == baseConditionClass && YES == traceLocks)
{
return class_createInstance(tracedConditionClass, 0);
}
return class_createInstance(self, 0);
}
+ (void) initialize
{
[NSLock class]; // Ensure mutex attributes are set up.
}
- (void) broadcast
{
pthread_cond_broadcast(&_condition);
}
MDEALLOC
MDESCRIPTION
- (void) finalize
{
pthread_cond_destroy(&_condition);
pthread_mutex_destroy(&_mutex);
}
- (id) init
{
if (nil != (self = [super init]))
{
if (0 != pthread_cond_init(&_condition, NULL))
{
DESTROY(self);
}
else if (0 != pthread_mutex_init(&_mutex, &attr_reporting))
{
pthread_cond_destroy(&_condition);
DESTROY(self);
}
}
return self;
}
MISLOCKED
MLOCK
MLOCKBEFOREDATE
MNAME
- (void) signal
{
pthread_cond_signal(&_condition);
}
MSTACK
MTRYLOCK
MUNLOCK
- (void) wait
{
pthread_cond_wait(&_condition, &_mutex);
}
- (BOOL) waitUntilDate: (NSDate*)limit
{
NSTimeInterval ti = [limit timeIntervalSince1970];
double secs, subsecs;
struct timespec timeout;
int retVal = 0;
// Split the float into seconds and fractions of a second
subsecs = modf(ti, &secs);
timeout.tv_sec = secs;
// Convert fractions of a second to nanoseconds
timeout.tv_nsec = subsecs * 1e9;
/* NB. On timeout the lock is still held even through condition is not met
*/
retVal = pthread_cond_timedwait(&_condition, &_mutex, &timeout);
if (retVal == 0)
{
return YES;
}
if (retVal == ETIMEDOUT)
{
return NO;
}
if (retVal == EINVAL)
{
NSLog(@"Invalid arguments to pthread_cond_timedwait");
}
return NO;
}
@end

NSConditionLock

NSConditionLock 是对 NSCondition 的进一步封装,可以设置具体的条件值。

相关API

1
2
3
4
5
6
/// 初始化锁,设置锁的条件1
NSConditionLock *conditionLock = [[NSConditionLock alloc] initWithCondition:1];
/// 如果条件为1就加锁
[conditionLock lockWhenCondition:1];
/// 解锁,并设置条件为2
[conditionLock unlockWithCondition:2];

应用

1
2
3
4
5
6
7
8
9
10
11
12
13
14
15
16
17
18
19
20
21
22
23
24
25
26
27
28
29
30
31
32
33
34
35
36
37
38
39
40
41
42
43
44
45
46
47
48
49
50
51
52
53
54
55
56
57
58
59
60
61
62
@interface NSConditionLockDemo()
@property (nonatomic, strong) NSConditionLock *conditionLock;
@property (nonatomic, strong) NSMutableArray *data;
@end
@implementation NSConditionLockDemo
- (instancetype)init
{
self = [super init];
if (self) {
self.conditionLock = [[NSConditionLock alloc] initWithCondition:1];
self.data = [NSMutableArray array];
}
return self;
}
- (void)otherTest
{
[[[NSThread alloc] initWithTarget:self selector:@selector(one) object:nil] start];
sleep(2.);
[[[NSThread alloc] initWithTarget:self selector:@selector(two) object:nil] start];
sleep(2.);
[[[NSThread alloc] initWithTarget:self selector:@selector(three) object:nil] start];
}
- (void)one
{
/// 如果条件等于1,继续往下执行
[self.conditionLock lockWhenCondition:1];
NSLog(@"1");
/// 解锁,设置条件为2
[self.conditionLock unlockWithCondition:2];
}
- (void)two
{
/// 如果条件等于2,继续往下执行
[self.conditionLock lockWhenCondition:2];
NSLog(@"2");
/// 解锁,设置条件为3
[self.conditionLock unlockWithCondition:3];
}
- (void)three
{
/// 如果条件等于3,继续往下执行
[self.conditionLock lockWhenCondition:3];
NSLog(@"3");
/// 解锁,设置条件为4
[self.conditionLock unlockWithCondition:4];
}
@end

打印结果:

1
2
3
16:04:40.425810+0800 多线程安全隐患[28831:334816] 1
16:04:42.426001+0800 多线程安全隐患[28831:334904] 2
16:04:44.426143+0800 多线程安全隐患[28831:334908] 3

可以看到 NSConditionLock 可以给线程之间设置优先级。

如果使用 -(void)lock 方法只会判断锁是否处于加锁状态,如果不是就直接加锁,不会判断条件。

NSConditionLock 实现原理

在 GNUstep 里的 source/Foundation 下面可以找到 NSLock.m 文件,在该文件里可以找到 NSConditionLock 的具体实现:

1
2
3
4
5
6
7
8
9
10
11
12
13
14
15
16
17
18
19
20
21
22
23
24
25
26
27
28
29
30
31
32
33
34
35
36
37
38
39
40
41
42
43
44
45
46
47
48
49
50
51
52
53
54
55
56
57
58
59
60
61
62
63
64
65
66
67
68
69
70
71
72
73
74
75
76
77
78
79
80
81
82
83
84
85
86
87
88
89
90
91
92
93
94
95
96
97
98
99
100
101
102
103
104
105
106
107
108
109
110
111
112
113
114
115
116
117
118
119
120
121
122
123
124
125
126
127
128
129
130
131
132
133
134
135
136
137
138
139
140
141
142
143
144
145
146
147
148
149
150
151
152
153
154
155
156
157
158
159
160
161
/// NSLock.h文件(Foundation)
@interface NSConditionLock : NSObject <NSLocking> {
@private
void *_priv;
}
/// 初始化
- (instancetype)initWithCondition:(NSInteger)condition NS_DESIGNATED_INITIALIZER;
/// 条件
@property (readonly) NSInteger condition;
/// 如果条件成立就加锁
- (void)lockWhenCondition:(NSInteger)condition;
/// 尝试加锁,成功返回YES
- (BOOL)tryLock;
/// 如果条件成立就尝试加锁,成功返回YES
- (BOOL)tryLockWhenCondition:(NSInteger)condition;
/// 解锁并设置条件
- (void)unlockWithCondition:(NSInteger)condition;
/// 在终止时间前加锁,成功返回YES
- (BOOL)lockBeforeDate:(NSDate *)limit;
/// 在终止时间前,如果条件成立就加锁
- (BOOL)lockWhenCondition:(NSInteger)condition beforeDate:(NSDate *)limit;
@property (nullable, copy) NSString *name API_AVAILABLE(macos(10.5), ios(2.0), watchos(2.0), tvos(9.0));
@end
/// NSLock.m文件(GNUstep)
@implementation NSConditionLock
+ (id) allocWithZone: (NSZone*)z
{
if (self == baseConditionLockClass && YES == traceLocks)
{
return class_createInstance(tracedConditionLockClass, 0);
}
return class_createInstance(self, 0);
}
+ (void) initialize
{
[NSLock class]; // Ensure mutex attributes are set up.
}
- (NSInteger) condition
{
return _condition_value;
}
- (void) dealloc
{
[_name release];
[_condition release];
[super dealloc];
}
- (id) init
{
return [self initWithCondition: 0];
}
- (id) initWithCondition: (NSInteger)value
{
if (nil != (self = [super init]))
{
if (nil == (_condition = [NSCondition new]))
{
DESTROY(self);
}
else
{
_condition_value = value;
[_condition setName:[NSString stringWithFormat: @"condition-for-lock-%p", self]];
}
}
return self;
}
- (BOOL) isLockedByCurrentThread
{
return [_condition isLockedByCurrentThread];
}
- (void) lock
{
[_condition lock];
}
- (BOOL) lockBeforeDate: (NSDate*)limit
{
return [_condition lockBeforeDate: limit];
}
- (void) lockWhenCondition: (NSInteger)value
{
[_condition lock];
while (value != _condition_value)
{
[_condition wait];
}
}
- (BOOL) lockWhenCondition: (NSInteger)condition_to_meet
beforeDate: (NSDate*)limitDate
{
if (NO == [_condition lockBeforeDate: limitDate])
{
return NO; // Not locked
}
if (condition_to_meet == _condition_value)
{
return YES; // Keeping the lock
}
while ([_condition waitUntilDate: limitDate])
{
if (condition_to_meet == _condition_value)
{
return YES; // Keeping the lock
}
}
[_condition unlock];
return NO; // Not locked
}
MNAME
MSTACK
- (BOOL) tryLock
{
return [_condition tryLock];
}
- (BOOL) tryLockWhenCondition: (NSInteger)condition_to_meet
{
if ([_condition tryLock])
{
if (condition_to_meet == _condition_value)
{
return YES; // KEEP THE LOCK
}
else
{
[_condition unlock];
}
}
return NO;
}
- (void) unlock
{
[_condition unlock];
}
- (void) unlockWithCondition: (NSInteger)value
{
_condition_value = value;
[_condition broadcast];
[_condition unlock];
}
@end

dispatch_semaphore

semaphore 叫做“信号量”。信号量的初始值,可以用来控制线程并发访问的最大数量。信号量的初始值为1,代表同时只允许1条线程访问资源,保证线程同步。

相关API

1
2
3
4
5
6
7
8
/// 初始化
dispatch_semaphore_t semaphore = dispatch_semaphore_create(5);
/// 如果信号量的值 >= 0,就让信号量的值减1,然后继续往下执行代码
/// 如果信号量的值 <= 0,就会休眠等待;当信号量的值变成 >0 时,就让信号量的值减1,然后继续往下执行代码
/// DISPATCH_TIME_FOREVER 表示一直在这里等待信号量变成 >0;DISPATCH_TIME_NOW 判断完后不管信号量的值是否 >0 都继续往下执行
dispatch_semaphore_wait(semaphore, DISPATCH_TIME_FOREVER);
/// 让信号量的值+1
dispatch_semaphore_signal(semaphore);

应用 - 控制最大并发数量

1
2
3
4
5
6
7
8
9
10
11
12
13
14
15
16
17
18
19
20
21
22
23
24
25
26
27
28
29
30
31
@interface SemaphoreDemo()
@property (nonatomic, strong) dispatch_semaphore_t semaphore;
@end
@implementation SemaphoreDemo
- (instancetype)init
{
self = [super init];
if (self) {
self.semaphore = dispatch_semaphore_create(5);
}
return self;
}
- (void)otherTest
{
for (int i=0; i < 20; i++) {
[[[NSThread alloc] initWithTarget:self selector:@selector(test) object:nil] start];
}
}
- (void)test
{
dispatch_semaphore_wait(self.semaphore, DISPATCH_TIME_FOREVER);
sleep(2);
NSLog(@"test - %@", [NSThread currentThread]);
dispatch_semaphore_signal(self.semaphore);
}
@end

打印结果:

1
2
3
4
5
6
7
8
9
10
11
12
13
14
15
16
17
18
19
20
10:16:19.552038+0800 多线程安全隐患[10797:47431] test - <NSThread: 0x600002deb640>{number = 6, name = (null)}
10:16:19.552041+0800 多线程安全隐患[10797:47434] test - <NSThread: 0x600002deb880>{number = 9, name = (null)}
10:16:19.552076+0800 多线程安全隐患[10797:47441] test - <NSThread: 0x600002deba40>{number = 16, name = (null)}
10:16:19.552043+0800 多线程安全隐患[10797:47433] test - <NSThread: 0x600002deb600>{number = 8, name = (null)}
10:16:19.552082+0800 多线程安全隐患[10797:47435] test - <NSThread: 0x600002deb8c0>{number = 10, name = (null)}
10:16:21.552319+0800 多线程安全隐患[10797:47445] test - <NSThread: 0x600002debb40>{number = 20, name = (null)}
10:16:21.552317+0800 多线程安全隐患[10797:47432] test - <NSThread: 0x600002deb800>{number = 7, name = (null)}
10:16:21.552447+0800 多线程安全隐患[10797:47439] test - <NSThread: 0x600002deb9c0>{number = 14, name = (null)}
10:16:21.552460+0800 多线程安全隐患[10797:47438] test - <NSThread: 0x600002deb980>{number = 13, name = (null)}
10:16:21.552463+0800 多线程安全隐患[10797:47449] test - <NSThread: 0x600002df16c0>{number = 24, name = (null)}
10:16:24.475953+0800 多线程安全隐患[10797:47436] test - <NSThread: 0x600002deb900>{number = 11, name = (null)}
10:16:24.475953+0800 多线程安全隐患[10797:47443] test - <NSThread: 0x600002debac0>{number = 18, name = (null)}
10:16:24.475953+0800 多线程安全隐患[10797:47444] test - <NSThread: 0x600002debb00>{number = 19, name = (null)}
10:16:24.475953+0800 多线程安全隐患[10797:47450] test - <NSThread: 0x600002da8380>{number = 25, name = (null)}
10:16:24.476004+0800 多线程安全隐患[10797:47446] test - <NSThread: 0x600002debb80>{number = 21, name = (null)}
10:16:26.476651+0800 多线程安全隐患[10797:47437] test - <NSThread: 0x600002deb940>{number = 12, name = (null)}
10:16:26.476652+0800 多线程安全隐患[10797:47448] test - <NSThread: 0x600002debc00>{number = 23, name = (null)}
10:16:26.476658+0800 多线程安全隐患[10797:47447] test - <NSThread: 0x600002debbc0>{number = 22, name = (null)}
10:16:26.476660+0800 多线程安全隐患[10797:47442] test - <NSThread: 0x600002deba80>{number = 17, name = (null)}
10:16:26.476658+0800 多线程安全隐患[10797:47440] test - <NSThread: 0x600002deba00>{number = 15, name = (null)}

从打印结果可以看到,一共执行了4次,每次5条线程。这是因为初始化 semaphore 的条件是5,每调用一次 dispatch_semaphore_wait 会减1,减5次等于0后就不在执行其它线程了。每调用一次 dispatch_semaphore_signal 会加1,就会有新的线程开始调用 dispatch_semaphore_wait 对条件减1。

应用 - 解决卖票和存钱取钱问题

1
2
3
4
5
6
7
8
9
10
11
12
13
14
15
16
17
18
19
20
21
22
23
24
25
26
27
28
29
30
31
32
33
34
35
36
37
38
39
40
41
42
43
44
45
46
47
@interface SemaphoreDemo()
@property (nonatomic, strong) dispatch_semaphore_t moneySemaphore;
@property (nonatomic, strong) dispatch_semaphore_t ticketSemaphore;
@end
@implementation SemaphoreDemo
- (instancetype)init
{
self = [super init];
if (self) {
self.moneySemaphore = dispatch_semaphore_create(1);
self.ticketSemaphore = dispatch_semaphore_create(1);
}
return self;
}
/// 取钱
- (void)__drawMoney
{
dispatch_semaphore_wait(self.moneySemaphore, DISPATCH_TIME_FOREVER);
[super __drawMoney];
dispatch_semaphore_signal(self.moneySemaphore);
}
/// 存钱
- (void)__saveManey
{
dispatch_semaphore_wait(self.moneySemaphore, DISPATCH_TIME_FOREVER);
[super __saveManey];
dispatch_semaphore_signal(self.moneySemaphore);
}
/// 卖票
- (void)__saleTicket
{
dispatch_semaphore_wait(self.ticketSemaphore, DISPATCH_TIME_FOREVER);
[super __saleTicket];
dispatch_semaphore_signal(self.ticketSemaphore);
}
@end

打印结果同 OSSpinLock。

dispatch_semaphore 汇编分析

查看方式与 “OSSpinLock 汇编分析” 相同。可以看到第一次调用 - (void)__saleTicket 方法是在 Thread 9 对信号量减1。第二次调用 - (void)__saleTicket 方法是在 Thread 11,因为此时的信号量等于0,所以 Thread 15 处于等待信号量变成 >0 的状态。重复执行 si 指令,到第16行时会调用 dispatch_semaphore_wait 函数:
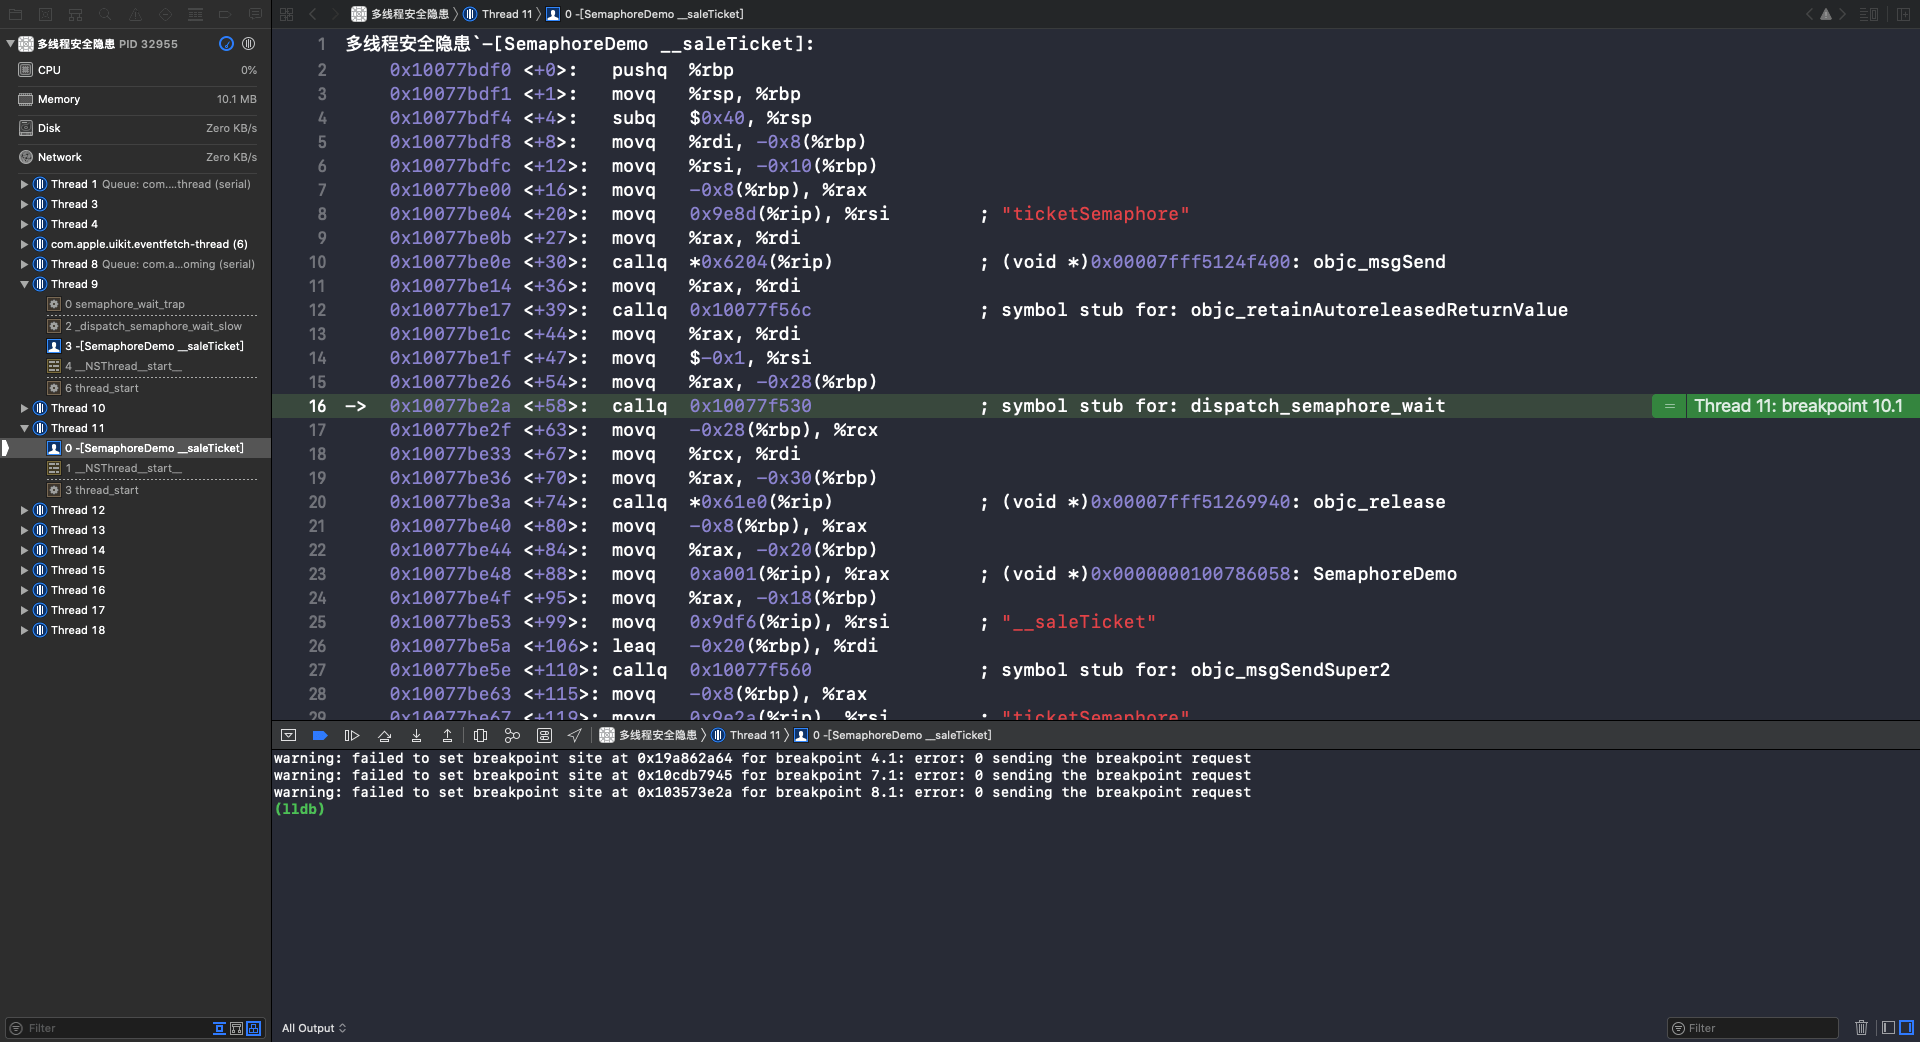
多线程33
执行 si 指令,进入 dispatch_semaphore_wait 函数:
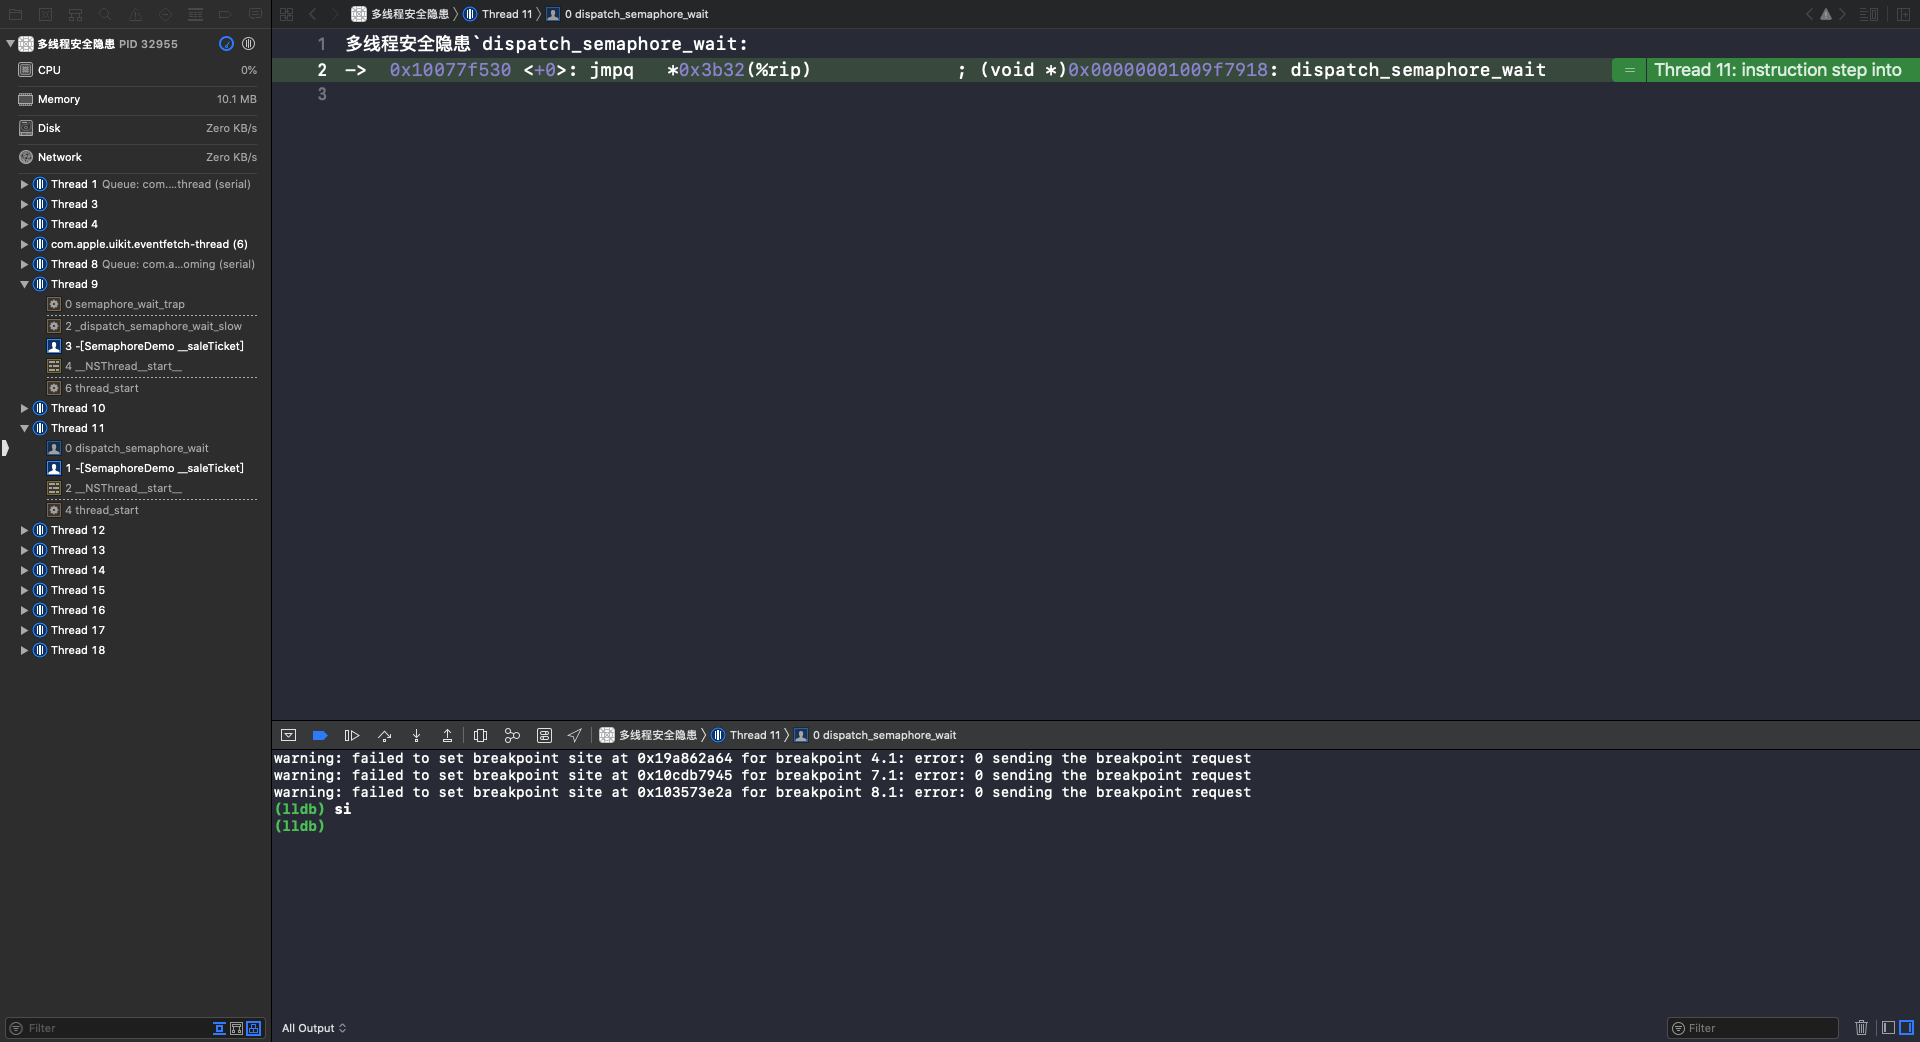
多线程34
执行 si 指令,进入 dispatch_semaphore_wait_slow 函数:
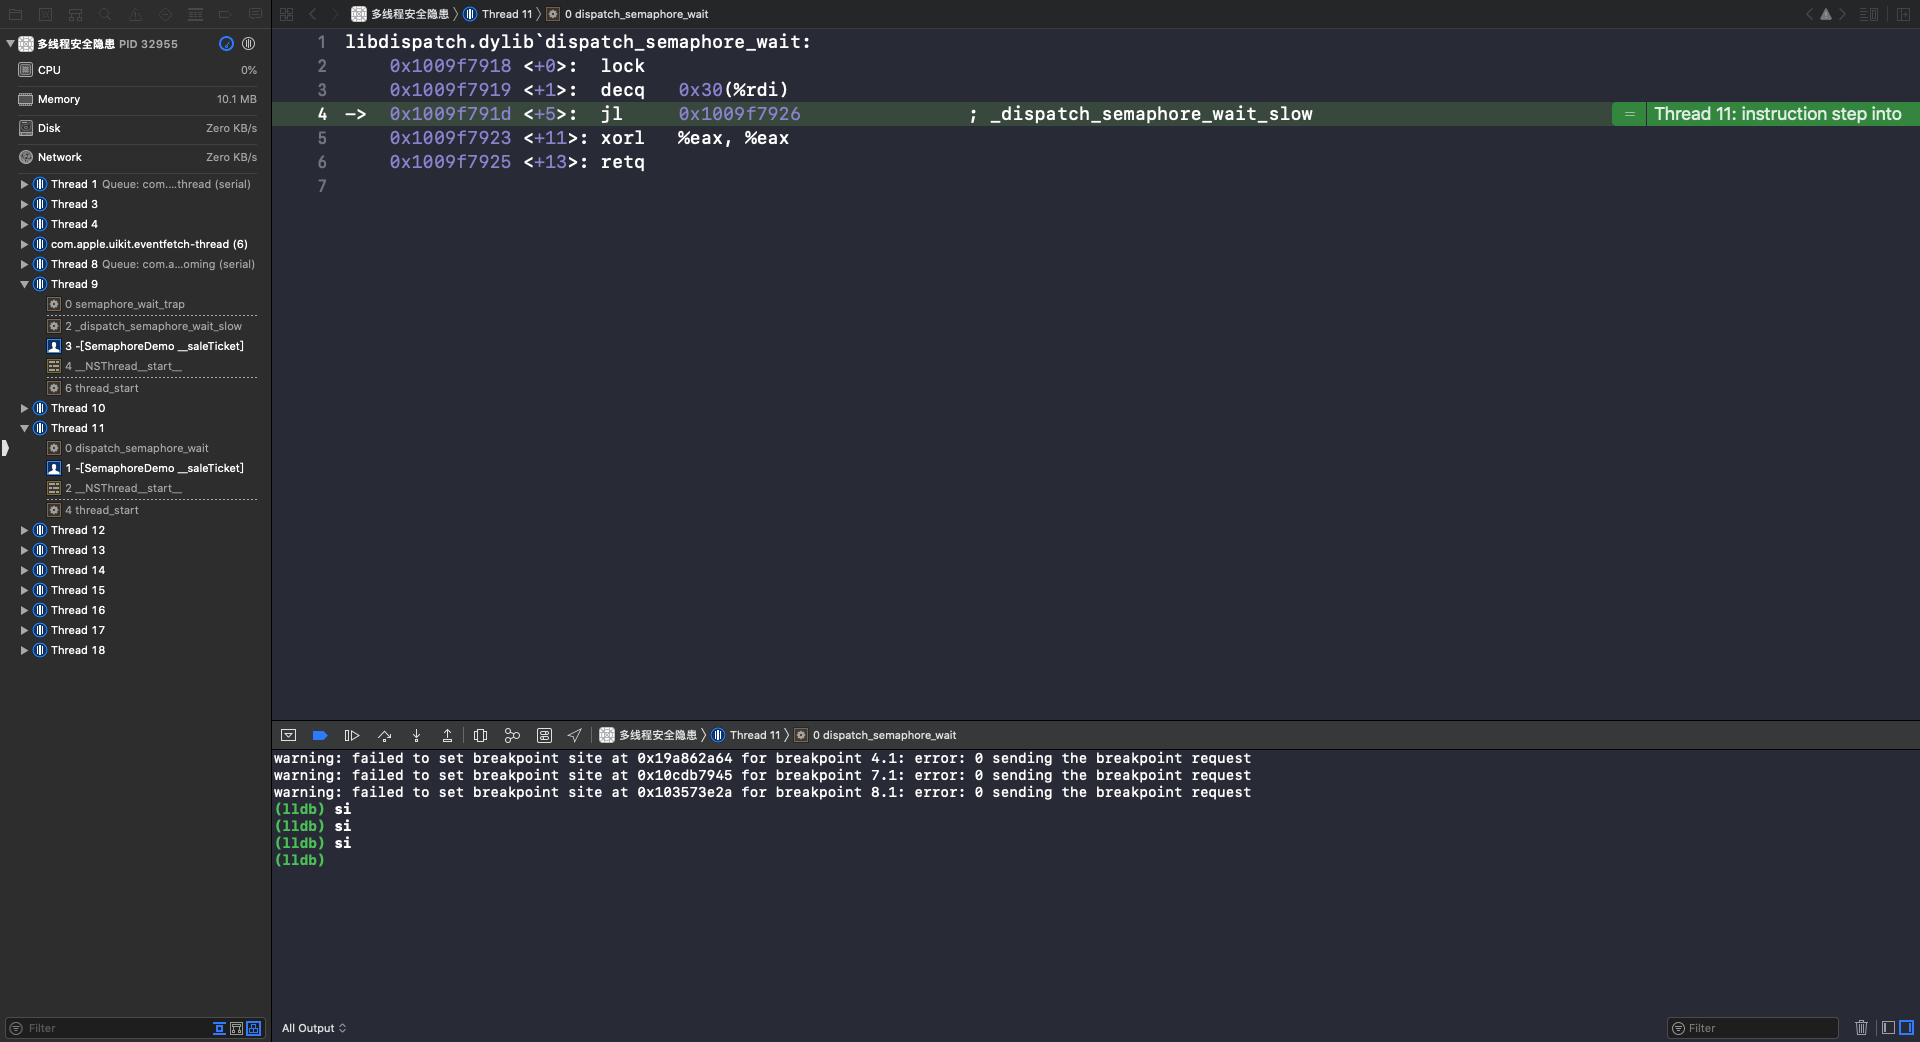
多线程35
重复执行 si 指令,在第35行,进入 _dispatch_sema4_wait 函数:
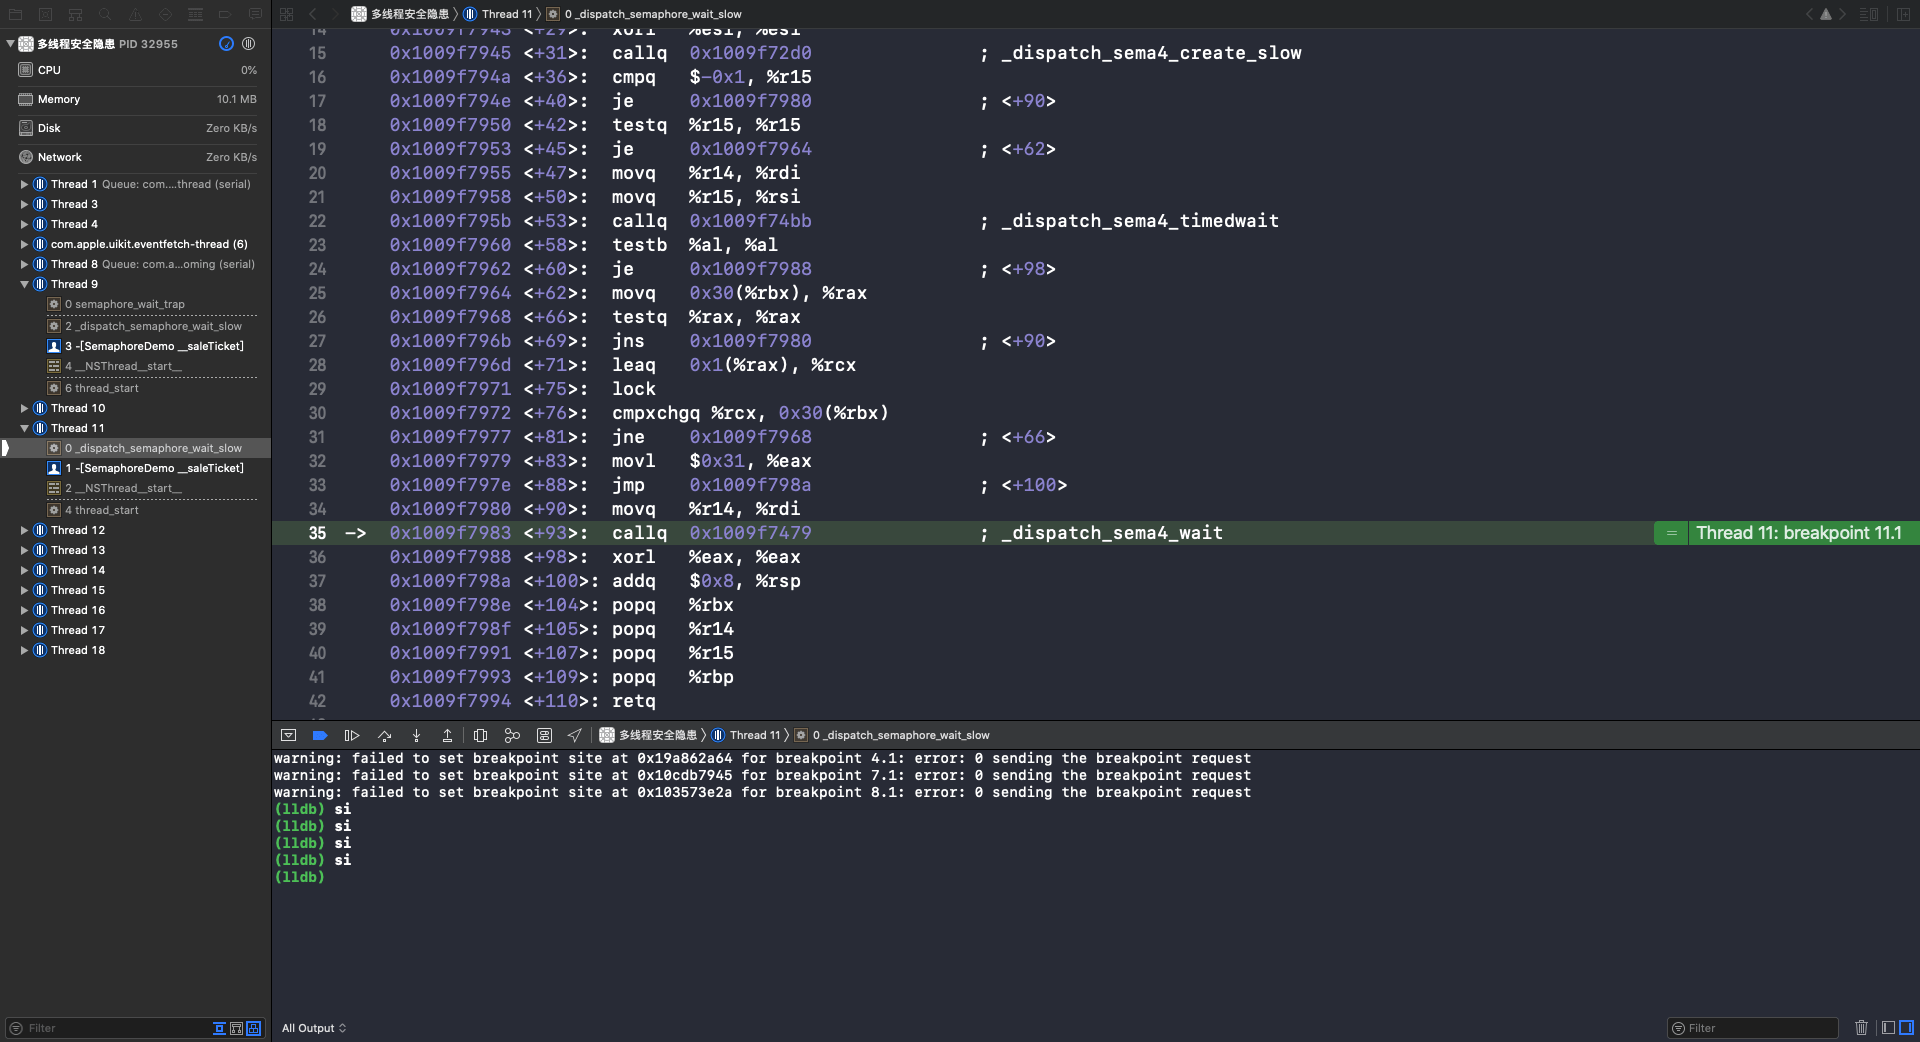
多线程36
重复执行 si 指令,在第8行,调用 semaphore_wait 函数:
多线程37
执行 si 指令,进入 semaphore_wait 函数:
多线程38
执行 si 指令,进入 semaphore_wait_trap 函数:
多线程39
重复执行 si 指令,在第4行,调用 syscall 函数。syscall 是系统调用,这个函数调用完成后,XCode 就又回到了OC代码页面,线程就进入休眠状态了(🔎 互斥锁标志):
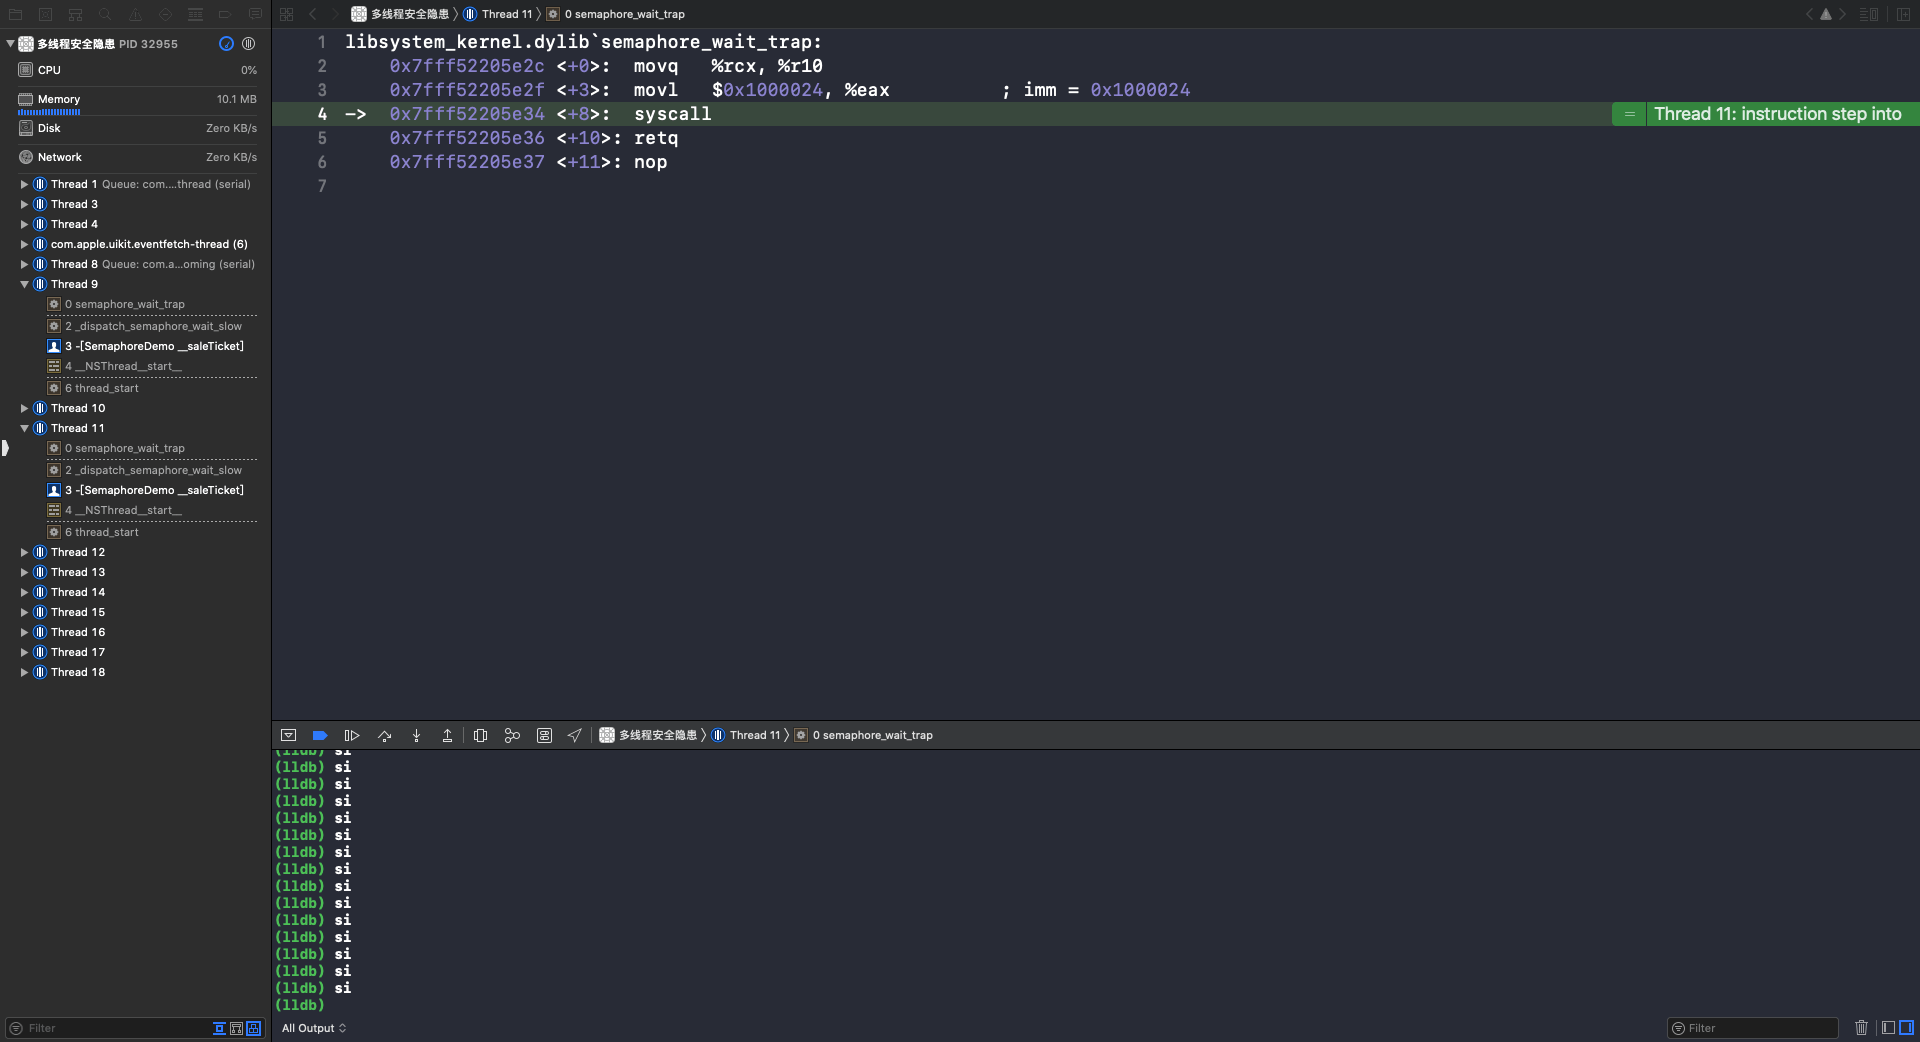
多线程40

dispatch_queue

直接使用 GCD 的串行队列,也是可以实现线程同步的。因为线程同步的本质就是保证多条线程按顺序执行任务,所以串行队列可以通过控制执行顺序来实现线程同步。

解决卖票和存钱取钱问题:

1
2
3
4
5
6
7
8
9
10
11
12
13
14
15
16
17
18
19
20
21
22
23
24
25
26
27
28
29
30
31
32
33
34
35
36
37
38
39
40
41
@interface SerialQueueDemo()
@property (nonatomic, strong) dispatch_queue_t moneyQueue;
@property (nonatomic, strong) dispatch_queue_t ticketQueue;
@end
@implementation SerialQueueDemo
- (instancetype)init
{
self = [super init];
if (self) {
self.moneyQueue = dispatch_queue_create("moneyQueue", nil);
self.ticketQueue = dispatch_queue_create("ticketQueue", nil);
}
return self;
}
/// 取钱
- (void)__drawMoney
{
dispatch_sync(self.moneyQueue, ^{
[super __drawMoney];
});
}
/// 存钱
- (void)__saveManey
{
dispatch_sync(self.moneyQueue, ^{
[super __saveManey];
});
}
/// 卖票
- (void)__saleTicket
{
dispatch_sync(self.ticketQueue, ^{
[super __saleTicket];
});
}
@end

打印结果同 OSSpinLock。

@synchronized

@synchronized 是对 mutex 递归锁的封装,@synchronized(obj) 内部会生成 obj 对应的递归锁,然后进行加锁、解锁操作。源码查看:objc4-781 中的 objc-sync.mm 文件。

解决卖票和存钱取钱问题

为了解决不同对象调用的问题,存钱取钱的 @synchronized() 传入的是类对象 [self class],卖票传入的是一个全局唯一的 NSObject 对象:

1
2
3
4
5
6
7
8
9
10
11
12
13
14
15
16
17
18
19
20
21
22
23
24
25
26
27
28
29
30
31
@implementation SynchronizeDemo
///取钱
- (void)__drawMoney
{
@synchronized ([self class]) {
[super __drawMoney];
}
}
///存钱
- (void)__saveManey
{
@synchronized ([self class]) { /// 断点1
[super __saveManey];
}
}
///卖票
- (void)__saleTicket
{
static NSObject *object;
static dispatch_once_t onceToken;
dispatch_once(&onceToken, ^{
object = [[NSObject alloc] init];
});
@synchronized (object) {
[super __saleTicket];
}
}
@end

打印结果同 OSSpinLock。

@synchronized 实现原理

在断点1处查看汇编代码 Debug -> Debug Workflow -> Always Show Disassembly:
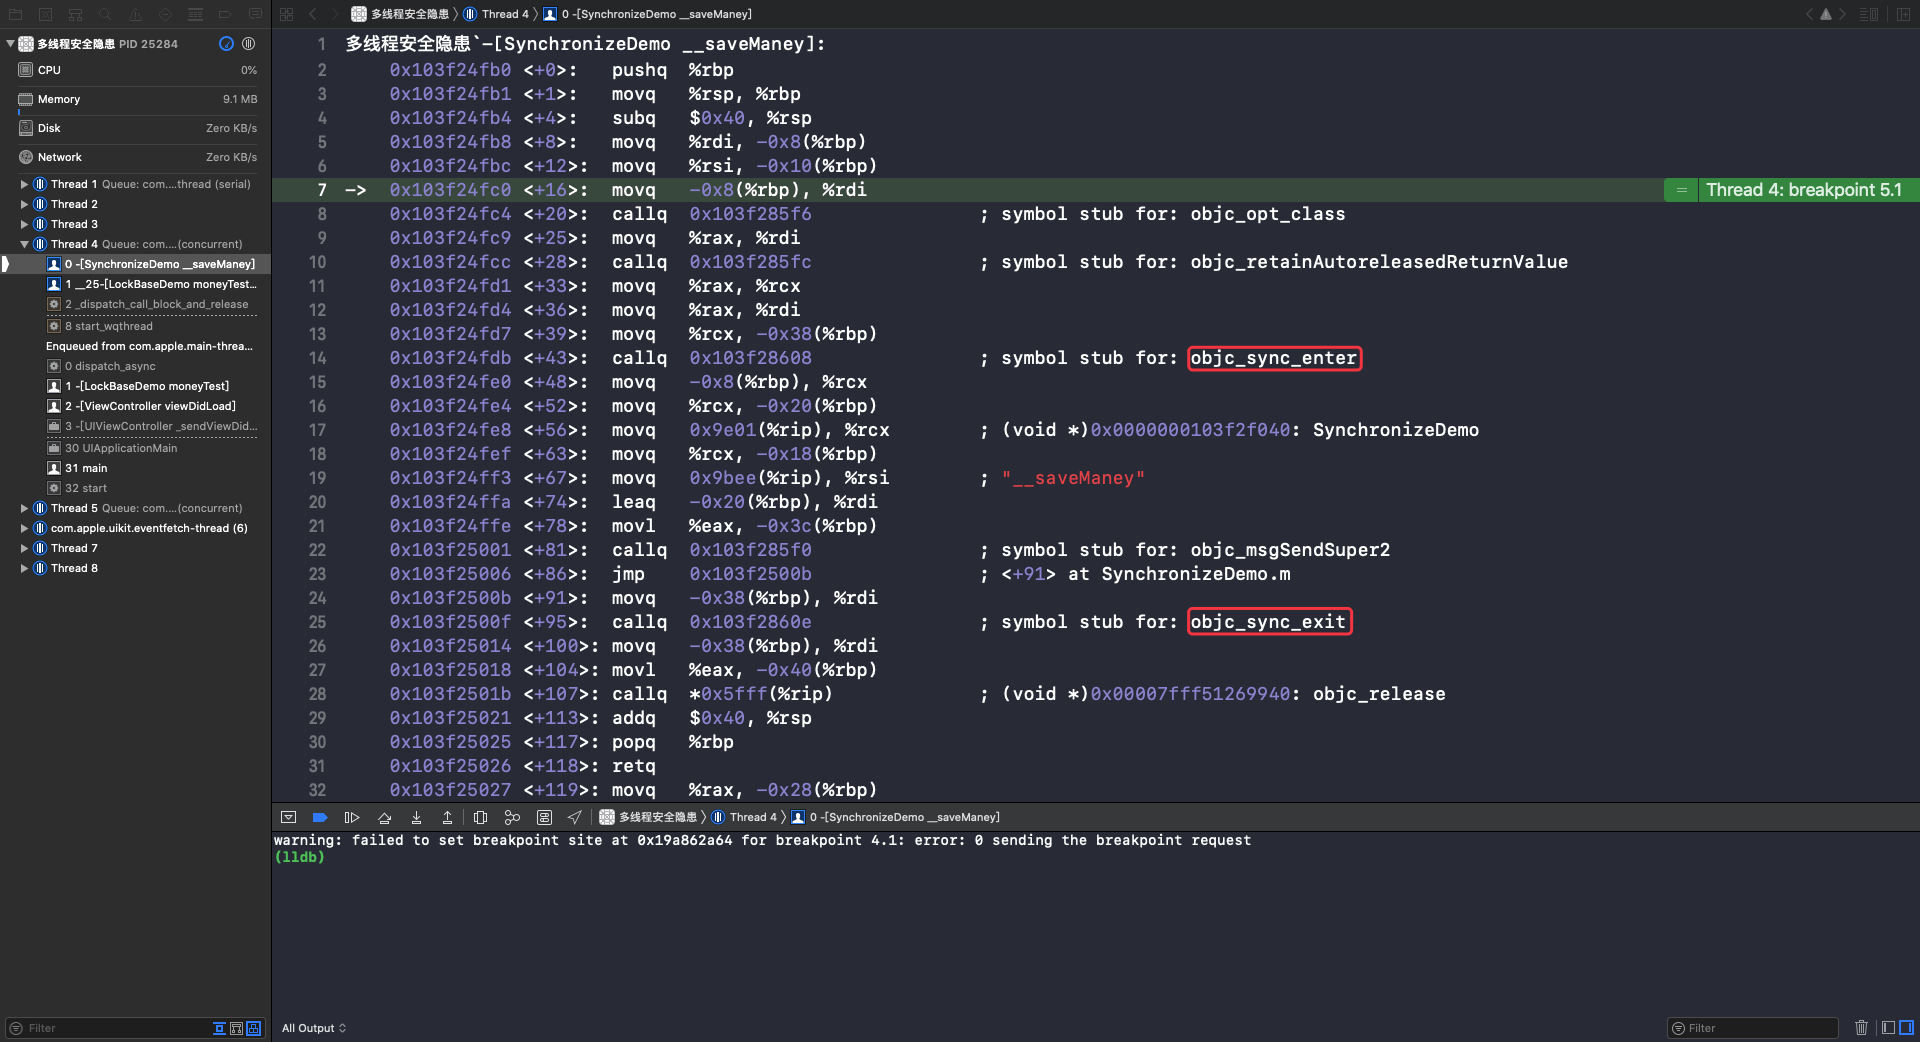
多线程32

可以看到 @synchronized() 在开始和结束分别调用了 objc_sync_enter()objc_sync_exit(),即:

1
2
3
4
5
6
7
///存钱
- (void)__saveManey
{
@synchronized ([self class]) { /// objc_sync_enter()
[super __saveManey];
} /// objc_sync_exit()
}

源码查看:objc4-781 中的 objc-sync.mm 文件

1
2
3
4
5
6
7
8
9
10
11
12
13
14
15
16
17
18
19
20
21
22
23
24
25
26
27
28
29
30
31
32
33
34
35
36
37
38
39
40
41
42
43
44
45
46
47
48
49
50
51
52
53
54
55
56
57
58
59
60
61
/// 加锁
int objc_sync_enter(id obj)
{
int result = OBJC_SYNC_SUCCESS;
if (obj) {
SyncData* data = id2data(obj, ACQUIRE); /// 以 obj 为key,从哈希表里获取到对应的 spinlock_t
ASSERT(data);
data->mutex.lock(); /// 调用 mutex 上锁
} else {
// @synchronized(nil) does nothing
if (DebugNilSync) {
_objc_inform("NIL SYNC DEBUG: @synchronized(nil); set a breakpoint on objc_sync_nil to debug");
}
objc_sync_nil();
}
return result;
}
/// 尝试加锁
BOOL objc_sync_try_enter(id obj)
{
BOOL result = YES;
if (obj) {
SyncData* data = id2data(obj, ACQUIRE);
ASSERT(data);
result = data->mutex.tryLock();
} else {
// @synchronized(nil) does nothing
if (DebugNilSync) {
_objc_inform("NIL SYNC DEBUG: @synchronized(nil); set a breakpoint on objc_sync_nil to debug");
}
objc_sync_nil();
}
return result;
}
/// 解锁
int objc_sync_exit(id obj)
{
int result = OBJC_SYNC_SUCCESS;
if (obj) {
SyncData* data = id2data(obj, RELEASE);
if (!data) {
result = OBJC_SYNC_NOT_OWNING_THREAD_ERROR;
} else {
bool okay = data->mutex.tryUnlock(); /// 调用 mutex 解锁
if (!okay) {
result = OBJC_SYNC_NOT_OWNING_THREAD_ERROR;
}
}
} else {
// @synchronized(nil) does nothing
}
return result;
}

SyncData 实现:

1
2
3
4
5
6
7
8
9
10
11
12
13
14
15
16
17
18
typedef struct alignas(CacheLineSize) SyncData {
struct SyncData* nextData;
DisguisedPtr<objc_object> object;
int32_t threadCount; // number of THREADS using this block
recursive_mutex_t mutex; /// 对 os_unfair_recursive_lock 锁的封装👇
} SyncData;
#define LOCK_FOR_OBJ(obj) sDataLists[obj].lock
#define LIST_FOR_OBJ(obj) sDataLists[obj].data
static SyncData* id2data(id object, enum usage why)
{
spinlock_t *lockp = &LOCK_FOR_OBJ(object);
SyncData **listp = &LIST_FOR_OBJ(object);
SyncData* result = NULL;
......
}

recursive_mutex_tt 实现:

1
2
3
4
5
6
7
8
9
10
11
12
13
14
15
16
17
18
19
20
21
22
23
24
25
26
27
28
29
30
31
32
33
34
35
36
37
38
39
40
41
42
43
44
45
46
47
48
49
50
51
52
53
54
55
56
57
58
59
class recursive_mutex_tt : nocopy_t {
os_unfair_recursive_lock mLock;
public:
constexpr recursive_mutex_tt() : mLock(OS_UNFAIR_RECURSIVE_LOCK_INIT) { /// 静态初始化方法,递归锁
lockdebug_remember_recursive_mutex(this);
}
constexpr recursive_mutex_tt(const fork_unsafe_lock_t unsafe)
: mLock(OS_UNFAIR_RECURSIVE_LOCK_INIT)
{ }
void lock()
{
lockdebug_recursive_mutex_lock(this);
os_unfair_recursive_lock_lock(&mLock);
}
void unlock()
{
lockdebug_recursive_mutex_unlock(this);
os_unfair_recursive_lock_unlock(&mLock);
}
void forceReset()
{
lockdebug_recursive_mutex_unlock(this);
bzero(&mLock, sizeof(mLock));
mLock = os_unfair_recursive_lock OS_UNFAIR_RECURSIVE_LOCK_INIT;
}
bool tryLock()
{
if (os_unfair_recursive_lock_trylock(&mLock)) {
lockdebug_recursive_mutex_lock(this);
return true;
}
return false;
}
bool tryUnlock()
{
if (os_unfair_recursive_lock_tryunlock4objc(&mLock)) {
lockdebug_recursive_mutex_unlock(this);
return true;
}
return false;
}
void assertLocked() {
lockdebug_recursive_mutex_assert_locked(this);
}
void assertUnlocked() {
lockdebug_recursive_mutex_assert_unlocked(this);
}
};

因为从源码中看到锁在初始化时传入的是 OS_UNFAIR_RECURSIVE_LOCK_INIT,所以 @synchronized() 其实就是一个递归锁。

验证:

1
2
3
4
5
6
7
- (void)otherTest
{
@synchronized (self) {
NSLog(@"%s", __func__);
[self otherTest];
}
}

打印结果:

1
2
3
4
5
-[SynchronizeDemo otherTest]
......

iOS线程同步方案性能比较

性能从高到低排序

  • os_unfair_lock
  • OSSpinLock
  • dispatch_semaphore
  • pthread_mutex
  • dispatch_queue(DISPATCH_QUEUE_SERIAL)
  • NSLock
  • NSCondition
  • pthread_mutex(recursive)
  • NSRecursiveLock
  • NSConditionLock
  • @synchronized

推荐使用

  • dispatch_semaphore
  • pthread_mutex

dispatch_semaphore

不同方法使用 dispatch_semaphore 实现线程同步,每个方法都需要一把属于自己的锁,可以这样实现:

1
2
3
4
5
6
7
8
9
10
11
12
13
14
15
16
17
18
19
20
21
22
23
24
25
26
27
28
29
30
31
32
33
34
35
36
37
38
39
40
41
42
43
44
45
46
47
48
49
50
51
/// 加锁
#define SemaphoreBegin \
static dispatch_semaphore_t semaphore; \
static dispatch_once_t onceToken; \
dispatch_once(&onceToken, ^{ \
semaphore = dispatch_semaphore_create(1); \
}); \
dispatch_semaphore_wait(semaphore, DISPATCH_TIME_FOREVER);
/// 解锁
#define SemaphoreEnd \
dispatch_semaphore_signal(semaphore);
@interface ViewController ()
@end
@implementation ViewController
- (void)viewDidLoad {
[super viewDidLoad];
[[[NSThread alloc] initWithTarget:self selector:@selector(test1) object:nil] start];
sleep(2);
[[[NSThread alloc] initWithTarget:self selector:@selector(test2) object:nil] start];
sleep(2);
[[[NSThread alloc] initWithTarget:self selector:@selector(test3) object:nil] start];
}
- (void)test1 {
SemaphoreBegin
NSLog(@"%s", __func__);
SemaphoreEnd
}
- (void)test2 {
SemaphoreBegin
NSLog(@"%s", __func__);
SemaphoreEnd
}
- (void)test3 {
SemaphoreBegin
NSLog(@"%s", __func__);
SemaphoreEnd
}
@end

打印结果:

1
2
3
-[ViewController test1]
-[ViewController test2]
-[ViewController test3]

pthread_mutex

1
2
3
4
5
6
7
8
9
10
11
12
13
14
15
16
17
18
19
20
21
22
23
24
25
26
27
28
29
30
31
32
33
34
35
36
37
38
39
40
41
42
43
44
45
46
47
48
49
#define PthreadMutexBegain \
static pthread_mutex_t mutex; \
static dispatch_once_t onceToken; \
dispatch_once(&onceToken, ^{ \
pthread_mutex_init(&mutex, NULL); \
}); \
pthread_mutex_lock(&mutex);
#define PthreadMutexEnd \
pthread_mutex_unlock(&mutex);
@interface ViewController ()
@end
@implementation ViewController
- (void)viewDidLoad {
[super viewDidLoad];
[[[NSThread alloc] initWithTarget:self selector:@selector(test1) object:nil] start];
sleep(2);
[[[NSThread alloc] initWithTarget:self selector:@selector(test2) object:nil] start];
sleep(2);
[[[NSThread alloc] initWithTarget:self selector:@selector(test3) object:nil] start];
}
- (void)test1 {
PthreadMutexBegain
NSLog(@"%s", __func__);
PthreadMutexEnd
}
- (void)test2 {
PthreadMutexBegain
NSLog(@"%s", __func__);
PthreadMutexEnd
}
- (void)test3 {
PthreadMutexBegain
NSLog(@"%s", __func__);
PthreadMutexEnd
}
@end

打印结果:

1
2
3
-[ViewController test1]
-[ViewController test2]
-[ViewController test3]

自旋锁、互斥锁比较

  • 什么情况使用自旋锁比较划算?
    预计线程等待锁的时间很短;(线程1加锁后处理的事情很少,线程2不需要等太多时间,就没必要去休眠,只通过一个while循环稍微等一下就好)
    加锁的代码(临界区)经常被调用,但竞争情况很少发生;(对于多条线程同时调用临界区的情况很少,而且临界区的调用比较频繁,使用自旋锁效率会更高)
    CPU资源不紧张;(自旋锁的优点是效率高,缺点是一直占用CPU资源,如果CPU资源不紧张,比如多核,就可以忽略自旋锁的缺点)
    多核处理器;

  • 什么情况使用互斥锁比较划算?
    预计线程等待锁的时间较长;(线程1加锁后处理的事情很多,比如需要耗时2~3秒,此时自旋锁效率高的优点也没啥用了,不如让线程2去休眠,这样也减少了CPU资源的占用)
    单核处理器;(这种情况以节省CPU资源为主,尽量不去占用CPU资源)
    临界区有IO操作;(因为IO操作是比较占用CPU资源的,所以这种情况以节省CPU资源为主)
    临界区代码复杂或者循环量大;(因为这种情况比较耗时,所以忽略效率比较高的自旋锁,选择节省CPU资源的互斥锁)
    临界区竞争非常激烈;(很多线程会同事调用临界区的代码,为了节省CPU资源,选择互斥锁)

atomic

atom:原子,不可再分割的单位。atomic:原子性,用于保证属性 setter、getter 的原子性操作,相当于在 getter 和 setter 内部加了线程同步的锁。

打开源码 objc4-781 的 objc-accessors.mm 文件,查看 setter 和 getter 方法 的实现:

1
2
3
4
5
6
7
8
9
10
11
12
13
14
15
16
17
18
19
20
21
22
23
24
25
26
27
28
29
30
31
32
33
34
35
36
37
38
39
40
41
42
43
44
45
46
47
48
49
50
51
52
53
54
/// setter 方法
static inline void reallySetProperty(id self, SEL _cmd, id newValue, ptrdiff_t offset, bool atomic, bool copy, bool mutableCopy)
{
if (offset == 0) {
object_setClass(self, newValue);
return;
}
id oldValue;
id *slot = (id*) ((char*)self + offset);
if (copy) {
newValue = [newValue copyWithZone:nil];
} else if (mutableCopy) {
newValue = [newValue mutableCopyWithZone:nil];
} else {
if (*slot == newValue) return;
newValue = objc_retain(newValue);
}
if (!atomic) {
/// 非原子性的不加锁
oldValue = *slot;
*slot = newValue;
} else {
/// 原子性的要加锁
spinlock_t& slotlock = PropertyLocks[slot];
slotlock.lock();
oldValue = *slot;
*slot = newValue;
slotlock.unlock();
}
objc_release(oldValue);
}
/// getter 方法
id objc_getProperty(id self, SEL _cmd, ptrdiff_t offset, BOOL atomic) {
if (offset == 0) {
return object_getClass(self);
}
id *slot = (id*) ((char*)self + offset);
/// 非原子性的不加锁
if (!atomic) return *slot;
/// 原子性的要加锁
spinlock_t& slotlock = PropertyLocks[slot];
slotlock.lock();
id value = objc_retain(*slot);
slotlock.unlock();
return objc_autoreleaseReturnValue(value);
}

aotmic 并不能保证使用属性的过程是线程安全的:

1
2
3
4
5
6
7
8
9
10
11
12
13
14
15
16
17
18
19
20
21
22
23
24
25
@interface ViewController ()
@property (atomic, copy) NSMutableArray *data;
@end
@implementation ViewController
- (void)viewDidLoad {
[super viewDidLoad];
self.data = [NSMutableArray array];
[[[NSThread alloc] initWithTarget:self selector:@selector(test1) object:nil] start];
[[[NSThread alloc] initWithTarget:self selector:@selector(test2) object:nil] start];
[[[NSThread alloc] initWithTarget:self selector:@selector(test3) object:nil] start];
}
- (void)test1 {
[self.data addObject:@"test1"];
}
- (void)test2 {
[self.data addObject:@"test2"];
}
- (void)test3 {
[self.data addObject:@"test3"];
}

上面这段代码中 data 是原子性的,所以 self.data 是线程安全的,但是 addObject 不是线程安全的,需要单独加锁:

1
2
3
4
5
6
7
8
9
10
11
12
13
14
15
16
17
- (void)test1 {
/// 加锁
[self.data addObject:@"test1"];
/// 解锁
}
- (void)test2 {
/// 加锁
[self.data addObject:@"test2"];
/// 解锁
}
- (void)test3 {
/// 加锁
[self.data addObject:@"test3"];
/// 解锁
}

iOS中的读写安全方案

  • 思考如何实现以下场景
    同一时间,只能有1个线程进行写的操作;
    同一时间,允许有多个线程进行读的操作;
    同一时间,不允许既有写的操作,又有读的操作;

上面的场景就是典型的“多读单写”,经常用于文件等数据的读写操作,iOS中的实现方案有 pthread_rwlock(读写锁)和 dispatch_barrier_async(异步栅栏调用)。

pthread_rwlock

相关API:

1
2
3
4
5
6
7
8
9
10
11
12
13
14
15
/// 初始化
pthread_rwlock_t lock;
pthread_rwlock_init(&lock, NULL);
/// 读-加锁
pthread_rwlock_rdlock(&lock);
/// 读-尝试加锁
pthread_rwlock_tryrdlock(&lock);
/// 写-加锁
pthread_rwlock_wrlock(&lock);
/// 写-尝试加锁
pthread_rwlock_trywrlock(&lock);
/// 解锁
pthread_rwlock_unlock(&lock);
/// 销毁
pthread_rwlock_destroy(&lock);

应用

1
2
3
4
5
6
7
8
9
10
11
12
13
14
15
16
17
18
19
20
21
22
23
24
25
26
27
28
29
30
31
32
33
34
35
36
37
38
39
40
41
42
43
44
45
@interface ViewController ()
@property (nonatomic, assign) pthread_rwlock_t lock;
@end
@implementation ViewController
- (void)viewDidLoad {
[super viewDidLoad];
/// 初始化
pthread_rwlock_init(&_lock, NULL);
for (int i=0; i < 5; i++) {
dispatch_async(dispatch_get_global_queue(0, 0), ^{
[self read];
});
dispatch_async(dispatch_get_global_queue(0, 0), ^{
[self write];
});
}
}
- (void)read
{
pthread_rwlock_rdlock(&_lock);
NSLog(@"%s", __func__);
sleep(2);
pthread_rwlock_unlock(&_lock);
}
- (void)write
{
pthread_rwlock_wrlock(&_lock);
NSLog(@"%s", __func__);
sleep(2);
pthread_rwlock_unlock(&_lock);
}
- (void)dealloc
{
pthread_rwlock_destroy(&_lock);
}
@end

打印结果:

1
2
3
4
5
6
7
8
9
10
10:57:24.915613+0800 多线程安全隐患[3171:66309] -[ViewController read]
10:57:24.915613+0800 多线程安全隐患[3171:66290] -[ViewController read]
10:57:26.918756+0800 多线程安全隐患[3171:66295] -[ViewController write]
10:57:28.921411+0800 多线程安全隐患[3171:66308] -[ViewController write]
10:57:30.924043+0800 多线程安全隐患[3171:66299] -[ViewController read]
10:57:32.927292+0800 多线程安全隐患[3171:66291] -[ViewController write]
10:57:34.927716+0800 多线程安全隐患[3171:66327] -[ViewController read]
10:57:36.930458+0800 多线程安全隐患[3171:66328] -[ViewController write]
10:57:38.934914+0800 多线程安全隐患[3171:66329] -[ViewController read]
10:57:40.940214+0800 多线程安全隐患[3171:66330] -[ViewController write]

从打印结果可以看到,read 和 read 操作之间存在同时被打印的情况,但是 read 和 write 操作、write 和 write 操作之间不存在同时被打印的情况。

dispatch_barrier_async

这个函数传入的并发队列必须是自己通过 dispatch_queue_cretate 创建的,如果传入的是一个串行或是一个全局的并发队列,那这个函数便等同于 dispatch_async 函数的效果。

dispatch_barrier_async 方法能够保证当前只有这一个临界区在执行,就可以实现在写的时候,没有其它写操作和读操作。

相关API

1
2
3
4
5
6
7
8
9
10
11
12
/// 初始化队列
dispatch_queue_t queue = dispatch_queue_create("rw_queue", DISPATCH_QUEUE_CONCURRENT);
/// 读
dispatch_async(queue, ^{
});
/// 写
dispatch_barrier_async(queue, ^{
});

应用

1
2
3
4
5
6
7
8
9
10
11
12
13
14
15
16
17
18
19
20
21
22
23
24
25
26
27
28
29
30
31
32
33
34
@interface ViewController ()
@property (nonatomic, strong) dispatch_queue_t queue;
@end
@implementation ViewController
- (void)viewDidLoad {
[super viewDidLoad];
self.queue = dispatch_queue_create("rw_queue", DISPATCH_QUEUE_CONCURRENT);
for (int i=0; i<5; i++) {
[self read];
[self read];
[self read];
[self write];
[self write];
[self write];
}
}
- (void)read
{
dispatch_async(self.queue, ^{
NSLog(@"read");
sleep(2);
});
}
- (void)write
{
dispatch_barrier_async(self.queue, ^{
NSLog(@"write");
sleep(2);
});
}
@end

打印结果:

1
2
3
4
5
6
7
8
9
10
11
12
13
11:29:28.216697+0800 多线程安全隐患[3903:86003] read
11:29:28.216708+0800 多线程安全隐患[3903:85991] read
11:29:28.216724+0800 多线程安全隐患[3903:85989] read
11:29:30.218087+0800 多线程安全隐患[3903:86003] write
11:29:32.222250+0800 多线程安全隐患[3903:86003] write
11:29:34.226490+0800 多线程安全隐患[3903:86003] write
11:29:36.231180+0800 多线程安全隐患[3903:86003] read
11:29:36.231210+0800 多线程安全隐患[3903:85983] read
11:29:36.231265+0800 多线程安全隐患[3903:86132] read
11:29:38.232286+0800 多线程安全隐患[3903:86003] write
11:29:40.232572+0800 多线程安全隐患[3903:86003] write
11:29:42.232894+0800 多线程安全隐患[3903:86003] write
......

从打印结果可以看到,read 操作是可以同时进行的,write 操作只能一个一个执行。

总结

你理解的多线程?

通过多线程可以处理耗时任务,减少主线程的压力。
通过多线程可以处理一个复杂任务的不同部分,充分利用CPU资源,提升效率。
多线程意味着你能够在同一个应用程序中运行多个线程,多线程应用程序就像是具有多个 CPU 在同时执行应用程序的代码。其实这是一种假象,线程数量并不等于 CPU 数量,单个 CPU 将在多个线程之间共享 CPU 的时间片,在给定的时间片内执行每个线程之间的切换,每个线程也可以由不同的 CPU 执行。
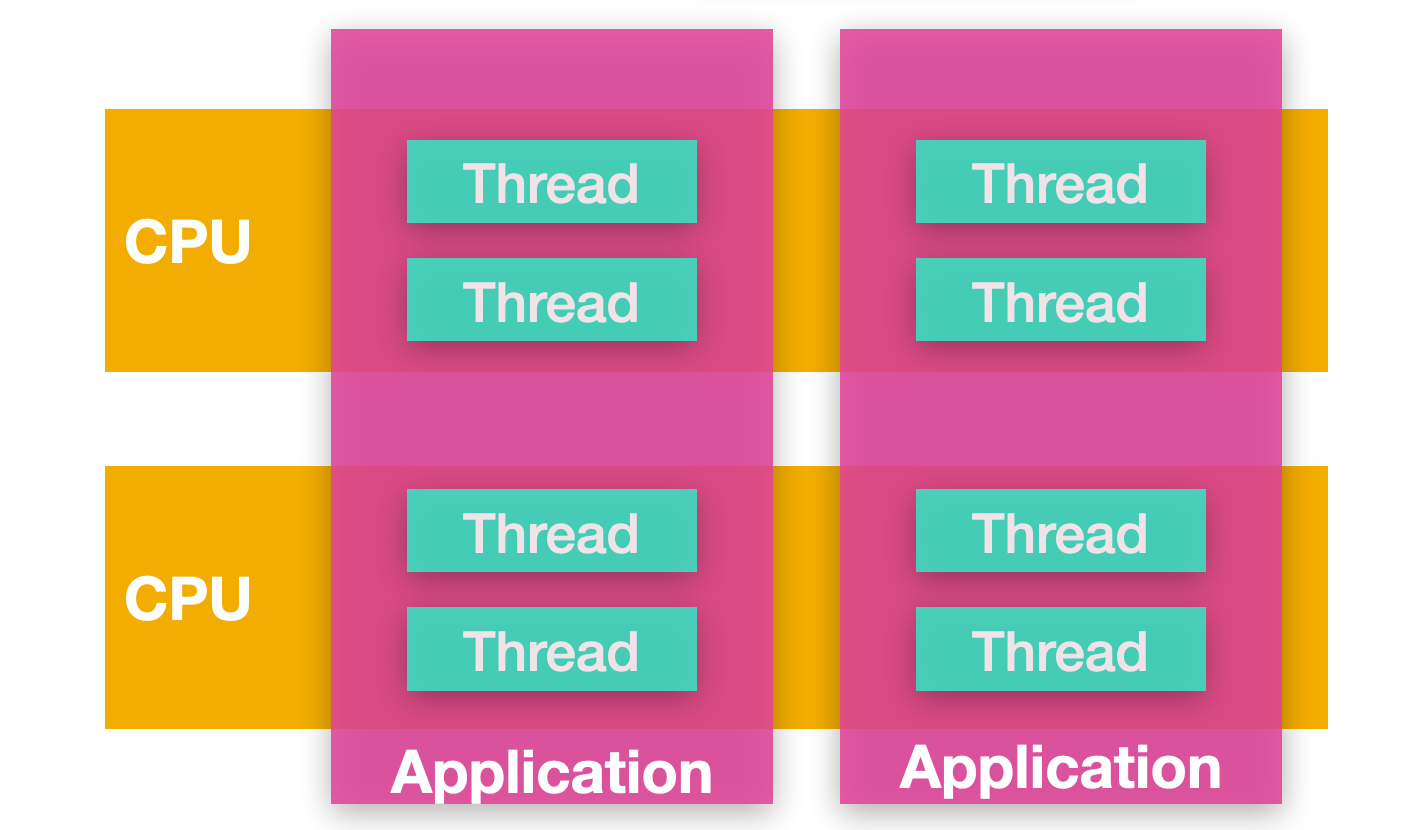
多线程41

iOS的多线程方案有哪几种?你更倾向于哪一种?

性能从高到低排序

os_unfair_lock
OSSpinLock
dispatch_semaphore
pthread_mutex
dispatch_queue(DISPATCH_QUEUE_SERIAL)
NSLock
NSCondition
pthread_mutex(recursive)
NSRecursiveLock
NSConditionLock
@synchronized

推荐使用

dispatch_semaphore
pthread_mutex

你在项目中用过 GCD 吗?

回到主线程

1
2
3
4
5
6
7
8
9
- (void)action
{
if (![NSThread isMainThread]) {
dispatch_async(dispatch_get_main_queue(), ^{
[self action];
return;
});
}
}

等所有的网络请求结束后,再刷新UI

1
2
3
4
5
6
7
8
9
10
11
12
13
14
15
16
17
18
19
20
21
22
23
24
25
26
dispatch_semaphore_t semaphore = dispatch_semaphore_create(0);
dispatch_queue_t queue = dispatch_queue_create("myRequestQueue", NULL);
dispatch_async(queue, ^{
dispatch_semaphore_wait(semaphore, DISPATCH_TIME_FOREVER); /// 减1
/// 请求全部完成
dispatch_async(dispatch_get_main_queue(), ^{
/// 回到主线程刷新UI
});
});
/// 网络请求1
[self.server request1Completion:^(id responseObject) {
if (semaphore) dispatch_semaphore_signal(semaphore); /// 加1
}];
/// 网络请求2
[self.server request2Completion:^(id responseObject) {
if (semaphore) dispatch_semaphore_signal(semaphore); /// 加1
}];
/// 网络请求3
[self.server request3Completion:^(id responseObject) {
if (semaphore) dispatch_semaphore_signal(semaphore); /// 加1
}];

延时执行

1
2
3
4
/// 延时5秒执行
dispatch_after(dispatch_time(DISPATCH_TIME_NOW, (int64_t)(5 * NSEC_PER_SEC)), dispatch_get_main_queue(), ^{
/// 回到主线程执行
});

定时器

1
2
3
4
5
6
7
8
9
10
11
12
13
14
15
16
17
18
19
20
21
22
23
24
25
26
27
28
29
30
@interface ViewController ()
@property (nonatomic, strong) dispatch_source_t timer;
@end
@implementation ViewController
- (void)startTimer {
__weak typeof(self) weakSelf = self;
/// 初始化
_timer = dispatch_source_create(DISPATCH_SOURCE_TYPE_TIMER, 0, 0, dispatch_get_global_queue(DISPATCH_QUEUE_PRIORITY_DEFAULT, 0));
/// 5秒后开始执行
dispatch_time_t delayTime = dispatch_time(DISPATCH_TIME_NOW, (int64_t)(5.0 * NSEC_PER_SEC));
/// 5秒执行一次
dispatch_source_set_timer(_timer, delayTime, 5.0 * NSEC_PER_SEC, 0 * NSEC_PER_SEC);
dispatch_source_set_event_handler(_timer, ^{
dispatch_async(dispatch_get_main_queue(), ^{
[weakSelf cancelTimer];
});
});
dispatch_resume(_timer);
}
- (void)cancelTimer {
if (_timer) {
dispatch_source_cancel(_timer);
_timer = nil;
}
}
@end

GCD 的队列类型

GCD的队列可以分为2大类型

  • 并发队列(Concurrent Dispatch Queue)
    可以让多个任务并发(同时)执行(自动开启多个线程同时执行任务);
    并发功能只有在异步(dispatch_async)函数下才有效;

  • 串行队列(Serial Dispatch Queue)
    让任务一个接着一个地执行(一个任务执行完毕后,再执行下一个任务);

主队列是一个特殊的串行队列,async 方法在主队列中添加任务不会开启新线程,并且是串行执行任务。

说一下 OperationQueue 和 GCD 的区别,以及各自的优势

OperationQueue 是对 GCD 的封装,更加面向对象。
GCD 相对于 OperationQueue 更加底层,效率更高。

线程安全的处理手段有哪些?

线程安全的处理是使用线程同步技术,包括加锁、信号量和串行队列。

OC你了解的锁有哪些?在你回答基础上进行二次提问;

性能从高到低排序:
os_unfair_lock
OSSpinLock
dispatch_semaphore
pthread_mutex
NSLock
NSCondition
pthread_mutex(recursive)
NSRecursiveLock
NSConditionLock
@synchronized

追问一:自旋和互斥对比?

  • 什么情况使用自旋锁比较划算?
    预计线程等待锁的时间很短;(线程1加锁后处理的事情很少,线程2不需要等太多时间,就没必要去休眠,只通过一个while循环稍微等一下就好)
    加锁的代码(临界区)经常被调用,但竞争情况很少发生;(对于多条线程同时调用临界区的情况很少,而且临界区的调用比较频繁,使用自旋锁效率会更高)
    CPU资源不紧张;(自旋锁的优点是效率高,缺点是一直占用CPU资源,如果CPU资源不紧张,比如多核,就可以忽略自旋锁的缺点)
    多核处理器;

  • 什么情况使用互斥锁比较划算?
    预计线程等待锁的时间较长;(线程1加锁后处理的事情很多,比如需要耗时2~3秒,此时自旋锁效率高的优点也没啥用了,不如让线程2去休眠,这样也减少了CPU资源的占用)
    单核处理器;(这种情况以节省CPU资源为主,尽量不去占用CPU资源)
    临界区有IO操作;(因为IO操作是比较占用CPU资源的,所以这种情况以节省CPU资源为主)
    临界区代码复杂或者循环量大;(因为这种情况比较耗时,所以忽略效率比较高的自旋锁,选择节省CPU资源的互斥锁)
    临界区竞争非常激烈;(很多线程会同事调用临界区的代码,为了节省CPU资源,选择互斥锁)

追问二:使用以上锁需要注意哪些?

加锁后一定要解锁;
一个变量对应一个锁;
使用 @synchronized(obj) 传入的 obj 对象就相当于一个锁,如果有不同的对象调用临界区,可以使用类对象 @synchronized([self class])
在使用 pthread_mutex_t、pthread_mutex_t 递归锁、pthread_mutex_t 条件 和 pthread_rwlock_t 锁时需要手动释放。

追问三:用C/OC/C++,任选其一,实现自旋或互斥?

参考上面的内容。

请问下面代码的打印结果是什么?

1
2
3
4
5
6
7
8
9
10
11
12
13
14
15
16
17
@implementation ViewController
- (void)viewDidLoad {
[super viewDidLoad];
dispatch_queue_t queue = dispatch_get_global_queue(0, 0);
dispatch_async(queue, ^{
NSLog(@"1");
[self performSelector:@selector(test) withObject:nil afterDelay:.0];
NSLog(@"3");
});
}
- (void)test
{
NSLog(@"2");
}
@end

上面有详解👆。

请问下面代码的打印结果是什么?

1
2
3
4
5
6
7
8
9
10
11
12
13
14
15
16
@implementation ViewController
- (void)test
{
NSLog(@"2");
}
- (void)touchesBegan:(NSSet<UITouch *> *)touches withEvent:(UIEvent *)event
{
NSThread *thread = [[NSThread alloc] initWithBlock:^{
NSLog(@"1");
}];
[thread start];
[self performSelector:@selector(test) onThread:thread withObject:nil waitUntilDone:YES];
}
@end

上面有详解👆。

2w字 + 40张图带你参透并发编程!