内存管理

思考:

  • 使用 CADisplayLink、NSTimer 有什么注意点?
  • 介绍下内存的几大区域
  • 讲一下你对 iOS 内存管理的理解
  • ARC 都帮我们做了什么?(LLVM + Runtime)
  • weak 指针的实现原理
  • autorelease 对象在什么时机会被调用 release
  • 方法里有局部对象, 出了方法后会立即释放吗?

CADisplayLink、NSTimer 定时器

CADisplayLink、NSTimer 会对 target 产生强引用,如果 target 又对它们产生强引用,那么就会引发循环引用。

循环引用问题

CADisplayLink 保证调用 -(void)timerTest 方法的频率和屏幕的刷新帧频率一致,60FPS。实际的调用频率可能不太一样,根据任务的耗时情况会有减少。

1
2
3
4
5
6
7
8
9
10
11
12
13
14
15
16
17
18
19
20
21
22
23
@interface TimerViewController ()
@property (nonatomic, strong) CADisplayLink *link;
@end
@implementation TimerViewController
- (void)viewDidLoad {
[super viewDidLoad];
self.link = [CADisplayLink displayLinkWithTarget:self selector:@selector(timerTest)];
[self.link addToRunLoop:[NSRunLoop currentRunLoop] forMode:NSDefaultRunLoopMode];
}
- (void)timerTest
{
NSLog(@"%s", __func__);
}
- (void)dealloc
{
NSLog(@"%s", __func__);
[self.link invalidate];
}
@end

打印结果:

1
2
3
4
5
-[TimerViewController timerTest]
......

从打印结果可以看到,进入 TimerViewController 控制器后返回,会发现 TimerViewController 没有释放,CADisplayLink 定时器还在继续运行。

NSTimer

1
2
3
4
5
6
7
8
9
10
11
12
13
14
15
16
17
18
19
20
21
22
23
@interface TimerViewController ()
@property (nonatomic, strong) NSTimer *timer;
@end
@implementation TimerViewController
- (void)viewDidLoad {
[super viewDidLoad];
self.timer = [NSTimer scheduledTimerWithTimeInterval:1.0 target:self selector:@selector(timerTest) userInfo:nil repeats:YES];
}
- (void)timerTest
{
NSLog(@"%s", __func__);
}
- (void)dealloc
{
NSLog(@"%s", __func__);
[self.timer invalidate];
}
@end

打印结果:

1
2
3
4
5
-[TimerViewController timerTest]
......

从打印结果可以看到,进入 TimerViewController 控制器后返回,会发现 TimerViewController 没有释放,NSTimer 定时器还在继续运行。

问题分析

内存管理01

解决方案

方案一:使用 block

1
2
3
4
5
6
7
8
9
10
11
12
13
14
15
16
17
18
19
20
21
22
23
24
25
@interface TimerViewController ()
@property (nonatomic, strong) NSTimer *timer;
@end
@implementation TimerViewController
- (void)viewDidLoad {
[super viewDidLoad];
__weak typeof(self) weakSelf = self;
self.timer = [NSTimer scheduledTimerWithTimeInterval:1.0 repeats:YES block:^(NSTimer * _Nonnull timer) {
[weakSelf timerTest];
}];
}
- (void)timerTest
{
NSLog(@"%s", __func__);
}
- (void)dealloc
{
NSLog(@"%s", __func__);
[self.timer invalidate];
}
@end

打印结果:

1
2
3
4
5
-[TimerViewController timerTest]
-[TimerViewController dealloc]

在使用 NSTimer 的时候,使用 block 的方式传入 weakSelf 可以有效解决循环引用的问题。并且以 scheduled 开头的方法会自动将 timer 添加到当前的 runloop 中并使用 default mode。

1
+ (NSTimer *)scheduledTimerWithTimeInterval:(NSTimeInterval)interval repeats:(BOOL)repeats block:(void (^)(NSTimer *timer))block API_AVAILABLE(macosx(10.12), ios(10.0), watchos(3.0), tvos(10.0));

target 传入 weakSelf 并不能解决循环引用个问题,因为 NSTimer 内部对传入的 target 也是强引用的,而且 weakSelf 只是用来解决 block 循环引用问题的方案。

1
+ (NSTimer *)scheduledTimerWithTimeInterval:(NSTimeInterval)ti target:(id)aTarget selector:(SEL)aSelector userInfo:(nullable id)userInfo repeats:(BOOL)yesOrNo;

CADisplayLink 没有 block 相关的 API。

方案二:使用中间对象
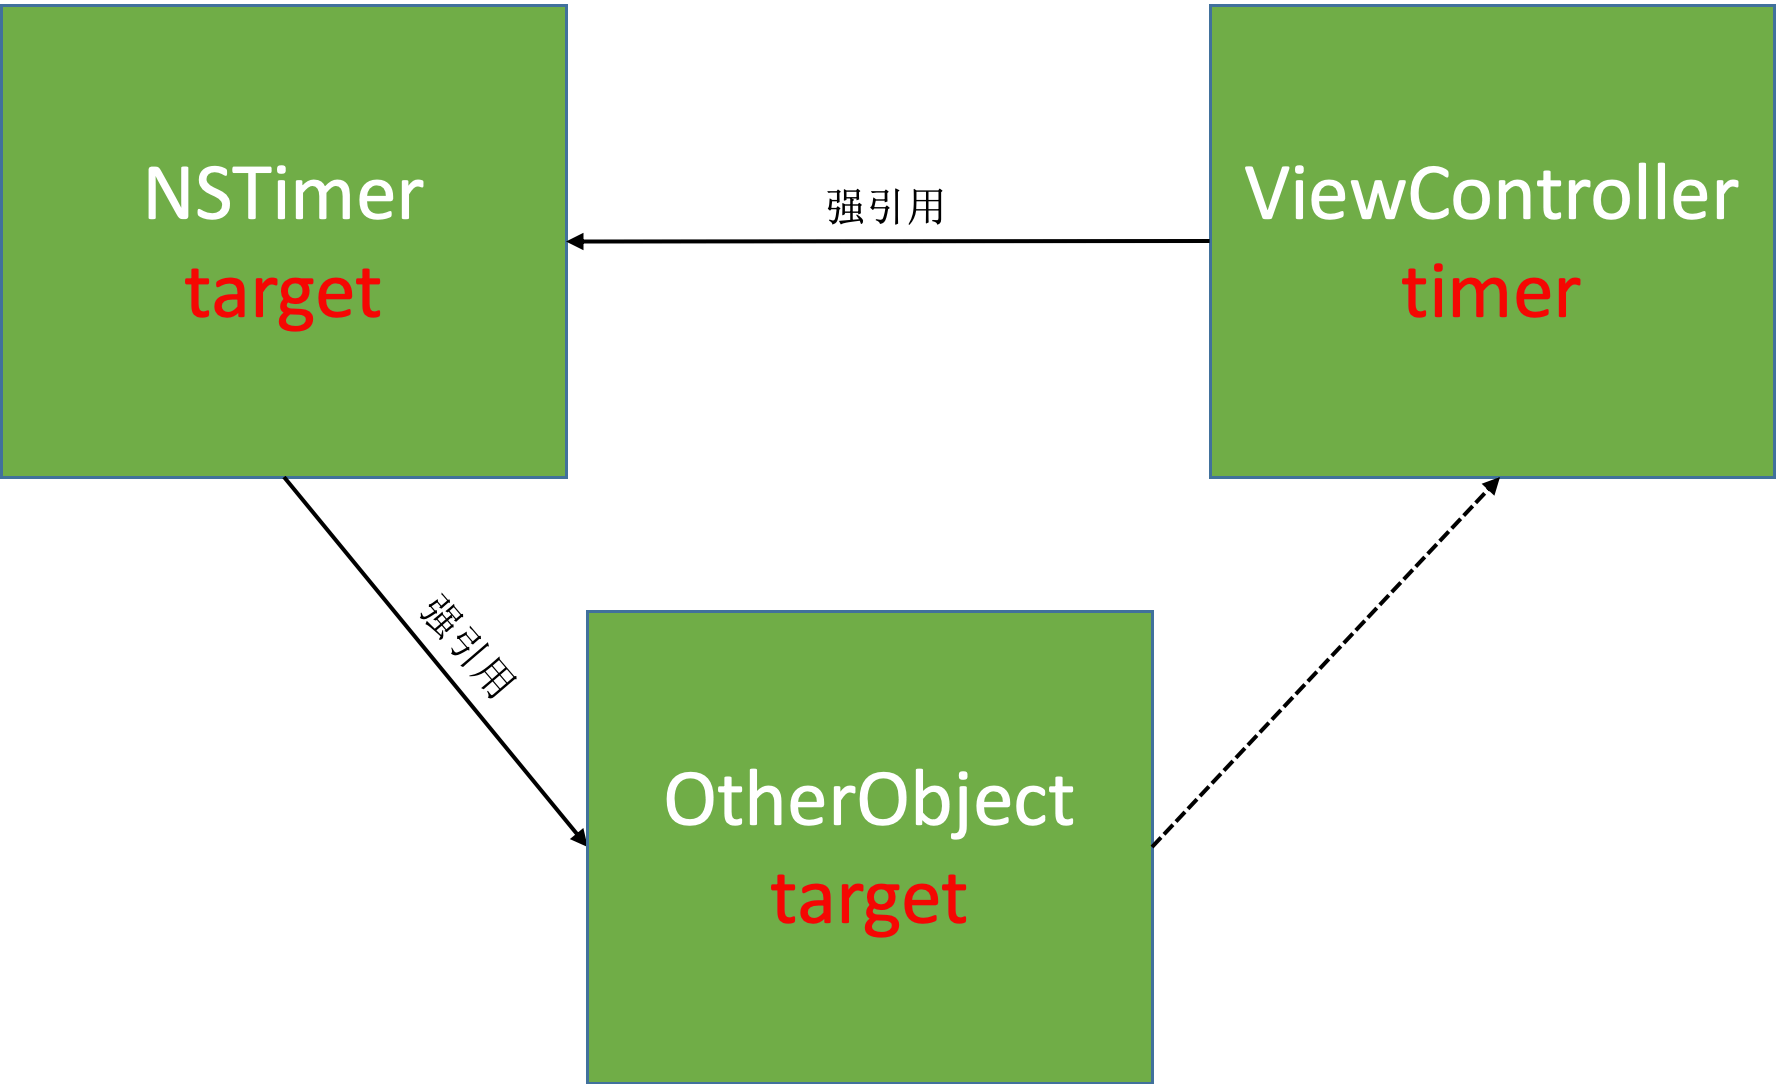
内存管理02

定义中间对象:

1
2
3
4
5
6
7
8
9
10
11
12
13
14
15
16
17
18
@interface YQProxy : NSObject
+ (instancetype)proxyWithTarget:(id)target;
@property (nonatomic, weak) id target;
@end
@implementation YQProxy
+ (instancetype)proxyWithTarget:(id)target
{
YQProxy *proxy = [[YQProxy alloc] init];
proxy.target = target;
return proxy;
}
- (id)forwardingTargetForSelector:(SEL)aSelector
{
return self.target;
}
@end

NSTimer

1
2
3
4
5
6
7
8
9
10
11
12
13
14
15
16
17
18
19
20
21
22
23
@interface TimerViewController ()
//@property (nonatomic, strong) CADisplayLink *link;
@property (nonatomic, strong) NSTimer *timer;
@end
@implementation TimerViewController
- (void)viewDidLoad {
[super viewDidLoad];
self.timer = [NSTimer scheduledTimerWithTimeInterval:1.0 target:[YQProxy proxyWithTarget:self] selector:@selector(timerTest) userInfo:nil repeats:YES];
}
- (void)timerTest
{
NSLog(@"%s", __func__);
}
- (void)dealloc
{
NSLog(@"%s", __func__);
[self.timer invalidate];
}
@end

打印结果:

1
2
3
4
5
-[TimerViewController timerTest]
-[TimerViewController dealloc]

1
2
3
4
5
6
7
8
9
10
11
12
13
14
15
16
17
18
19
20
21
22
23
24
@interface TimerViewController ()
@property (nonatomic, strong) CADisplayLink *link;
@end
@implementation TimerViewController
- (void)viewDidLoad {
[super viewDidLoad];
self.link = [CADisplayLink displayLinkWithTarget:[YQProxy proxyWithTarget:self] selector:@selector(timerTest)];
[self.link addToRunLoop:[NSRunLoop currentRunLoop] forMode:NSDefaultRunLoopMode];
}
- (void)timerTest
{
NSLog(@"%s", __func__);
}
- (void)dealloc
{
NSLog(@"%s", __func__);
[self.link invalidate];
}
@end

打印结果:

1
2
3
4
5
6
......
-[TimerViewController timerTest]
-[TimerViewController dealloc]

传给定时器的 target 是 YQProxy 对象,在 YQProxy 对象尝试调用 -(void)timerTest 方法时,发现没有实现后会调用 - (id)forwardingTargetForSelector:(SEL)aSelector 方法走消息转发的逻辑,在该方法内部返回已经实现了 -(void)timerTest 方法的对象,就可以正常实现 timer 定时器调用 -(void)timerTest 方法的逻辑了。

因为 YQProxy 对象没有实现 -(void)timerTest 方法,所以需要添加消息转发逻辑。如果 YQProxy 中没有添加消息转发的逻辑会出现如下报错:
内存管理03

YQProxy 会在其类对象以及父类的类对象里查找 -(void)timerTest 方法,查找了一圈后发现找不到,就会抛出错误。

使用代理对象(NSProxy)

定义 YQTimerProxy 继承自 NSProxy:

1
2
3
4
5
6
7
8
9
10
11
12
13
14
15
16
17
18
19
20
21
22
23
@interface YQTimerProxy : NSProxy
+ (instancetype)proxyWithTarget:(id)target;
@property (nonatomic, weak) id target;
@end
@implementation YQTimerProxy
+ (instancetype)proxyWithTarget:(id)target
{
YQTimerProxy *proxy = [YQTimerProxy alloc];
proxy.target = target;
return proxy;
}
- (NSMethodSignature *)methodSignatureForSelector:(SEL)sel
{
return [self.target methodSignatureForSelector:sel];
}
- (void)forwardInvocation:(NSInvocation *)invocation
{
[invocation invokeWithTarget:self.target];
}
@end

NSProxy 对象没有 -(instancetype)init 方法,直接 alloc 就可以了。

NSTimer

1
2
3
4
5
6
7
8
9
10
11
12
13
14
15
16
17
18
19
20
21
22
23
24
25
26
@interface TimerViewController ()
@property (nonatomic, strong) NSTimer *timer;
@end
@implementation TimerViewController
- (void)viewDidLoad {
[super viewDidLoad];
self.timer = [NSTimer scheduledTimerWithTimeInterval:1.0
target:[YQTimerProxy proxyWithTarget:self]
selector:@selector(timerTest)
userInfo:nil
repeats:YES];
}
- (void)timerTest
{
NSLog(@"%s", __func__);
}
- (void)dealloc
{
NSLog(@"%s", __func__);
[self.timer invalidate];
}
@end

打印结果:

1
2
3
4
5
-[TimerViewController timerTest]
-[TimerViewController dealloc]

1
2
3
4
5
6
7
8
9
10
11
12
13
14
15
16
17
18
19
20
21
22
23
24
@interface TimerViewController ()
@property (nonatomic, strong) CADisplayLink *link;
@end
@implementation TimerViewController
- (void)viewDidLoad {
[super viewDidLoad];
self.link = [CADisplayLink displayLinkWithTarget:[YQTimerProxy proxyWithTarget:self] selector:@selector(timerTest)];
[self.link addToRunLoop:[NSRunLoop currentRunLoop] forMode:NSDefaultRunLoopMode];
}
- (void)timerTest
{
NSLog(@"%s", __func__);
}
- (void)dealloc
{
NSLog(@"%s", __func__);
[self.link invalidate];
}
@end

传给定时器的 target 是 YQTimerProxy 对象,YQTimerProxy 对象不会尝试调用 -(void)timerTest 方法,而是直接走消息转发逻辑,在对应的消息转发的方法里返回已经实现了 -(void)timerTest 方法的对象,就可以正常实现 timer 定时器调用 -(void)timerTest 方法的逻辑了。

因为 YQTimerProxy 对象不会尝试调用 -(void)timerTest 方法,而是直接调用 - (NSMethodSignature *)methodSignatureForSelector:(SEL)sel 方法,所以需要添加消息转发逻辑。如果 YQTimerProxy 中没有添加消息转发的逻辑会出现如下报错:
内存管理04

可以看到 YQTimerProxy 没有去查找 -(void)timerTest 方法,而是直接查找的 - (NSMethodSignature *)methodSignatureForSelector:(SEL)sel 方法。这一点可以通过 GNUStep 查看 NSProxy 的源码找到原因。NSProxy 内部的方法的实现都是直接调用的 - (NSMethodSignature *)methodSignatureForSelector:(SEL)sel 方法,因此 NSProxy 作为代理对象效率更高。

NSProxy

1
2
3
4
5
6
7
8
9
10
11
@interface ViewController ()
@end
@implementation ViewController
- (void)viewDidLoad {
[super viewDidLoad];
YQProxy *proxy1 = [YQProxy proxyWithTarget:self];
YQTimerProxy *proxy2 = [YQTimerProxy proxyWithTarget:self];
NSLog(@"%d %d", [proxy1 isKindOfClass:[ViewController class]], [proxy2 isKindOfClass:[ViewController class]]);
}
@end

打印结果:

1
0 1

从打印结果可以看到,YQProxy 的实例对象和 YQTimerProxy 的实列对象在判断是否是 ViewController 的对象类型的时候结果不同。这是因为 YQTimerProxy 继承自 NSProxy,NSProxy 的 -(BOOL) isKindOfClass:(Class)aClass 方法的实现与普通的 OC 对象同。通过 GNUStep 查看 NSProxy 的源码:

1
2
3
4
5
6
7
8
9
10
11
12
13
14
- (BOOL)isKindOfClass:(Class)aClass
{
NSMethodSignature *sig;
NSInvocation *inv;
BOOL ret;
sig = [self methodSignatureForSelector: _cmd];
inv = [NSInvocation invocationWithMethodSignature: sig];
[inv setSelector: _cmd];
[inv setArgument: &aClass atIndex: 2];
[self forwardInvocation: inv];
[inv getReturnValue: &ret];
return ret;
}

可以看到,NSProxy 的 -(BOOL)isKindOfClass:(Class)aClass 方法内部直接调用了 - (NSMethodSignature *)methodSignatureForSelector:(SEL)sel 方法。

普通 OC 对象的 -(BOOL)isKindOfClass:(Class)aClass 方法实现 objc4-781

1
2
3
4
5
6
- (BOOL)isKindOfClass:(Class)cls {
for (Class tcls = [self class]; tcls; tcls = tcls->superclass) {
if (tcls == cls) return YES;
}
return NO;
}

GCD 定时器

CADisplayLink 和 NSTimer 依赖于 RunLoop,如果 RunLoop 的任务过于繁重,可能会导致 CADisplayLink 和 NSTimer 不准时。GCD 的定时器会更加准时。

block 回调:

1
2
3
4
5
6
7
8
9
10
11
12
13
14
15
16
17
18
19
20
21
22
23
@interface ViewController ()
@property (nonatomic, strong) dispatch_source_t timer;
@end
@implementation ViewController
- (void)viewDidLoad {
[super viewDidLoad];
NSLog(@"%s", __func__);
// 队列
dispatch_queue_t queue = dispatch_get_main_queue();
// 创建定时器
dispatch_source_t timer = dispatch_source_create(DISPATCH_SOURCE_TYPE_TIMER, 0, 0, queue);
// 设置时间(定时器,延迟执行时间,执行时间间隔,误差)
dispatch_source_set_timer(timer, dispatch_time(DISPATCH_TIME_NOW, 2 * NSEC_PER_SEC), 1 * NSEC_PER_SEC, 0);
// 回调
dispatch_source_set_event_handler(timer, ^{
NSLog(@"GCD timer");
});
// 启动定时器
dispatch_resume(timer);
self.timer = timer;
}
@end

打印结果:

1
2
3
4
5
18:16:38.889349+0800 内存管理-定时器[15880:352867] -[ViewController viewDidLoad]
18:16:40.889609+0800 内存管理-定时器[15880:352867] GCD timer
18:16:41.889685+0800 内存管理-定时器[15880:352867] GCD timer
18:16:42.889624+0800 内存管理-定时器[15880:352867] GCD timer
......

函数回调:

1
2
3
4
5
6
7
8
9
10
11
12
13
14
15
16
17
18
19
20
21
22
23
24
25
26
27
28
@interface ViewController ()
@property (nonatomic, strong) dispatch_source_t timer;
@end
@implementation ViewController
- (void)viewDidLoad {
[super viewDidLoad];
NSLog(@"%s", __func__);
// 队列
dispatch_queue_t queue = dispatch_get_main_queue();
// 创建定时器
dispatch_source_t timer = dispatch_source_create(DISPATCH_SOURCE_TYPE_TIMER, 0, 0, queue);
// 设置时间(定时器,延迟执行时间,执行时间间隔,误差)
dispatch_source_set_timer(timer, dispatch_time(DISPATCH_TIME_NOW, 2 * NSEC_PER_SEC), 1 * NSEC_PER_SEC, 0);
// 回调
dispatch_source_set_event_handler_f(timer, timerFire);
// 启动定时器
dispatch_resume(timer);
self.timer = timer;
}
void timerFire(void *param)
{
NSLog(@"GCD timer - %@", [NSThread currentThread]);
}
@end

打印结果:

1
2
3
4
5
20:37:01.629410+0800 内存管理-定时器[1363:25276] -[ViewController viewDidLoad]
20:37:03.629774+0800 内存管理-定时器[1363:25276] GCD timer - <NSThread: 0x600001b70d40>{number = 1, name = main}
20:37:04.629784+0800 内存管理-定时器[1363:25276] GCD timer - <NSThread: 0x600001b70d40>{number = 1, name = main}
20:37:05.629800+0800 内存管理-定时器[1363:25276] GCD timer - <NSThread: 0x600001b70d40>{number = 1, name = main}
......

自定义队列

1
2
3
4
5
6
7
8
9
10
11
12
13
14
15
16
17
18
19
20
21
22
23
24
25
26
@interface ViewController ()
@property (nonatomic, strong) dispatch_source_t timer;
@end
@implementation ViewController
- (void)viewDidLoad {
[super viewDidLoad];
NSLog(@"%s", __func__);
// 自定义队列
dispatch_queue_t queue = dispatch_queue_create("GCDTimer", NULL);
// 创建定时器
dispatch_source_t timer = dispatch_source_create(DISPATCH_SOURCE_TYPE_TIMER, 0, 0, queue);
// 设置时间(定时器,延迟执行时间,执行时间间隔,误差)
dispatch_source_set_timer(timer, dispatch_time(DISPATCH_TIME_NOW, 2 * NSEC_PER_SEC), 1 * NSEC_PER_SEC, 0);
// 回调
dispatch_source_set_event_handler_f(timer, timerFire);
// 启动定时器
dispatch_resume(timer);
self.timer = timer;
}
void timerFire(void *param)
{
NSLog(@"GCD timer - %@", [NSThread currentThread]);
}
@end

打印结果:

1
2
3
4
5
20:39:58.857389+0800 内存管理-定时器[1460:28690] -[ViewController viewDidLoad]
20:40:00.857845+0800 内存管理-定时器[1460:28836] GCD timer - <NSThread: 0x600002119280>{number = 5, name = (null)}
20:40:01.857692+0800 内存管理-定时器[1460:28835] GCD timer - <NSThread: 0x6000021272c0>{number = 6, name = (null)}
20:40:02.857792+0800 内存管理-定时器[1460:28836] GCD timer - <NSThread: 0x600002119280>{number = 5, name = (null)}
......

封装 GCD

1
2
3
4
5
6
7
8
9
10
11
12
13
14
15
16
17
18
19
20
21
22
23
24
25
26
27
28
29
30
31
32
33
34
35
36
37
38
39
40
41
42
43
44
45
46
47
48
49
50
51
52
53
54
55
56
57
58
59
60
61
62
63
64
65
66
67
68
69
70
71
72
73
74
75
76
77
78
79
80
81
82
83
84
85
86
87
88
89
90
91
92
93
94
95
96
97
@interface YQGCDTimer : NSObject
/**
block 回调
*/
+ (NSString *)execTask:(void(^)(void))task
start:(NSTimeInterval)start
interval:(NSTimeInterval)interval
repeats:(BOOL)repeats
async:(BOOL)async;
/**
函数回调
*/
+ (NSString *)execTaskWithTarget:(id)target
selector:(SEL)selector
start:(NSTimeInterval)start
interval:(NSTimeInterval)interval
repeats:(BOOL)repeats
async:(BOOL)async;
/**
取消
*/
+ (void)cancelTask:(NSString *)name;
@end
NSInteger index_;
static NSMutableDictionary *timers_;
dispatch_semaphore_t semaphore_;
@implementation YQGCDTimer
+ (void)initialize
{
static dispatch_once_t onceToken;
dispatch_once(&onceToken, ^{
timers_ = [NSMutableDictionary dictionary];
semaphore_ = dispatch_semaphore_create(1);
index_ = 0;
});
}
+ (NSString *)execTask:(void (^)(void))task start:(NSTimeInterval)start interval:(NSTimeInterval)interval repeats:(BOOL)repeats async:(BOOL)async
{
if (!task || start < 0 || (interval <= 0 && repeats)) return nil;
// 队列(全局串行队列或主队列)
dispatch_queue_t queue = async ? dispatch_get_global_queue(0, 0) : dispatch_get_main_queue();
// 创建定时器
dispatch_source_t timer = dispatch_source_create(DISPATCH_SOURCE_TYPE_TIMER, 0, 0, queue);
// 设置时间
dispatch_source_set_timer(timer, dispatch_time(DISPATCH_TIME_NOW, start * NSEC_PER_SEC), interval * NSEC_PER_SEC, 0);
// 回调
dispatch_source_set_event_handler(timer, ^{
task();
// 不需要重复任务
if (!repeats) {
dispatch_source_cancel(timer);
}
});
// 加锁
dispatch_semaphore_wait(semaphore_, DISPATCH_TIME_FOREVER);
// 定时器唯一标识
NSString *identify = [NSString stringWithFormat:@"%ld", (long)index_++];
// 保存
timers_[identify] = timer;
// 解锁
dispatch_semaphore_signal(semaphore_);
// 启动定时器
dispatch_resume(timer);
return identify;
}
+ (NSString *)execTaskWithTarget:(id)target selector:(SEL)selector start:(NSTimeInterval)start interval:(NSTimeInterval)interval repeats:(BOOL)repeats async:(BOOL)async
{
return [self execTask:^{
if ([target respondsToSelector:selector]) {
#pragma clang diagnostic push
#pragma clang diagnostic ignored "-Warc-performSelector-leaks"
[target performSelector:selector];
#pragma clang diagnostic pop
}
} start:start interval:interval repeats:repeats async:async];
}
+ (void)cancelTask:(NSString *)name
{
if (name.length == 0) return;
// 加锁
dispatch_semaphore_wait(semaphore_, DISPATCH_TIME_FOREVER);
dispatch_source_t timer = timers_[name];
if (timer) {
dispatch_source_cancel(timer);
[timers_ removeObjectForKey:name];
}
// 解锁
dispatch_semaphore_signal(semaphore_);
}
@end

调用 block 回调方法:

1
2
3
4
5
6
7
8
9
10
11
12
13
14
15
16
17
18
19
@interface TimerViewController ()
@property (nonatomic, copy) NSString *task;
@end
@implementation TimerViewController
- (void)viewDidLoad {
[super viewDidLoad];
NSLog(@"%s", __func__);
self.task = [YQGCDTimer execTask:^{
NSLog(@"GCD timer");
} start:2 interval:1 repeats:YES async:NO];
}
- (void)touchesBegan:(NSSet<UITouch *> *)touches withEvent:(UIEvent *)event
{
[YQGCDTimer cancelTask:self.task];
}
@end

调用函数回调方法:

1
2
3
4
5
6
7
8
9
10
11
12
13
14
15
16
17
18
19
20
21
22
@interface TimerViewController ()
@property (nonatomic, copy) NSString *task;
@end
@implementation TimerViewController
- (void)viewDidLoad {
[super viewDidLoad];
NSLog(@"%s", __func__);
self.task = [YQGCDTimer execTaskWithTarget:self selector:@selector(timerTest) start:2 interval:1 repeats:YES async:NO];
}
- (void)timerTest
{
NSLog(@"%s", __func__);
}
- (void)touchesBegan:(NSSet<UITouch *> *)touches withEvent:(UIEvent *)event
{
[YQGCDTimer cancelTask:self.task];
}
@end

打印结果:

1
2
3
4
21:18:01.050592+0800 内存管理-定时器[2321:52592] -[TimerViewController viewDidLoad]
21:18:03.050800+0800 内存管理-定时器[2321:52592] GCD timer
21:18:04.050986+0800 内存管理-定时器[2321:52592] GCD timer
21:18:05.050943+0800 内存管理-定时器[2321:52592] GCD timer

去掉警告:

1
2
3
4
5
6
7
8
9
10
11
+ (NSString *)execTaskWithTarget:(id)target selector:(SEL)selector start:(NSTimeInterval)start interval:(NSTimeInterval)interval repeats:(BOOL)repeats async:(BOOL)async
{
return [self execTask:^{
if ([target respondsToSelector:selector]) {
#pragma clang diagnostic push
#pragma clang diagnostic ignored "-Warc-performSelector-leaks"
[target performSelector:selector];
#pragma clang diagnostic pop
}
} start:start interval:interval repeats:repeats async:async];
}

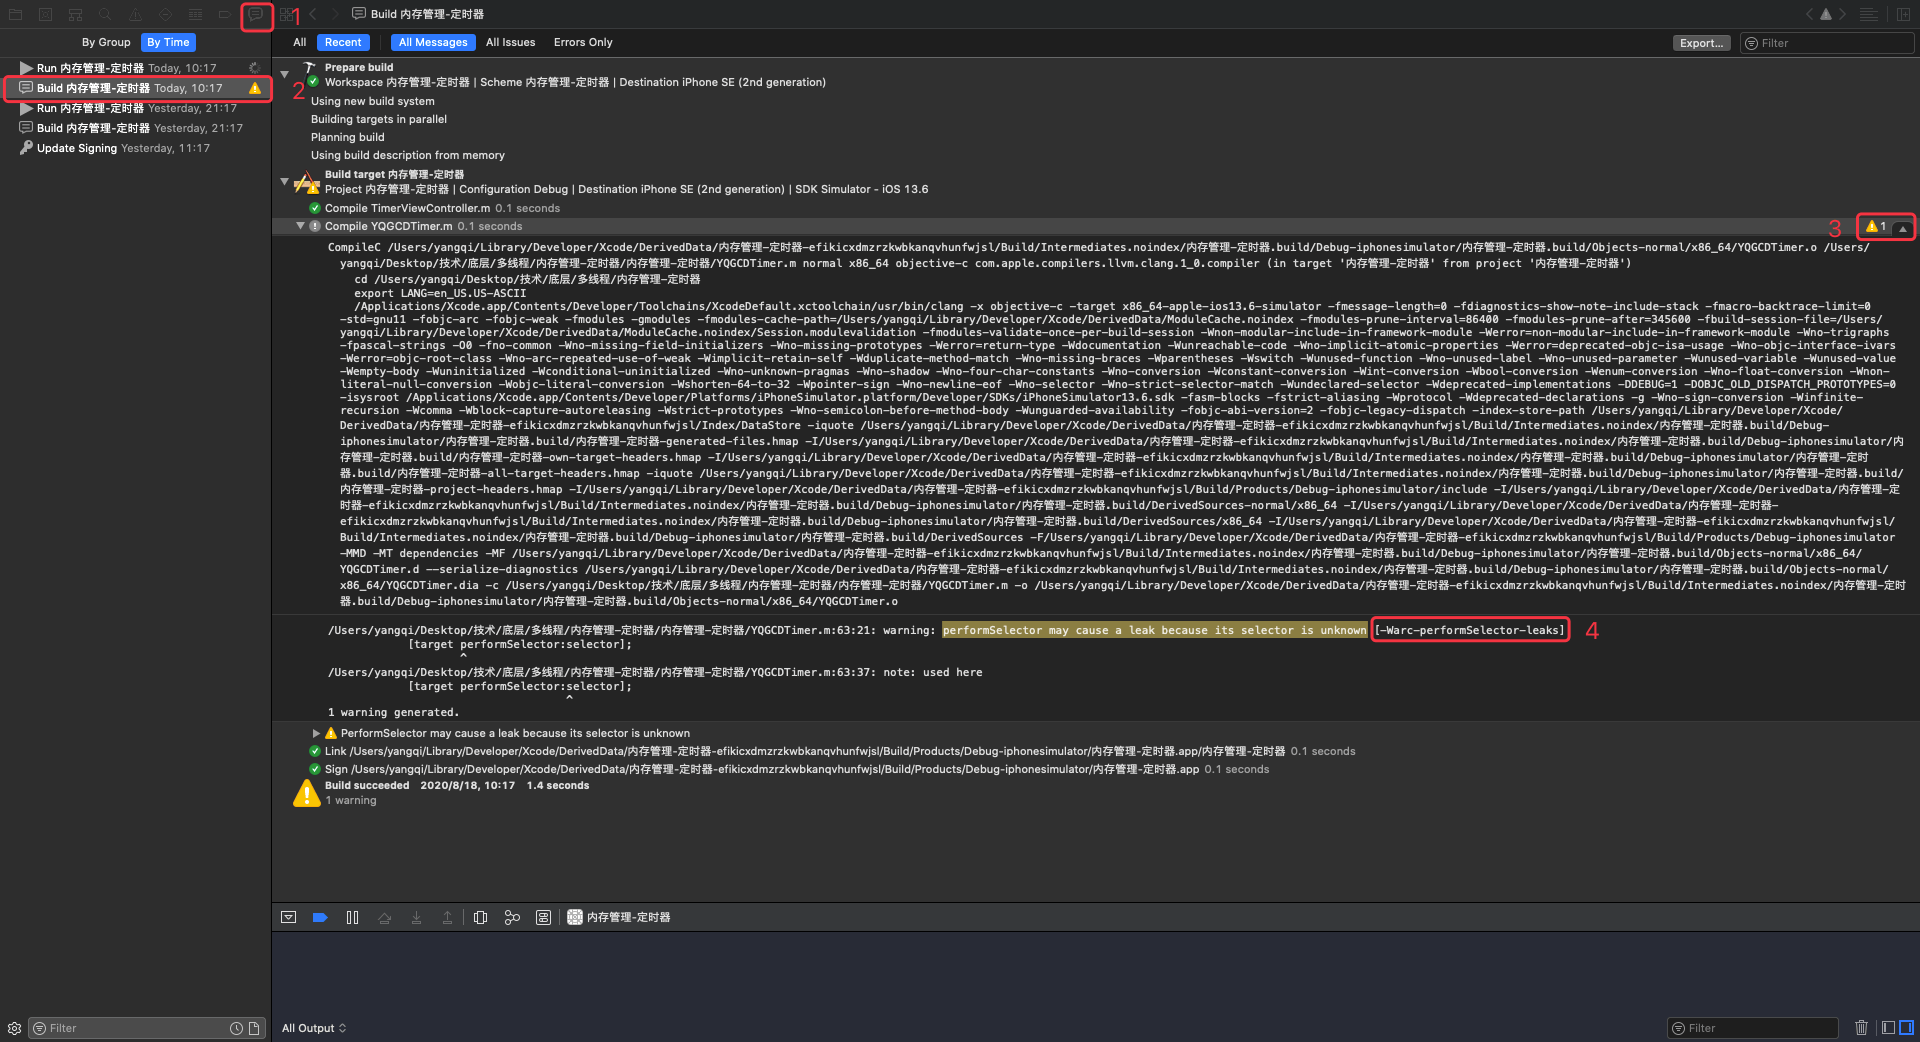
"-Warc-performSelector-leaks" 可以在这里找到:
内存管理05

iOS程序的内存布局

  • 代码段:编译之后的代码
  • 数据段:字符串常量、已初始化数据和未初始化数据
  • 栈:函数调用开销,比如局部变量。(分配的内存空间地址越来越小)
  • 堆:通过 alloc、malloc、calloc 等动态分配的空间,分配的内存空间地址越来越大
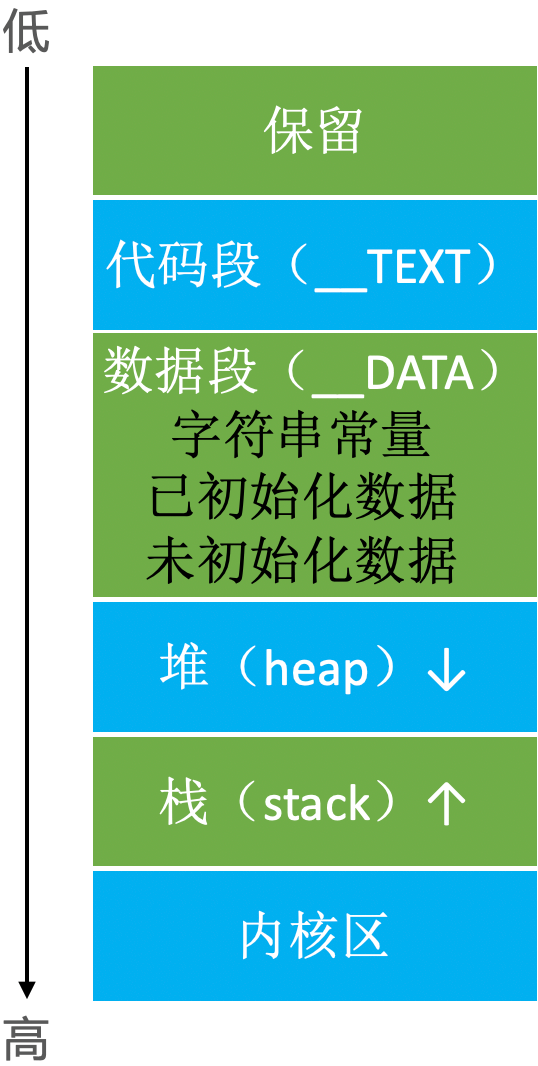
    内存管理06
1
2
3
4
5
6
7
8
9
10
11
12
13
14
15
16
17
18
19
20
21
22
23
24
// 已初始化的全局变量
int a = 10;
// 未初始化的全局变量
int b;
int main(int argc, char * argv[]) {
@autoreleasepool {
// 已初始化的静态变量
static int c = 20;
// 未初始化的静态变量
static int d;
// 栈
int e;
int f = 20;
// 字符串常量
NSString *str = @"123";
// 堆
NSObject *obj = [[NSObject alloc] init];
NSLog(@"\n&a=%p\n&b=%p\n&c=%p\n&d=%p\n&e=%p\n&f=%p\nstr=%p\nobj1=%p\nobj2=%p\n",
&a, &b, &c, &d, &e, &f, str, obj1, obj2);
return UIApplicationMain(argc, argv, nil, NSStringFromClass([AppDelegate class]));
}
}

打印结果:

1
2
3
4
5
6
7
8
9
&a=0x105bbee38
&b=0x105bbef04
&c=0x105bbee3c
&d=0x105bbef00
&e=0x7ffeea042c2c
&f=0x7ffeea042c28
str=0x105bbe070
obj1=0x600002528110
obj2=0x600002528120

打印结果解析(内地地址从小到大排序):

1
2
3
4
5
6
7
8
9
10
11
12
13
14
15
16
17
18
// 字符串常量
str=0x105bbe070
// 已初始化的全局变量、静态变量
&a=0x105bbee38
&c=0x105bbee3c
// 未初始化的全局变量、静态变量
&d=0x105bbef00
&b=0x105bbef04
// 堆
obj1=0x600002528110
obj2=0x600002528120
// 栈
&f=0x7ffeea042c28
&e=0x7ffeea042c2c

内存地址大小比较:

1
str < a < c < d < b < obj1 < obj2 < f < e

数据段:str < a < c < d < b,空间地址越来越大。
堆区:obj1 比 b 多了3位数,这3位数的空间都属于数据段。obj1 的内存地址首位数字为6,obj1 < obj2,分配的内存空间越来越大(越来越逼近栈区)。
栈区:e 的内存地址首位数字为7,f < e,分配的内存空间越来越小(越来越逼近堆区)。

Tagged Pointer

  • 从64bit开始,iOS 引入了 Tagged Pointer 技术,用于优化 NSNumber、NSDate、NSString 等小对象的存储。
  • 在没有使用 Tagged Pointer 之前,NSNumber 等对象需要动态分配内存、维护引用计数等,NSNumber 等对象的指针存储的是堆中 NSNumber 对象的地址值。
  • 使用 Tagged Pointer 之后,NSNumber 指针里面存储的数据变成了:Tag + Data,也就是将数据直接存储在了指针中。
  • 当指针不够存储数据时,才会使用动态分配内存的方式来存储数据。
  • objc_msgSend() 能识别 Tagged Pointer,比如 NSNumber 的 intValue 方法,直接从指针提取数据,节省了以前的调用开销。
  • 如何判断一个指针是否为Tagged Pointer?
    iOS平台,最高有效位是1(第64bit)
    Mac平台,最低有效位是1

NSNumber

1
2
3
4
5
6
7
8
9
10
11
12
13
14
15
int main(int argc, char * argv[]) {
NSString * appDelegateClassName;
@autoreleasepool {
NSNumber *number1 = @4;
NSNumber *number2 = @5;
NSNumber *number3 = @(0xFFFFFFFFFFFFFFFF);
NSLog(@"%p %p %p", number1, number2, number3);
int a = [number1 intValue];
appDelegateClassName = NSStringFromClass([AppDelegate class]);
}
return UIApplicationMain(argc, argv, nil, appDelegateClassName);
}

打印结果:

1
0xb0d1e4bcdb858740 0xb0d1e4bcdb858750 0x600000b4c080

0xb0d1e4bcdb8587400xb0d1e4bcdb858750 去掉前面相同的部分后是 0x400x50,可以看出数据直接存储在了指针中。当指针不够存储数据时,如 @(0xFFFFFFFFFFFFFFFF) 打印出来的内存地址是 0x600000b4c080(堆空间里 NSNumber 对象的地址值),是使用了动态分配内存的方式来存储数据。

因为 objc_msgSend() 能识别 Tagged Pointer,所以在 number1 调用 intValue 方法时,objc_msgSend() 直接从指针提取数据。

1
int a = [number1 intValue];

可以看出 Tagged Pointer 技术不仅仅是内存空间的优化,也对使用过程进行了优化。

NSString

例一:

1
2
3
4
5
6
7
8
9
10
11
12
13
14
15
16
@interface ViewController ()
@property (nonatomic, copy) NSString *name;
@end
@implementation ViewController
- (void)viewDidLoad {
[super viewDidLoad];
dispatch_queue_t queue = dispatch_get_global_queue(0, 0);
for (int i=0; i<1000; i++) {
dispatch_async(queue, ^{
self.name = [NSString stringWithFormat:@"abcdefghijk"];
});
}
}
@end

运行后报错(坏内存访问):
内存管理07

因为 name 是非原子性(nonatomic)的,多条线程同时访问 name 的 set 方法时,如果有一条线程已经将 _name 释放了,其它线程再次对 _name 进行释放操作就会出现坏内存访问的错误:

1
2
3
4
5
6
7
- (void)setName:(NSString *)name
{
if (_name != name) {
[_name release]; // 多条线程同时操作这一行,如果 `_name` 已经被释放了,其它线程再次对 `_name` 进行 release 操作,坏内存访问
_name = [name copy];
}
}

解决方案一:

name 改成原子性的:

1
@property (atomic, copy) NSString *name;

程序运行正常。

name 改成原子性后,name 的 set 方法就是线程安全的了,不会出现多条线程同时对 name 进行 release 操作。

解决方案二:

name 改成原子性后,任何地方、任何时候调用 name 的 get 方法都是有锁的。因为 name 只需要在异步线程访问时加锁,如果在主线程的话没有必要加锁,所以不使用 atomic 而是选择手动加锁,哪里需要就在哪里加锁,尽可能的提升效率节省资源:

1
2
3
4
5
6
7
8
9
10
11
12
13
14
15
16
17
18
19
20
21
22
23
24
25
26
27
28
29
30
31
32
/// 加锁
#define SemaphoreBegin \
static dispatch_semaphore_t semaphore; \
static dispatch_once_t onceToken; \
dispatch_once(&onceToken, ^{ \
semaphore = dispatch_semaphore_create(1); \
}); \
dispatch_semaphore_wait(semaphore, DISPATCH_TIME_FOREVER);
/// 解锁
#define SemaphoreEnd \
dispatch_semaphore_signal(semaphore);
@interface ViewController ()
@property (nonatomic, copy) NSString *name;
@end
@implementation ViewController
- (void)viewDidLoad {
[super viewDidLoad];
dispatch_queue_t queue = dispatch_get_global_queue(0, 0);
for (int i=0; i<1000; i++) {
dispatch_async(queue, ^{
// 加锁
SemaphoreBegin;
self.name = [NSString stringWithFormat:@"abcdefghijk"];
// 解锁
SemaphoreEnd;
});
}
}
@end

程序运行正常。

例二:

@"abcdefghijk" 改成 @"abc"

1
2
3
4
5
6
7
8
9
10
11
12
13
14
15
16
@interface ViewController ()
@property (nonatomic, copy) NSString *name;
@end
@implementation ViewController
- (void)viewDidLoad {
[super viewDidLoad];
dispatch_queue_t queue = dispatch_get_global_queue(0, 0);
for (int i=0; i<1000; i++) {
dispatch_async(queue, ^{
self.name = [NSString stringWithFormat:@"abc"];
});
}
}
@end

运行正常。

同样是多线程访问、没有加锁,但是将 @"abcdefghijk" 改成 @"abc" 后,就不会出现坏内存访问的错误,难道是没有调用 name 的 set 方法吗?是的。

1
2
3
4
5
6
7
8
9
10
@implementation ViewController
- (void)viewDidLoad {
[super viewDidLoad];
NSString *str1 = [NSString stringWithFormat:@"abcdefghijk"];
NSString *str2 = [NSString stringWithFormat:@"abc"];
NSLog(@"%p %p", str1, str2);
NSLog(@"%@ %@", [str1 class], [str2 class]);
}
@end

打印结果:

1
2
0x600002aefdc0 0x9cedd15798132057
__NSCFString NSTaggedPointerString

str1 是一个 __NSCFString,其内存地址是6开头的,说明 str1 是存储在堆空间里的。
str2 是一个 NSTaggedPointerString@"abc" 存储在 str2 指针里,不会调用 set 方法,取值时也不会调用 get 方法而是直接从指针里取值。

判断是否是 Tagged Pointer

objc4-781 的 objc-internal.h 文件里:

_OBJC_TAG_MASK 定义:

1
2
3
4
5
6
7
8
9
10
11
12
13
#if (TARGET_OS_OSX || TARGET_OS_IOSMAC) && __x86_64__
// 64-bit Mac - tag bit is LSB
# define OBJC_MSB_TAGGED_POINTERS 0 // Mac
#else
// Everything else - tag bit is MSB
# define OBJC_MSB_TAGGED_POINTERS 1 // iPhone(真机/模拟器)
#endif
#if OBJC_MSB_TAGGED_POINTERS
# define _OBJC_TAG_MASK (1UL<<63)
#else
# define _OBJC_TAG_MASK 1UL
#endif

判断是否是 tagged pointer:

1
2
3
4
5
static inline bool
_objc_isTaggedPointer(const void * _Nullable ptr)
{
return ((uintptr_t)ptr & _OBJC_TAG_MASK) == _OBJC_TAG_MASK;
}

如果是 mac,_OBJC_TAG_MASK 等于1。如果不是 mac, _OBJC_TAG_MASK 等于 1UL<<63。_OBJC_TAG_MASK 和指针地址进行与运算,判断结果是否是 _OBJC_TAG_MASK,如果是的话,那这个指针就是 tagged pointer。
在 iOS 平台,如果指针转成2进制后它的最高位(64位)为1的话,那么这个指针就是 tagged pointer。
在 Mac 平台,如果指针转成2进制后它的最低位为1的话,那么这个指针就是 tagged pointer。

MRC

  • 在 iOS 中,使用引用计数来管理 OC 对象的内存。
  • 一个新创建的 OC 对象引用计数默认是1,当引用计数减为0,OC 对象就会销毁,释放其占用的内存空间。
  • 调用 retain 会让 OC 对象的引用计数+1,调用 release 会让 OC 对象的引用计数-1。
  • 内存管理的经验总结:
    当调用 alloc、new、copy、mutableCopy 方法返回了一个对象,在不需要这个对象时,要调用 release 或者 autorelease 来释放它。
    想拥有某个对象,就让它的引用计数+1;不想再拥有某个对象,就让它的引用计数-1。
  • 可以通过以下私有函数来查看自动释放池的情况
    1
    extern void _objc_autoreleasePoolPrint(void);

👉 使用 MRC:Build Setting -> Objective-C Automatic Referencd Counting 设置为 YES。

定义 Person 类:

1
2
3
4
5
6
7
8
9
10
@interface Person : NSObject
@end
@implementation Person
- (void)dealloc
{
[super dealloc];
NSLog(@"%s", __func__);
}
@end

release

创建 person 对象:

1
2
3
4
5
6
7
int main(int argc, const char * argv[]) {
@autoreleasepool {
Person *person = [[Person alloc] init]; // Person *person = [Person new];
NSLog(@"%zd", person.retainCount);
}
return 0;
}

打印结果:

1
1

从打印结果可以看到,person 对象调用完 alloc 方法后引用计数是1,没有被释放。

添加 release:

1
2
3
4
5
6
7
8
9
10
11
12
int main(int argc, const char * argv[]) {
@autoreleasepool {
Person *person = [[Person alloc] init];
// 使用 person 对象
NSLog(@"%zd", person.retainCount);
[person release];
NSLog(@"111");
}
return 0;
}

打印结果:

1
2
3
1
-[Person dealloc]
111

从打印结果可以看到,因为 person 对象调用完 alloc 方法后引用计数是1,调用完 release 方法后引用计数减1等于0,所以 person 对象在调用 release 的那一刻就被释放了。

MRC 下 alloc 方法和 release 方法是一一对应的,每个对象使用完成后都要调用一下 release 方法,这样才能避免内存泄漏。另外,在使用 release 方法管理 person 对象时,要保证在调用 release 方法之前使用 person 对象。

autorelease

1
2
3
4
5
6
7
8
9
int main(int argc, const char * argv[]) {
@autoreleasepool {
Person *person = [[[Person alloc] init] autorelease];
NSLog(@"%zd", person.retainCount);
NSLog(@"111");
}
NSLog(@"222");
return 0;
}

打印结果:

1
2
3
4
1
111
-[Person dealloc]
222

从打印结果可以看到,因为 person 对象调用完 alloc 方法又调用了 autorelease 后引用计数是1,直到 @autoreleasepool {} 执行完那一刻才被释放。

@autoreleasepool {} 执行完那一刻,会对调用了 autorelease 方法的对象进行 release 操作:

1
2
3
4
5
6
7
8
9
int main(int argc, const char * argv[]) {
@autoreleasepool {
Person *person1 = [[[Person alloc] init] autorelease];
Person *person2 = [[[Person alloc] init] autorelease];
NSLog(@"111");
} // [person release][person release]
NSLog(@"222");
return 0;
}

打印结果:

1
2
3
4
111
-[Person dealloc]
-[Person dealloc]
222

使用 autorelease 方法管理 person 对象的内存,只需要在调用 alloc 方法的同时调用一下 autorelease 方法,就可以放心的使用 person 对象了,当然是在 @autoreleasepool {} 内部使用。不用再关心 person 对象的释放问题,在 @autoreleasepool {} 执行完那一刻,person 对象会自动调用 release 方法。

retain

错误演示:

1
2
3
4
5
6
7
8
9
10
11
12
13
14
15
16
17
18
19
20
21
22
23
24
25
26
27
28
29
30
31
32
33
34
35
36
37
38
39
40
41
42
43
44
45
46
47
48
49
50
51
52
53
54
55
56
57
58
59
60
61
62
63
// Dog
@interface Dog : NSObject
- (void)run;
@end
@implementation Dog
- (void)dealloc
{
[super dealloc];
NSLog(@"%s", __func__);
}
- (void)run
{
NSLog(@"%s", __func__);
}
@end
// Person
@interface Person : NSObject
{
Dog *_dog;
}
- (void)setDog:(Dog *)dog;
- (Dog *)dog;
@end
@implementation Person
- (void)dealloc
{
[super dealloc];
NSLog(@"%s", __func__);
}
- (void)setDog:(Dog *)dog
{
_dog = dog;
}
- (Dog *)dog
{
return _dog;
}
@end
// 调用
int main(int argc, const char * argv[]) {
@autoreleasepool {
Dog *dog = [[Dog alloc] init]; // 引用计数:1
Person *person = [[Person alloc] init];
[person setDog:dog];
[dog release]; // 引用计数:0
[[person dog] run];
[person release];
NSLog(@"111");
}
NSLog(@"222");
return 0;
}

打印信息:

1
-[Dog dealloc]

[[person dog] run] 这个时候 dog 对象因为引用计数为0已经被释放了。
内存管理08

[person setDog:dog] 方法表示 person 对象想要用于 dog 对象,那么 person 对象应该对 dog 的引用计数加1,只要 person 对象还在,dog 对象就不可以被释放。

上面的写法有两个地方需要优化:
1、Person 类的 - (void)setDog:(Dog *)dog 方法在获取 dog 对象时,引用计数需要加1。
2、Person 类的 - (void)dealloc 方法需要对 dog 对象进行 release 操作。

Person 类优化后:

1
2
3
4
5
6
7
8
9
10
11
12
13
14
15
16
17
18
19
20
@implementation Person
- (void)dealloc
{
[_dog release];
_dog = nil;
[super dealloc]; // 父类的 dealloc 放到子类后
NSLog(@"%s", __func__);
}
- (void)setDog:(Dog *)dog
{
_dog = [dog retain];
}
- (Dog *)dog
{
return _dog;
}
@end

打印结果:

1
2
3
4
5
-[Dog run]
-[Dog dealloc]
-[Person dealloc]
111
222

创建两个 person 对象引用 dog 对象:

1
2
3
4
5
6
7
8
9
10
11
12
13
14
15
16
17
18
19
20
21
22
23
int main(int argc, const char * argv[]) {
@autoreleasepool {
Dog *dog = [[Dog alloc] init]; // dog 引用计数:1
Person *person1 = [[Person alloc] init];
[person1 setDog:dog]; // dog 引用计数:2
Person *person2 = [[Person alloc] init];
[person2 setDog:dog]; // dog 引用计数:3
[dog release]; // dog 引用计数:2
[person1 release]; // dog 引用计数:1
[[person2 dog] run];
[person2 release]; // dog 引用计数:0
NSLog(@"111");
}
NSLog(@"222");
return 0;
}

打印结果:

1
2
3
4
5
6
-[Person dealloc]
-[Dog run]
-[Dog dealloc]
-[Person dealloc]
111
222

set 方法

上面 Person 类里的 set 方法还有问题,在 person 对象替换 dog 对象时会出现不释放的问题:

1
2
3
4
5
6
7
8
9
10
11
12
13
14
15
16
17
int main(int argc, const char * argv[]) {
@autoreleasepool {
Dog *dog1 = [[Dog alloc] init]; // dog1 : 1
Dog *dog2 = [[Dog alloc] init]; // dog2 : 1
Person *person = [[Person alloc] init];
[person setDog:dog1]; // dog1 : 2
[person setDog:dog2]; // dog2 : 2
[dog1 release]; // dog1 : 1
[dog2 release]; // dog2 : 1
[person release]; // dog0 : 0
NSLog(@"111");
}
NSLog(@"222");
return 0;
}

打印结果:

1
2
3
4
-[Dog dealloc]
-[Person dealloc]
111
222

从打印结果和注释可以看到,dog1 最后的引用计数是1,没有释放。这是因为 person 对象在拥有 dog1 时,将 _dog 指向了 dog1 并对其引用计数加1,后又将 _dog 指向了 dog2 并对其引用计数加1,所以 person 对象在调用 [_dog release] 时的 _dog 是 dog2 对象,dog1 对象因此少调用了一次 release 方法,最后的引用计数最后为1无法释放。

优化 set 方法:在 person 对象引用新的 dog 对象时,需要先将之前的 dog 对象进行 release 操作。

1
2
3
4
5
6
7
8
9
10
11
12
13
14
15
16
17
18
19
20
21
@implementation Person
- (void)dealloc
{
[_dog release];
_dog = nil;
[super dealloc];
NSLog(@"%s", __func__);
}
- (void)setDog:(Dog *)dog
{
[_dog release];
_dog = [dog retain];
}
- (Dog *)dog
{
return _dog;
}
@end

打印结果:

1
2
3
4
5
-[Dog dealloc]
-[Dog dealloc]
-[Person dealloc]
111
222

从打印结果可以看到,dog1 和 dog2 对象都被释放调用。但是优化后的 set 方法还不够完善,person 对象在重复设置同一个 dog 对象的时候还是有问题:

1
2
3
4
5
6
7
8
9
10
11
12
13
14
15
16
17
18
int main(int argc, const char * argv[]) {
@autoreleasepool {
Dog *dog = [[Dog alloc] init]; // dog1 : 1
Person *person = [[Person alloc] init];
[person setDog:dog]; // dog1 : 2
[dog release]; // dog1 : 1
[person setDog:dog]; // dog1 : 0
[person release];
NSLog(@"111");
}
NSLog(@"222");
return 0;
}

错误信息:
内存管理09

问题出在 Person 类的 set 方法:
第一次赋值,dog 对象的引用计数加一,此时 dog 对象的引用计数等于2。
dog 对象调用了一次 release 方法,此时 dog 对象的引用计数等于1。
第二次赋值,会先调用 [_dog release], 此时 dog 对象的引用计数等于0,dog 对象被释放。再调用 _dog = [dog retain],此时 dog 指向的内存已经被销毁了:

1
2
3
4
5
- (void)setDog:(Dog *)dog
{
[_dog release]; // dog : 0
_dog = [dog retain]; // dog 指向的内存已经被销毁
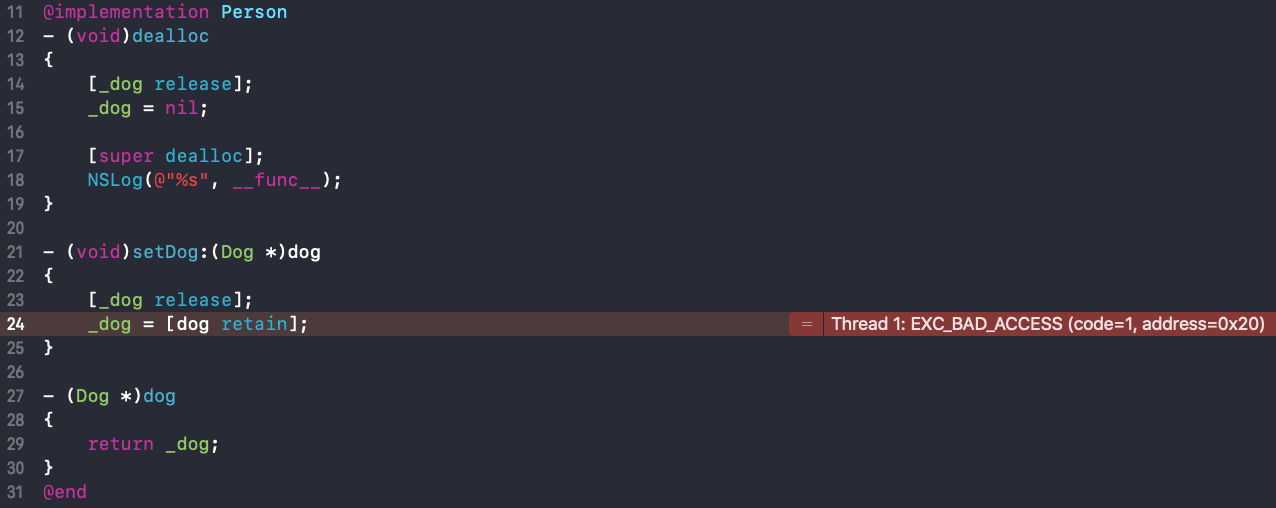
}

因此,在 set 方法里对 _dog 处理前,需要先判断一下 _dog 是否等于传入的 dog 对象。因为一个 person 对象在拥有一个 dog 对象时只需要对其 retain 一次,所以如果 _dog == dog 就不做处理。

优化 Person 类里的 set 方法:

1
2
3
4
5
6
7
8
9
10
11
12
13
14
15
16
17
18
19
20
21
22
@implementation Person
- (void)dealloc
{
self.dog = nil;
[super dealloc];
NSLog(@"%s", __func__);
}
- (void)setDog:(Dog *)dog
{
if (_dog != dog) {
[_dog release];
_dog = [dog retain];
}
}
- (Dog *)dog
{
return _dog;
}
@end

打印结果:

1
2
3
4
-[Dog dealloc]
-[Person dealloc]
111
222

property 属性

在 .h 文件通过 property 声明的属性,编译器会自动生成成员变量和属性的 setter、getter 实现。

基本数据类型

1
2
3
@interface Person : NSObject
@property (nonatomic, assign) int age;
@end

编译器自动生成:

1
2
3
4
5
6
7
8
9
10
11
12
13
14
@implementation Person
@synthesize age = _age;
- (void)setAge:(int)age
{
_age = age;
}
- (int)age
{
return _age;
}
@end

对象类型

1
2
3
@interface Person : NSObject
@property (nonatomic, retain) Dog *dog;
@end

编译器自动生成:

1
2
3
4
5
6
7
8
9
10
11
12
13
14
15
16
17
@implementation Person
@synthesize dog = _dog;
- (void)setDog:(Dog *)dog
{
if (_dog != dog) {
[_dog release];
_dog = [dog retain];
}
}
- (Dog *)dog
{
return _dog;
}
@end

如果是在 MRC 环境下,这种情况下还需要在 delloc 方法里手动调用 _dog 的 release 方法:

1
2
3
4
5
6
7
8
9
@implementation Person
- (void)dealloc
{
self.dog = nil;
[super dealloc];
NSLog(@"%s", __func__);
}
@end

常用代码解析

创建一个 iOS 项目,设置 MRC 环境。

1
2
3
4
5
6
7
8
9
10
11
12
13
14
15
16
17
18
19
20
21
@interface ViewController ()
@property (nonatomic, retain) NSMutableArray *data;
@end
@implementation ViewController
- (void)viewDidLoad {
[super viewDidLoad];
NSMutableArray *data = [[NSMutableArray alloc] init];
self.data = data;
[data release];
}
- (void)dealloc
{
self.data = nil;
[super dealloc];
}
@end

简化:

1
2
3
4
5
6
- (void)viewDidLoad {
[super viewDidLoad];
self.data = [[NSMutableArray alloc] init];
[self.data release];
}

autorelease

1
2
3
4
5
- (void)viewDidLoad {
[super viewDidLoad];
self.data = [[[NSMutableArray alloc] init] autorelease];
}

+array

1
2
3
4
5
- (void)viewDidLoad {
[super viewDidLoad];
self.data = [NSMutableArray array];
}

不是通过 alloc 方法初始化的,而是通过类方法初始化的,在类方法内部已经调用过 autorelease 了。类方法 +array 大概是这样:

1
2
3
4
5
6
@implementation NSMutableArray
+ (instancetype)array
{
return [[[NSMutableArray alloc] init] autorelease];
}
@end

工厂方法

1
2
3
4
5
6
7
8
9
10
11
12
13
14
15
16
17
18
19
20
21
22
23
24
25
26
@interface Person : NSObject
+ (instancetype)person;
@end
@implementation Person
+ (instancetype)person
{
return [[[Person alloc] init] autorelease];
}
- (void)dealloc
{
[super dealloc];
NSLog(@"%s", __func__);
}
@end
int main(int argc, const char * argv[]) {
@autoreleasepool {
Person *person = [Person person];
NSLog(@"111");
}
NSLog(@"222");
return 0;
}

打印结果:

1
2
3
111
-[Person dealloc]
222

copy和mutableCopy

  • 拷贝的目的:产生一个副本对象,跟原对象互不影响
    修改了原对象,不会影响副本对象
    修改了副本对象,不会影响原对象

  • iOS 提供了两个拷贝方法
    1、copy,不可变拷贝,产生不可变副本
    2、mutableCopy,可变拷贝,产生可变副本

拷贝

NSString

1
2
3
4
5
6
7
8
9
10
11
12
13
14
int main(int argc, const char * argv[]) {
@autoreleasepool {
NSString *str1 = [NSString stringWithFormat:@"test"];
NSString *str2 = [str1 copy]; // 返回的是 NSString
NSMutableString *str3 = [str1 mutableCopy]; // 返回的是 NSMutableString
NSLog(@"%@ %@ %@", str1, str2, str3);
NSLog(@"%d %d %d",
[str1 isKindOfClass:[NSMutableString class]],
[str2 isKindOfClass:[NSMutableString class]],
[str3 isKindOfClass:[NSMutableString class]]);
}
return 0;
}

打印结果:

1
2
test test test
0 0 1

str1、str2 和 str3 打印出来都是 test,但是 str1 和 str2 是不可变字符串,str3 是可变字符串。即:
[不可变 copy] -> 不可变
[不可变 mutableCopy] -> 可变

NSMutableString

1
2
3
4
5
6
7
8
9
10
11
12
13
14
int main(int argc, const char * argv[]) {
@autoreleasepool {
NSMutableString *str1 = [NSMutableString stringWithFormat:@"test"];
NSString *str2 = [str1 copy];
NSMutableString *str3 = [str1 mutableCopy];
NSLog(@"%@ %@ %@", str1, str2, str3);
NSLog(@"%d %d %d",
[str1 isKindOfClass:[NSMutableString class]],
[str2 isKindOfClass:[NSMutableString class]],
[str3 isKindOfClass:[NSMutableString class]]);
}
return 0;
}

打印结果:

1
2
test test test
1 0 1

不管是可变字符串还是不可变字符串,调用 copy 返回的都是不可变字符串,调用 mutableCopy 返回的都是可变字符串。

内存管理

在 MRC 环境下,调用 alloc、new、copy、mutableCopy 方法返回了一个对象,在不需要这个对象时,要调用 release 或者 autorelease 来释放它。

1
2
3
4
5
6
7
8
9
10
11
12
int main(int argc, const char * argv[]) {
@autoreleasepool {
NSString *str1 = [[NSString alloc] initWithString:@"test"];
NSString *str2 = [str1 copy];
NSMutableString *str3 = [str1 mutableCopy];
[str1 release];
[str2 release];
[str3 release];
}
return 0;
}

深拷贝和浅拷贝

  • 深拷贝:内容拷贝,产生新的对象
  • 浅拷贝:指针拷贝,没有产生新的对象

NSString

1
2
3
4
5
6
7
8
9
10
11
12
13
14
15
int main(int argc, const char * argv[]) {
@autoreleasepool {
NSString *str1 = [[NSString alloc] initWithFormat:@"test"];
NSString *str2 = [str1 copy]; // 浅拷贝:指针拷贝,没有产生新对象
NSMutableString *str3 = [str1 mutableCopy]; // 深拷贝:内容拷贝,又产生新对象
NSLog(@"%@ %@ %@", str1, str2, str3);
NSLog(@"%p %p %p", str1, str2, str3);
[str1 release];
[str2 release];
[str3 release];
}
return 0;
}

打印结果:

1
2
test test test
0x100001018 0x100001018 0x1007bb4e0

str1、str2 和 str3 打印出来都是 test,但是 str1 和 str2 指向的是同一个内存地址,str3 指向的是另一个内存地址。即 str1 通过 copy 方法拷贝出来的副本 str2 还是原对象(str1),而 str1 通过 mutableCopy 方法拷贝出来的副本 str3 是一个新的对象。
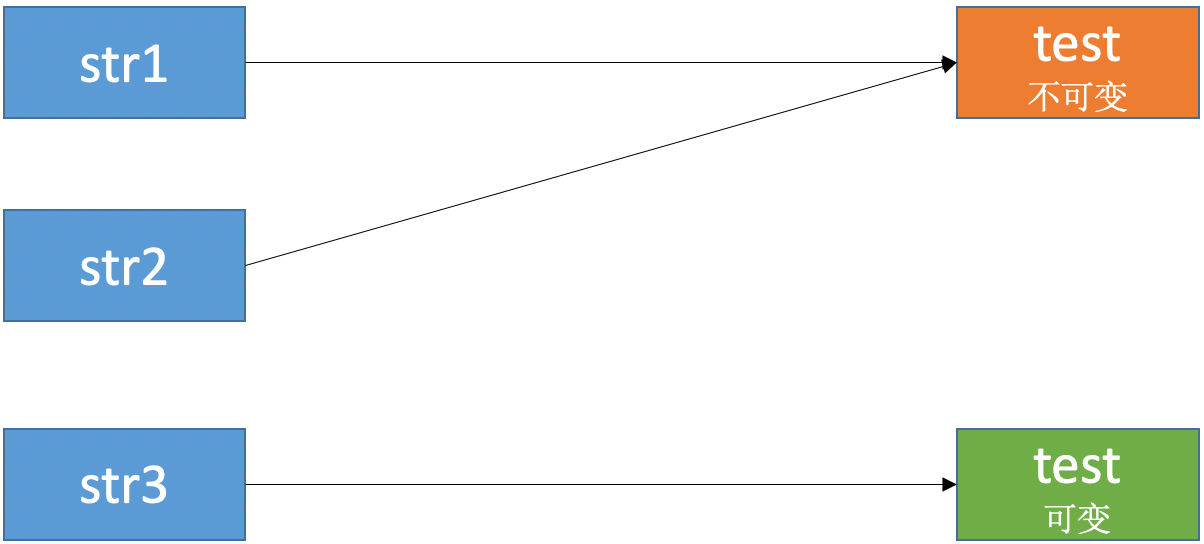
内存管理10

👉 拷贝的目的:产生一个副本对象,跟原对象互不影响。
str1 是一个不可变字符串对象,通过 copy 方法拷贝出来的副本也是不可变字符串对象。因为不可变字符串对象不可以被修改,不可以被修改就不会互相影响,所以 str1 和 str2 指向同一个对象满足拷贝的原则(互不影响)。而且将 str1 和 str2 指向同一个对象还节省了内存。
str1 是一个不可变字符串对象,通过 mutableCopy 方法拷贝出来的副本是可变字符串对象。因为可变字符串对象可以被修改,所以 str3 指向的是一个新的对象,保证在修改 str3 时不会影响到 str1。

(总的来看,既要保证互不影响,也要做到节省资源)

1
2
3
4
5
6
7
8
9
10
11
12
13
14
15
16
17
int main(int argc, const char * argv[]) {
@autoreleasepool {
NSString *str1 = [[NSString alloc] initWithString:@"test"];
NSString *str2 = [[NSString alloc] initWithString:@"test"];
NSString *str3 = [str2 copy];
NSString *str4 = @"test";
NSMutableString *str5 = [str1 mutableCopy];
NSLog(@"%@ %@ %@ %@ %@ %@", @"test", str1, str2, str3, str4, str5);
NSLog(@"%p %p %p %p %p %p", @"test", str1, str2, str3, str4, str5);
[str1 release];
[str2 release];
[str3 release];
}
return 0;
}

打印结果:

1
2
test test test test test test
0x100002040 0x100002040 0x100002040 0x100002040 0x100002040 0x1006bd980

str1、str2、str3 和 str4 都是 @"test" 对象。

引用计数:

1
2
3
4
5
6
7
8
9
10
11
12
13
14
int main(int argc, const char * argv[]) {
@autoreleasepool {
NSString *str1 = [[NSString alloc] initWithFormat:@"test111111111"]; // str1 : 1
NSString *str2 = [str1 copy]; // str1 : 2
NSMutableString *str3 = [str1 mutableCopy];
NSLog(@"%zd", str1.retainCount);
[str1 release];
[str2 release];
[str3 release];
}
return 0;
}

打印结果:

1
2

从打印结果可以看到,str1 在调用 copy 方法后,引用计数加1,相当于调用了一次 retain 方法。

1
2
3
4
5
6
7
8
9
10
11
12
13
14
15
int main(int argc, const char * argv[]) {
@autoreleasepool {
NSString *str1 = [[NSString alloc] initWithFormat:@"test111111111"];
NSString *str2 = [[NSString alloc] initWithFormat:@"test"];
NSString *str3 = [[NSString alloc] initWithString:@"test"];
NSLog(@"%@ %@ %@", [str1 class], [str2 class], [str3 class]);
NSLog(@"%zd %zd %zd", str1.retainCount, str2.retainCount, str3.retainCount);
[str1 release];
[str2 release];
[str3 release];
}
return 0;
}

打印结果:

1
2
__NSCFString NSTaggedPointerString __NSCFConstantString
1 -1 -1

使用 initWithFormat: 方法初始化字符串,字符串长度足够长,创建出来的是 __NSCFString 类型的字符串。__NSCFString 类型的字符串是通过引用计数管理内存的。
使用 initWithFormat: 方法初始化字符串,字符串长度不够长,创建出来的是 NSTaggedPointerString 类型的字符串。NSTaggedPointerString 类型的字符串不是通过引用计数管理内存的。
使用 initWithString: 方法初始化字符串,不管字符串长度,创建出来的是 __NSCFConstantString 类型的字符串。__NSCFConstantString 类型的字符串不是通过引用计数管理内存的。

ps:

1
2
3
4
5
6
7
8
9
10
11
12
13
14
15
16
17
18
19
20
21
22
23
24
25
26
27
28
29
30
31
32
33
34
35
36
37
38
39
40
41
42
43
44
45
int main(int argc, const char * argv[]) {
@autoreleasepool {
NSString *str1 = @"test";
NSString *str1_1 = @"test";
NSString *str2 = [[NSString alloc] initWithString:@"test"];
NSString *str2_1 = [[NSString alloc] initWithString:@"test"];
NSString *str3 = [NSString stringWithString:@"test"];
NSString *str3_1 = [NSString stringWithString:@"test"];
NSString *str4 = [[NSString alloc] initWithFormat:@"test"];
NSString *str4_1 = [[NSString alloc] initWithFormat:@"test"];
NSString *str5 = [NSString stringWithFormat:@"test"];
NSString *str5_1 = [NSString stringWithFormat:@"test"];
NSLog(@"%p", str1);
NSLog(@"%p", str1_1);
NSLog(@"------------------");
NSLog(@"%p", str2);
NSLog(@"%p", str2_1);
NSLog(@"------------------");
NSLog(@"%p", str3);
NSLog(@"%p", str3_1);
NSLog(@"------------------");
NSLog(@"%p", str4);
NSLog(@"%p", str4_1);
NSLog(@"------------------");
NSLog(@"%p", str5);
NSLog(@"%p", str5_1);
[str1 release];
[str1_1 release];
[str2 release];
[str2_1 release];
[str3 release];
[str3_1 release];
[str4 release];
[str4_1 release];
[str5 release];
[str5_1 release];
}
return 0;
}

打印结果:

1
2
3
4
5
6
7
8
9
10
11
12
13
14
0x100002040
0x100002040
------------------
0x100002040
0x100002040
------------------
0x100002040
0x100002040
------------------
0x1f9d08801e47ec0b
0x1f9d08801e47ec0b
------------------
0x1f9d08801e47ec0b
0x1f9d08801e47ec0b

通过 GNUStep 查看源码:
以 Format 结尾的方法最终调用的都是这个方法:

1
- (id)initWithFormat:(NSString*)format locale:(NSDictionary*)locale arguments:(va_list)argList;

以 String 结尾的方法最终调用的都是这个方法:

1
- (id)initWithString:(NSString*)string;

NSMutableString

1
2
3
4
5
6
7
8
9
10
11
12
13
14
15
int main(int argc, const char * argv[]) {
@autoreleasepool {
NSMutableString *str1 = [[NSMutableString alloc] initWithString:@"test"];
NSString *str2 = [str1 copy]; // 深拷贝
NSMutableString *str3 = [str1 mutableCopy]; // 深拷贝
NSLog(@"%@ %@ %@", str1, str2, str3);
NSLog(@"%p %p %p", str1, str2, str3);
[str1 release];
[str2 release];
[str3 release];
}
return 0;
}

打印结果:

1
2
test test test
0x103aaab50 0x48301b1a78a3a9e5 0x103aab150

str1、str2 和 str3 打印出来都是 test,但是他们指向的都是不同的内存地址。即 str1 通过 copymutableCopy 方法拷贝出来的副本 str2 和 str3 都是一个新的对象。
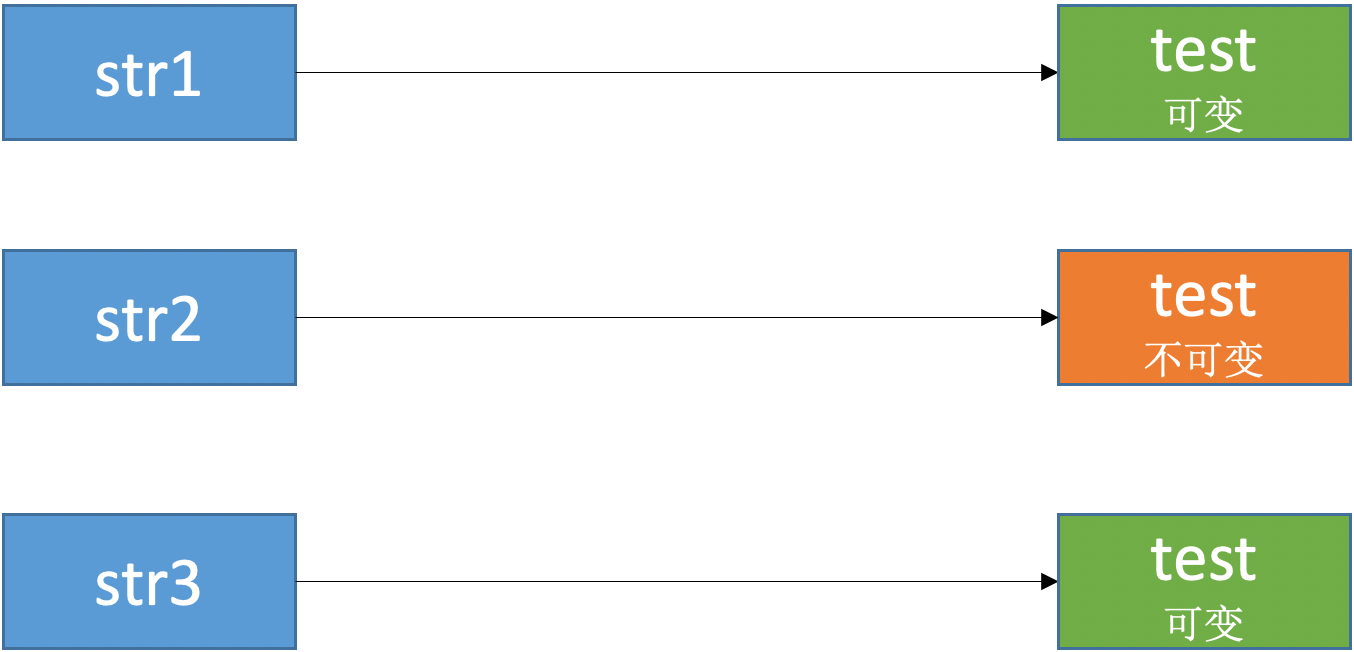
内存管理11

NSArray

1
2
3
4
5
6
7
8
9
10
11
12
13
14
15
int main(int argc, const char * argv[]) {
@autoreleasepool {
NSArray *arr1 = [[NSArray alloc] initWithArray:@[@"1", @"2"]];
NSArray *arr2 = [arr1 copy]; // 浅拷贝
NSMutableArray *arr3 = [arr1 mutableCopy]; // 深拷贝
NSLog(@"%@ %@ %@", arr1, arr2, arr3);
NSLog(@"%p %p %p", arr1, arr2, arr3);
NSLog(@"%d %d %d",
[arr1 isKindOfClass:[NSMutableArray class]],
[arr2 isKindOfClass:[NSMutableArray class]],
[arr3 isKindOfClass:[NSMutableArray class]]);
}
return 0;
}

打印结果:

1
2
3
4
5
6
7
8
9
10
11
12
(
1,
2
) (
1,
2
) (
1,
2
)
0x1004bfc20 0x1004bfc20 0x1004c0100
0 0 1

arr1 和 arr2 是不可变数组,arr3 是可变数组。即:
[不可变 copy] -> 不可变
[不可变 mutableCopy] -> 可变

arr1、arr2 和 arr3 打印出来都是同样的内容,但是 arr1 和 arr2 指向的是同一个内存地址,arr3 指向的是另一个内存地址。即 arr1 通过 copy 方法拷贝出来的副本 arr2 还是原对象(arr1),而 arr1 通过 mutableCopy 方法拷贝出来的副本 arr3 是一个新的对象。

1
2
3
4
5
6
7
8
9
int main(int argc, const char * argv[]) {
@autoreleasepool {
NSArray *arr1 = [[NSArray alloc] initWithArray:@[@"1", @"2"]];
NSArray *arr2 = [arr1 copy]; // 浅拷贝
NSMutableArray *arr3 = [arr1 mutableCopy]; // 深拷贝
NSLog(@"%p %p %p %p", @[@"1", @"2"], arr1, arr2, arr3);
}
return 0;
}

打印结果:

1
0x100713270 0x100712d60 0x100712d60 0x100713240

NSArray 和 NSString 不同,@[@"1", @"2"]、arr1 和 arr2 虽然内容相同,但是它们是不同的对象(arr1 和 arr2 是同一个对象)。

NSMutableArray

1
2
3
4
5
6
7
8
9
10
11
12
13
14
15
int main(int argc, const char * argv[]) {
@autoreleasepool {
NSMutableArray *arr1 = [[NSMutableArray alloc] initWithArray:@[@"1", @"2"]];
NSArray *arr2 = [arr1 copy]; // 深拷贝
NSMutableArray *arr3 = [arr1 mutableCopy]; // 深拷贝
NSLog(@"%@ %@ %@", arr1, arr2, arr3);
NSLog(@"%p %p %p", arr1, arr2, arr3);
NSLog(@"%d %d %d",
[arr1 isKindOfClass:[NSMutableArray class]],
[arr2 isKindOfClass:[NSMutableArray class]],
[arr3 isKindOfClass:[NSMutableArray class]]);
}
return 0;
}

打印结果:

1
2
3
4
5
6
7
8
9
10
11
12
(
1,
2
) (
1,
2
) (
1,
2
)
0x100535780 0x1005358f0 0x100535910
1 0 1

arr1 和 arr3 是可变数组,arr2 是不可变数组。即:
[可变 copy] -> 不可变
[可变 mutableCopy] -> 可变

arr1、arr2 和 arr3 打印出来都是同样的内容,但是他们指向的都是不同的内存地址。即 arr1 通过 copymutableCopy 方法拷贝出来的副本 arr2 和 arr3 都是一个新的对象。

NSDictionary

1
2
3
4
5
6
7
8
9
10
11
int main(int argc, const char * argv[]) {
@autoreleasepool {
NSDictionary *dict1 = [NSDictionary dictionaryWithObjectsAndKeys:@"value", @"key", nil];
NSDictionary *dict2 = [dict1 copy]; // 浅拷贝
NSMutableDictionary *dict3 = [dict1 mutableCopy]; // 深拷贝
NSLog(@"%@ %@ %@", dict1, dict2, dict3);
NSLog(@"%p %p %p", dict1, dict2, dict3);
}
return 0;
}

打印结果:

1
2
3
4
5
6
7
8
{
key = value;
} {
key = value;
} {
key = value;
}
0x100491ff0 0x100491ff0 0x1004923f0

dict1 和 dict2 是不可变字典,dict3 是可变字典。即:
[不可变 copy] -> 不可变
[不可变 mutableCopy] -> 可变

dict1、dict2 和 dict3 打印出来都是同样的内容,但是 dict1 和 dict2 指向的是同一个内存地址,dict3 指向的是另一个内存地址。即 dict1 通过 copy 方法拷贝出来的副本 dict2 还是原对象(dict1),而 dict1 通过 mutableCopy 方法拷贝出来的副本 dict3 是一个新的对象。

NSMutableDictionary

1
2
3
4
5
6
7
8
9
10
11
int main(int argc, const char * argv[]) {
@autoreleasepool {
NSMutableDictionary *dict1 = [NSMutableDictionary dictionaryWithObjectsAndKeys:@"value", @"key", nil];
NSDictionary *dict2 = [dict1 copy]; // 深拷贝
NSMutableDictionary *dict3 = [dict1 mutableCopy]; // 深拷贝
NSLog(@"%@ %@ %@", dict1, dict2, dict3);
NSLog(@"%p %p %p", dict1, dict2, dict3);
}
return 0;
}

打印结果:

1
2
3
4
5
6
7
8
{
key = value;
} {
key = value;
} {
key = value;
}
0x100463300 0x100463900 0x100463920

dict1 和 dict3 是可变字典,dict2 是不可变字典。即:
[可变 copy] -> 不可变
[可变 mutableCopy] -> 可变

dict1、dict2 和 dict3 打印出来都是同样的内容,但是他们指向的都是不同的内存地址。即 dict1 通过 copymutableCopy 方法拷贝出来的副本 dict2 和 dict3 都是一个新的对象。

小结

copy mutableCopy
NSString NSString
浅拷贝
NSMutableString
深拷贝
NSMutableString NSString
深拷贝
NSMutableString
深拷贝
NSArray NSArray
浅拷贝
NSMutableArray
深拷贝
NSMutableArray NSArray
深拷贝
NSMutableArray
深拷贝
NSDictionary NSDictionary
浅拷贝
NSMutableDictionary
深拷贝
NSMutableDictionary NSDictionary
深拷贝
NSDictionary
深拷贝

copy策略的property

定义 Person

1
2
3
4
5
6
7
8
9
10
11
12
13
14
15
@interface Person : NSObject
@property (nonatomic, copy) NSMutableArray *data;
@end
@implementation Person
@end
int main(int argc, const char * argv[]) {
@autoreleasepool {
Person *person = [[Person alloc] init];
person.data = [NSMutableArray array];
[person.data addObject:@"123"];
}
return 0;
}

报错:
内存管理12

data 是 Person 用 copy 策略定义的 NSMutableArraydata 的 set 方法是:

1
2
3
4
5
6
7
8
9
@implementation Person
- (void)setData:(NSMutableArray *)data
{
if (_data != data) {
[_data release];
_data = [data copy];
}
}
@end

person.data = [NSMutableArray array] 赋值的这一刻,虽然传入的是一个 NSMutableArray,但是因为是 copy 策略,所以在赋值时需要进行 copy 操作 _data = [data copy],所以 _data 是一个 NSArray 类型的不可变数组。

对于可变类型的变量,在声明时使用 strong 策略。
对于不可变类型的变量,在声明时使用 copy 策略。

比如 UITextField 里的 text、attributedText 和 placeholder 等,都是使用的 copy 策略,保证不管传入的是可变类型还是不可变类型,UITextField 内部使用的都是不可变类型:

1
2
3
4
5
6
7
@interface UITextField : UIControl <UITextInput, NSCoding, UIContentSizeCategoryAdjusting>
@property(nullable, nonatomic,copy) NSString *text; // default is nil
@property(nullable, nonatomic,copy) NSAttributedString *attributedText API_AVAILABLE(ios(6.0)); // default is nil
......
@property(nullable, nonatomic,copy) NSString *placeholder; // default is nil. string is drawn 70% gray
@property(nullable, nonatomic,copy) NSAttributedString *attributedPlaceholder API_AVAILABLE(ios(6.0)); // default is nil

copyWithZone:

对象类型进行 copy 操作,首先要遵守 <NSCopying> 协议,然后实现 - (id)copyWithZone:(struct _NSZone *)zone 方法:

1
2
3
4
5
6
7
8
9
10
11
12
13
14
15
16
17
18
19
20
21
22
23
24
25
26
27
28
29
30
31
32
@interface Person : NSObject <NSCopying>
@property (nonatomic, assign) int age;
@property (nonatomic, assign) int weight;
@end
@implementation Person
- (id)copyWithZone:(struct _NSZone *)zone
{
Person *person = [Person allocWithZone:zone];
// 设置需要拷贝的属性
person.age = self.age;
person.weight = self.weight;
return person;
}
- (NSString *)description
{
return [NSString stringWithFormat:@"age = %d, weight = %d", self.age, self.weight];
}
@end
int main(int argc, const char * argv[]) {
@autoreleasepool {
Person *person = [[Person alloc] init];
person.age = 10;
person.weight = 20;
Person *person2 = [person copy];
NSLog(@"{%@} {%@}", person, person2);
}
return 0;
}

打印结果:

1
{age = 10, weight = 20} {age = 10, weight = 20}

引用计数的存储

在 64bit 中,引用计数可以直接存储在优化过的 isa 指针中,也可能存储在 SideTable 类中。

1
2
3
4
5
6
struct SideTable {
spinlock_t slock;
RefcountMap refcnts; // 一个存放着对象引用计数的散列表
weak_table_t weak_table; // 弱引用表
......
};

在 objc-weak.h 文件查看 weak_table_t 定义:

1
2
3
4
5
6
struct weak_table_t {
weak_entry_t *weak_entries; // 数组地址(首元素地址)
size_t num_entries; // 数组的数量
uintptr_t mask; // 数组下标最大值(weak_table_t的size-1)
uintptr_t max_hash_displacement; // 最大hash偏移量
};

retainCount

objc4-781 的 NSObject.mm 文件中查看 retainCount

1
2
3
4
5
6
7
8
9
10
11
12
13
- (NSUInteger)retainCount {
return _objc_rootRetainCount(self);
}
......
uintptr_t
_objc_rootRetainCount(id obj)
{
ASSERT(obj);
return obj->rootRetainCount();
}

在 objc-object.h 文件中查看 rootRetainCount() 方法:

1
2
3
4
5
6
7
8
9
10
11
12
13
14
15
16
17
18
19
20
inline uintptr_t
objc_object::rootRetainCount()
{
if (isTaggedPointer()) return (uintptr_t)this;
sidetable_lock();
isa_t bits = LoadExclusive(&isa.bits);
ClearExclusive(&isa.bits);
if (bits.nonpointer) { // 非指针类型(优化过的isa指针)
uintptr_t rc = 1 + bits.extra_rc;
if (bits.has_sidetable_rc) { // 引用计数不是存储在isa中,而是存储在sidetable中
rc += sidetable_getExtraRC_nolock();
}
sidetable_unlock();
return rc;
}
sidetable_unlock();
return sidetable_retainCount();
}

在 NSObject.mm 文件中查看 sidetable_getExtraRC_nolock() 方法:

1
2
3
4
5
6
7
8
9
size_t
objc_object::sidetable_getExtraRC_nolock()
{
ASSERT(isa.nonpointer);
SideTable& table = SideTables()[this];
RefcountMap::iterator it = table.refcnts.find(this); //取出对象对应的散列表
if (it == table.refcnts.end()) return 0;
else return it->second >> SIDE_TABLE_RC_SHIFT;
}

has_sidetable_rc:引用计数器是否过大无法存储在 isa 中,如果为1,那么引用计数会存储在一个叫 SideTable 的类的属性中。
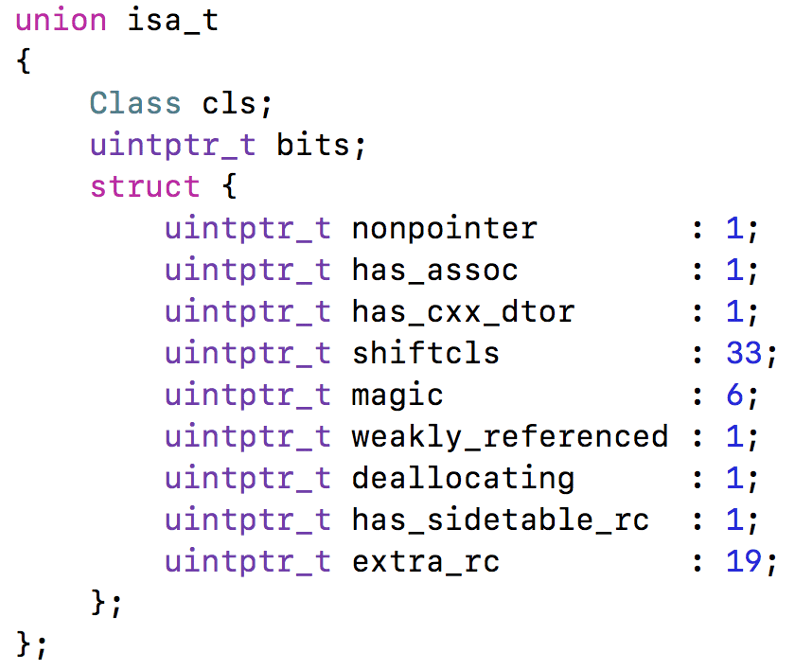
内存管理17

release

1
2
3
4
5
6
7
8
9
10
11
12
13
- (oneway void)release {
_objc_rootRelease(self);
}
......
NEVER_INLINE void
_objc_rootRelease(id obj)
{
ASSERT(obj);
obj->rootRelease();
}

在 objc-object.h 文件中查看 rootRelease() 方法:

1
2
3
4
5
6
7
8
9
10
11
12
13
14
15
16
17
18
19
20
21
22
23
24
25
26
27
28
29
30
31
32
33
34
35
36
37
38
39
40
41
42
43
44
45
46
47
48
49
50
51
52
53
54
55
56
57
58
59
60
61
62
63
64
65
66
67
68
69
70
71
72
73
74
75
76
77
78
79
80
81
82
83
84
85
86
87
88
89
90
91
92
93
94
95
96
97
98
99
100
101
102
103
104
105
106
107
108
109
110
111
112
113
114
115
116
117
118
119
120
121
122
123
124
125
126
127
128
129
130
ALWAYS_INLINE bool
objc_object::rootRelease(bool performDealloc, bool handleUnderflow)
{
if (isTaggedPointer()) return false;
bool sideTableLocked = false;
isa_t oldisa;
isa_t newisa;
retry:
do {
oldisa = LoadExclusive(&isa.bits);
newisa = oldisa;
if (slowpath(!newisa.nonpointer)) {
// 不是优化过的isa指针
ClearExclusive(&isa.bits);
if (rawISA()->isMetaClass()) return false;
if (sideTableLocked) sidetable_unlock();
return sidetable_release(performDealloc);
}
// don't check newisa.fast_rr; we already called any RR overrides
uintptr_t carry;
newisa.bits = subc(newisa.bits, RC_ONE, 0, &carry); // extra_rc--
// 相减后下溢出
if (slowpath(carry)) {
// don't ClearExclusive()
goto underflow;
}
} while (slowpath(!StoreReleaseExclusive(&isa.bits,
oldisa.bits, newisa.bits)));
if (slowpath(sideTableLocked)) sidetable_unlock();
return false;
underflow:
// newisa.extra_rc-- underflowed: borrow from side table or deallocate
// abandon newisa to undo the decrement
newisa = oldisa;
// 引用计数不是存储在isa中,而是存储在sidetable中
if (slowpath(newisa.has_sidetable_rc)) {
if (!handleUnderflow) {
ClearExclusive(&isa.bits);
// 再执行 rootRelease 一次,处理下溢出
return rootRelease_underflow(performDealloc);
}
// Transfer retain count from side table to inline storage.
if (!sideTableLocked) {
ClearExclusive(&isa.bits);
sidetable_lock();
sideTableLocked = true;
// Need to start over to avoid a race against
// the nonpointer -> raw pointer transition.
goto retry;
}
// 下面是从 sideTable 借 RC_HALF 的引用计数放到 extra_rc 上, 借不到的情况,对象需要被销毁了
// Try to remove some retain counts from the side table.
size_t borrowed = sidetable_subExtraRC_nolock(RC_HALF);
// To avoid races, has_sidetable_rc must remain set
// even if the side table count is now zero.
if (borrowed > 0) {
// Side table retain count decreased.
// Try to add them to the inline count.
newisa.extra_rc = borrowed - 1; // redo the original decrement too
bool stored = StoreReleaseExclusive(&isa.bits,
oldisa.bits, newisa.bits);
if (!stored) {
// Inline update failed.
// Try it again right now. This prevents livelock on LL/SC
// architectures where the side table access itself may have
// dropped the reservation.
isa_t oldisa2 = LoadExclusive(&isa.bits);
isa_t newisa2 = oldisa2;
if (newisa2.nonpointer) {
uintptr_t overflow;
newisa2.bits =
addc(newisa2.bits, RC_ONE * (borrowed-1), 0, &overflow);
if (!overflow) {
stored = StoreReleaseExclusive(&isa.bits, oldisa2.bits,
newisa2.bits);
}
}
}
if (!stored) {
// Inline update failed.
// Put the retains back in the side table.
sidetable_addExtraRC_nolock(borrowed);
goto retry;
}
// Decrement successful after borrowing from side table.
// This decrement cannot be the deallocating decrement - the side
// table lock and has_sidetable_rc bit ensure that if everyone
// else tried to -release while we worked, the last one would block.
sidetable_unlock();
return false;
}
else {
// Side table is empty after all. Fall-through to the dealloc path.
}
}
// Really deallocate.
if (slowpath(newisa.deallocating)) {
ClearExclusive(&isa.bits);
if (sideTableLocked) sidetable_unlock();
return overrelease_error();
// does not actually return
}
newisa.deallocating = true;
if (!StoreExclusive(&isa.bits, oldisa.bits, newisa.bits)) goto retry;
if (slowpath(sideTableLocked)) sidetable_unlock();
__c11_atomic_thread_fence(__ATOMIC_ACQUIRE);
if (performDealloc) {
((void(*)(objc_object *, SEL))objc_msgSend)(this, @selector(dealloc));
}
return true;
}

在 NSObject.mm 文件中查看 sidetable_release() 方法:

1
2
3
4
5
6
7
8
9
10
11
12
13
14
15
16
17
18
19
20
21
22
23
24
25
26
27
28
29
30
31
32
33
34
35
36
#define SIDE_TABLE_RC_ONE (1UL<<2) // MSB-ward of deallocating bit
......
uintptr_t
objc_object::sidetable_release(bool performDealloc)
{
#if SUPPORT_NONPOINTER_ISA
ASSERT(!isa.nonpointer);
#endif
SideTable& table = SideTables()[this];
bool do_dealloc = false;
//----- 对引用计数减操作 -----
table.lock();
auto it = table.refcnts.try_emplace(this, SIDE_TABLE_DEALLOCATING);
auto &refcnt = it.first->second;
if (it.second) {
do_dealloc = true;
} else if (refcnt < SIDE_TABLE_DEALLOCATING) {
// SIDE_TABLE_WEAKLY_REFERENCED may be set. Don't change it.
do_dealloc = true;
refcnt |= SIDE_TABLE_DEALLOCATING;
} else if (! (refcnt & SIDE_TABLE_RC_PINNED)) {
refcnt -= SIDE_TABLE_RC_ONE;
}
table.unlock();
//----- 对引用计数减操作 end -----
// 是否要执行 dealloc
if (do_dealloc && performDealloc) {
((void(*)(objc_object *, SEL))objc_msgSend)(this, @selector(dealloc));
}
return do_dealloc;
}

retain()

在 objc-object.h 文件中查看 retain() 方法:

1
2
3
4
5
6
7
8
9
10
11
inline id
objc_object::retain()
{
ASSERT(!isTaggedPointer());
if (fastpath(!ISA()->hasCustomRR())) {
return sidetable_retain();
}
return ((id(*)(objc_object *, SEL))objc_msgSend)(this, @selector(retain));
}

在 NSObject.mm 文件中查看 sidetable_retain() 方法:

1
2
3
4
5
6
7
8
9
10
11
12
13
14
15
16
17
18
19
id
objc_object::sidetable_retain()
{
#if SUPPORT_NONPOINTER_ISA
ASSERT(!isa.nonpointer);
#endif
SideTable& table = SideTables()[this];
//----- 对引用计数加操作 -----
table.lock();
size_t& refcntStorage = table.refcnts[this];
if (! (refcntStorage & SIDE_TABLE_RC_PINNED)) {
refcntStorage += SIDE_TABLE_RC_ONE;
}
table.unlock();
//----- 对引用计数加操作 end -----
return (id)this;
}

weak指针的原理

局部变量的内存管理

创建局部变量 person:

1
2
3
4
5
6
7
8
9
10
@implementation ViewController
- (void)viewDidLoad {
[super viewDidLoad];
NSLog(@"111");
{
Person *person = [[Person alloc] init];
}
NSLog(@"222");
}
@end

打印结果:

1
2
3
111
-[Person dealloc]
222

__strong

使用 __strong 修饰的局部变量 person:

1
2
3
4
5
6
7
8
9
10
11
12
13
@implementation ViewController
- (void)viewDidLoad {
[super viewDidLoad];
__strong Person *strongPerson;
NSLog(@"111");
{
Person *person = [[Person alloc] init];
strongPerson = person;
}
NSLog(@"222");
NSLog(@"%@", strongPerson);
}
@end

打印结果:

1
2
3
4
111
222
<Person: 0x60000177c310>
-[Person dealloc]

__weak

使用 __weak 修饰的局部变量 person:

1
2
3
4
5
6
7
8
9
10
11
12
13
@implementation ViewController
- (void)viewDidLoad {
[super viewDidLoad];
__weak Person *weakPerson;
NSLog(@"111");
{
Person *person = [[Person alloc] init];
weakPerson = person;
}
NSLog(@"222");
NSLog(@"%@", weakPerson);
}
@end

打印结果:

1
2
3
4
111
-[Person dealloc]
222
(null)

weakPerson 指针指向的内存地址被销毁后,weakPerson 指针会自动置为 nil。

__unsafe_unretained

使用 __unsafe_unretained 修饰的局部变量 person:

1
2
3
4
5
6
7
8
9
10
11
12
@implementation ViewController
- (void)viewDidLoad {
[super viewDidLoad];
__unsafe_unretained Person *unsafePerson;
NSLog(@"111");
{
Person *person = [[Person alloc] init];
unsafePerson = person;
}
NSLog(@"222");
}
@end

报错:
内存管理12

报错的原因是指针 unsafePerson 还在,但是它指向的内存地址已经不存在了。这也是跟 weakPerson 指针相比不同也是不够安全的地方。

dealloc

objc4-781 查看源码:

NSObject.mm 文件:

1
2
3
4
5
6
7
8
9
10
11
12
13
- (void)dealloc {
_objc_rootDealloc(self);
}
......
void
_objc_rootDealloc(id obj)
{
ASSERT(obj);
obj->rootDealloc();
}

在 objc-object.h 文件查看 rootDealloc() 方法:

1
2
3
4
5
6
7
8
9
10
11
12
13
14
15
16
17
18
inline void
objc_object::rootDealloc()
{
if (isTaggedPointer()) return; // fixme necessary?
if (fastpath(isa.nonpointer &&
!isa.weakly_referenced &&
!isa.has_assoc &&
!isa.has_cxx_dtor &&
!isa.has_sidetable_rc))
{
assert(!sidetable_present());
free(this);
}
else {
object_dispose((id)this);
}
}

  • nonpointer
    0,代表普通的指针,isa 只存储着 Class、Meta-Class 对象的内存地址
    1,代表优化过,isa 使用位域存储更多的信息
  • has_assoc
    是否有设置过关联对象,如果没有,释放时会更快
  • has_cxx_dtor
    是否有 C++ 的析构函数(.cxx_destruct),如果没有,释放时会更快
  • weakly_referenced
    是否有被弱引用指向过,如果没有,释放时会更快
  • has_sidetable_rc
    引用计数器是否过大无法存储在 isa 中,如果为1,那么引用计数会存储在一个叫 SideTable 的类的属性中

如果条件不成立会走到 objc-runtime-new.mm 文件的 object_dispose() 方法:

1
2
3
4
5
6
7
8
9
10
11
12
13
14
15
16
17
18
19
20
21
22
23
24
25
26
27
28
id
object_dispose(id obj)
{
if (!obj) return nil;
objc_destructInstance(obj);
free(obj);
return nil;
}
......
void *objc_destructInstance(id obj)
{
if (obj) {
// Read all of the flags at once for performance.
bool cxx = obj->hasCxxDtor();
bool assoc = obj->hasAssociatedObjects();
// This order is important.
if (cxx) object_cxxDestruct(obj); // 清除成员变量
if (assoc) _object_remove_assocations(obj); // 移除关联对象
obj->clearDeallocating(); // 将指向当前对象的弱指针置为nil
}
return obj;
}

在 objc-object.h 文件查看 clearDeallocating() 方法:

1
2
3
4
5
6
7
8
9
10
11
12
13
14
inline void
objc_object::clearDeallocating()
{
if (slowpath(!isa.nonpointer)) { // 是否是普通的isa指针
// Slow path for raw pointer isa.
sidetable_clearDeallocating();
}
else if (slowpath(isa.weakly_referenced || isa.has_sidetable_rc)) { // 是否有被弱引用指向过 || // 是否是优化过的isa指针
// Slow path for non-pointer isa with weak refs and/or side table data.
clearDeallocating_slow();
}
assert(!sidetable_present());
}

在 NSObject.mm 文件 查看 clearDeallocating_slow() 方法:

1
2
3
4
5
6
7
8
9
10
11
12
13
14
15
NEVER_INLINE void
objc_object::clearDeallocating_slow()
{
ASSERT(isa.nonpointer && (isa.weakly_referenced || isa.has_sidetable_rc));
SideTable& table = SideTables()[this];
table.lock();
if (isa.weakly_referenced) {
weak_clear_no_lock(&table.weak_table, (id)this); // 清除弱应用
}
if (isa.has_sidetable_rc) {
table.refcnts.erase(this); // 清空引用计数
}
table.unlock();
}

在 objc-weak.mm 文件查看 weak_clear_no_lock() 方法:

1
2
3
4
5
6
7
8
9
10
11
12
13
14
15
16
17
18
19
20
21
22
23
24
25
26
27
28
29
30
31
32
33
34
35
36
37
38
39
40
41
42
43
44
45
46
47
48
49
50
51
52
53
54
55
56
57
58
59
60
61
62
63
64
65
66
67
68
69
void
weak_clear_no_lock(weak_table_t *weak_table, id referent_id)
{
// 获取当前对象
objc_object *referent = (objc_object *)referent_id;
weak_entry_t *entry = weak_entry_for_referent(weak_table, referent); // 传入弱引用表和当前对象的地址值,找到对应的弱引用数组
if (entry == nil) {
return; // 如果没有表示当前对象没有弱引用,不用处理直接返回
}
// zero out references
weak_referrer_t *referrers;
size_t count;
if (entry->out_of_line()) {
referrers = entry->referrers;
count = TABLE_SIZE(entry);
}
else {
referrers = entry->inline_referrers;
count = WEAK_INLINE_COUNT;
}
for (size_t i = 0; i < count; ++i) {
objc_object **referrer = referrers[i];
if (referrer) {
if (*referrer == referent) {
*referrer = nil;
}
else if (*referrer) {
_objc_inform("__weak variable at %p holds %p instead of %p. "
"This is probably incorrect use of "
"objc_storeWeak() and objc_loadWeak(). "
"Break on objc_weak_error to debug.\n",
referrer, (void*)*referrer, (void*)referent);
objc_weak_error();
}
}
}
weak_entry_remove(weak_table, entry);
}
......
static weak_entry_t *
weak_entry_for_referent(weak_table_t *weak_table, objc_object *referent)
{
ASSERT(referent);
weak_entry_t *weak_entries = weak_table->weak_entries; // 在weak_table中取出weak_entry_t数组
if (!weak_entries) return nil;
size_t begin = hash_pointer(referent) & weak_table->mask; // 通过hash实例对象的地址 & weak_table->mask得到begin(没有hash冲突的index),因为是 & mask(2的n次方-1,类似00001111),所以保证了begin在mask范围内(<=mask)
size_t index = begin;
size_t hash_displacement = 0;
while (weak_table->weak_entries[index].referent != referent) { // while循环检测hash冲突,如果有冲突,index+1,hash_displacement++(hash冲突偏移量)
index = (index+1) & weak_table->mask;
if (index == begin) bad_weak_table(weak_table->weak_entries);
hash_displacement++;
if (hash_displacement > weak_table->max_hash_displacement) {
return nil;
}
}
return &weak_table->weak_entries[index];
}

自动释放池

自动释放池的主要底层数据结构是:__AtAutoreleasePoolAutoreleasePoolPage,调用了 autorelease 的对象最终都是通过 AutoreleasePoolPage 对象来管理的。

__AtAutoreleasePool

堆代码:

1
2
3
4
5
6
int main(int argc, const char * argv[]) {
@autoreleasepool {
Person *person = [[[Person alloc] init] autorelease];
}
return 0;
}

找到 main.m 所在文件,在终端输入:

1
$ xcrun -sdk iphoneos clang -arch arm64 -rewrite-objc main.m

上面的代码转成 C++ 代码后就是这个样子:

1
2
3
4
5
6
7
int main(int argc, const char * argv[]) {
{
__AtAutoreleasePool __autoreleasepool;
Person *person = ((Person *(*)(id, SEL))(void *)objc_msgSend)((id)((Person *(*)(id, SEL))(void *)objc_msgSend)((id)((Person *(*)(id, SEL))(void *)objc_msgSend)((id)objc_getClass("Person"), sel_registerName("alloc")), sel_registerName("init")), sel_registerName("autorelease"));
}
return 0;
}

简化一下:

1
2
3
4
5
6
7
int main(int argc, const char * argv[]) {
{
__AtAutoreleasePool __autoreleasepool;
Person *person = [[[Person alloc] init] autorelease];
}
return 0;
}

在生成的 main.mm 文件中搜索 __AtAutoreleasePool__AtAutoreleasePool 是一个 C++ 结构体:

1
2
3
4
5
6
7
8
9
10
11
struct __AtAutoreleasePool {
// 构造函数,在创建结构体的时候调用
__AtAutoreleasePool() {
atautoreleasepoolobj = objc_autoreleasePoolPush();
}
// 析构函数,在结构体销毁的时候调用
~__AtAutoreleasePool() {
objc_autoreleasePoolPop(atautoreleasepoolobj);
}
void * atautoreleasepoolobj;
};

认识了 __AtAutoreleasePool 结构体后,通过 clang 生成的 C++ 代码可以看做:

1
2
3
4
5
6
7
8
int main(int argc, const char * argv[]) {
atautoreleasepoolobj = objc_autoreleasePoolPush();
MJPerson *person = [[[MJPerson alloc] init] autorelease];
objc_autoreleasePoolPop(atautoreleasepoolobj);
return 0;
}

通过上面的摸索,@autoreleasepool {} 的第一个大括号其实是调用了 objc_autoreleasePoolPush() 方法,第二个大括号是调用 objc_autoreleasePoolPop() 方法,objc_autoreleasePoolPop() 方法的参数是 objc_autoreleasePoolPush() 方法生成的 atautoreleasepoolobj

如果有多个 @autoreleasepool {} 嵌套的话就是这样:

1
2
3
4
5
6
7
8
9
10
11
12
13
14
15
16
int main(int argc, const char * argv[]) {
@autoreleasepool { // objc_autoreleasePoolPush()
Person *person = [[[Person alloc] init] autorelease];
} // objc_autoreleasePoolPop()
return 0;
}

查看 objc_autoreleasePoolPush() 源码:

1
2
3
4
5
void *
objc_autoreleasePoolPush(void)
{
return AutoreleasePoolPage::push();
}

查看 objc_autoreleasePoolPop() 源码:

1
2
3
4
5
6
NEVER_INLINE
void
objc_autoreleasePoolPop(void *ctxt)
{
AutoreleasePoolPage::pop(ctxt);
}

从源码可以看到,objc_autoreleasePoolPush()objc_autoreleasePoolPop() 方法内部都是通过 AutoreleasePoolPage 实现的。

AutoreleasePoolPage

定义

objc4-781 的 NSObject-internal.h 文件可以看到 AutoreleasePoolPage 的定义:

1
2
3
4
5
6
7
8
9
10
11
12
13
14
15
16
17
18
19
20
21
22
23
class AutoreleasePoolPage;
struct AutoreleasePoolPageData
{
magic_t const magic; // 用于校验内存是否损坏
__unsafe_unretained id *next; // 指向了下一个能存放autorelease对象地址的区域
pthread_t const thread; // 线程
AutoreleasePoolPage * const parent; // 前驱结点,指向前一个page
AutoreleasePoolPage *child; // 后继结点,指向下一个page
uint32_t const depth;
uint32_t hiwat;
AutoreleasePoolPageData(__unsafe_unretained id* _next, pthread_t _thread, AutoreleasePoolPage* _parent, uint32_t _depth, uint32_t _hiwat)
: magic(), next(_next), thread(_thread),
parent(_parent), child(nil),
depth(_depth), hiwat(_hiwat)
{
}
};
class AutoreleasePoolPage : private AutoreleasePoolPageData
{
......
}

AutoreleasePoolPage 结构体的 thread 存储的是其对应的线程,也表示一个 AutoreleasePoolPage 对应一个线程。

结构

每个 AutoreleasePoolPage 对象占用4096字节内存,除了用来存放它内部的成员变量,剩下的空间用来存放 autorelease 对象的地址,所有的 AutoreleasePoolPage 对象通过双向链表的形式连接在一起。

假设 AutoreleasePoolPage 对象的内存地址从 0x1000 开始:
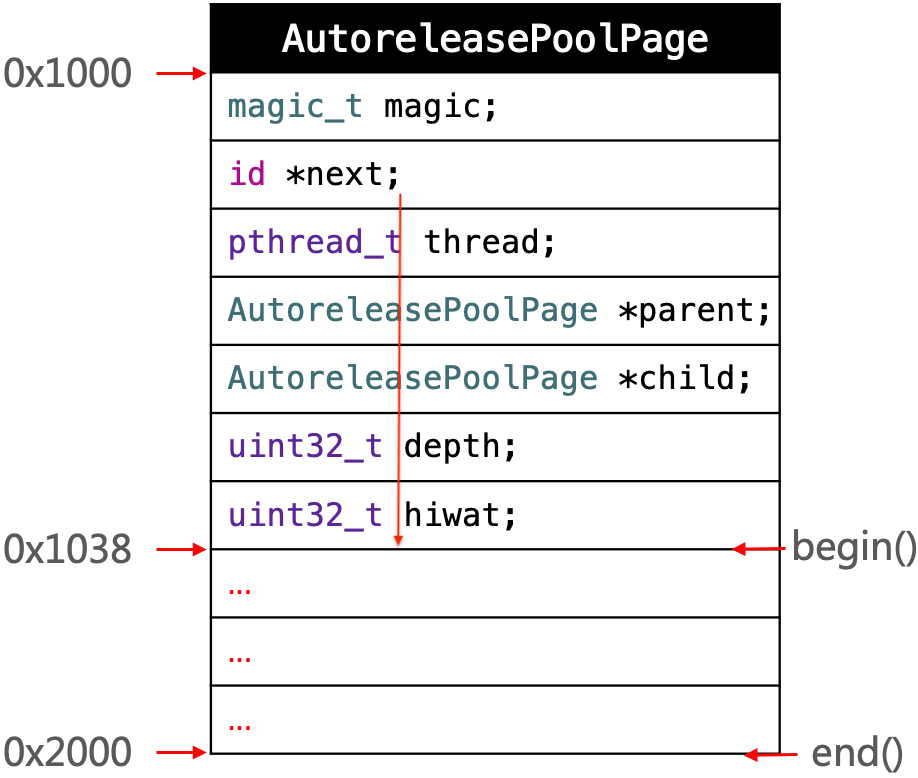
内存管理14
0x10000x2000 共4096个字节(0x1000)。
0x10000x1038 共56个字节(0x38),即 AutoreleasePoolPage 结构体内部的成员变量大小之和。
0x10380x2000 共4040个字节,分别是 begain()end() 方法调用的位置,这段内存用来保存调用了 autorelease 方法的对象的地址值。

查看 begain() 方法源码:

1
2
3
id * begin() {
return (id *) ((uint8_t *)this+sizeof(*this));
}

可以看到 begain() 方法内部直接返回的是 AutoreleasePoolPage 内存地址开始位置加上其自身占用内存大小(0x1000 + 0x38 = 0x1038)。

查看 end() 方法源码:

1
2
3
id * end() {
return (id *) ((uint8_t *)this+SIZE);
}

可以看到 end() 方法内部直接返回的是 AutoreleasePoolPage 内存地址开始位置加上 SIZE

1
2
3
4
5
6
7
8
9
10
#define I386_PGBYTES 4096 /* bytes per 80386 page */
#define PAGE_SIZE I386_PGBYTES
#define PAGE_MAX_SIZE PAGE_SIZE
static size_t const SIZE =
#if PROTECT_AUTORELEASEPOOL
PAGE_MAX_SIZE; // must be multiple of vm page size
#else
PAGE_MIN_SIZE; // size and alignment, power of 2
#endif

一个 AutoreleasePoolPage 结构体能够存放的 autorelease 对象的地址是有限的,如果超出存储最大值,会新创建一个 AutoreleasePoolPage 结构体用来存储剩下的部分。多个 AutoreleasePoolPage 结构体通过机构体中的 child 指向下一个 AutoreleasePoolPage 结构体,通过 parent 指向上一个 AutoreleasePoolPage 结构体,构成双向链表结构:
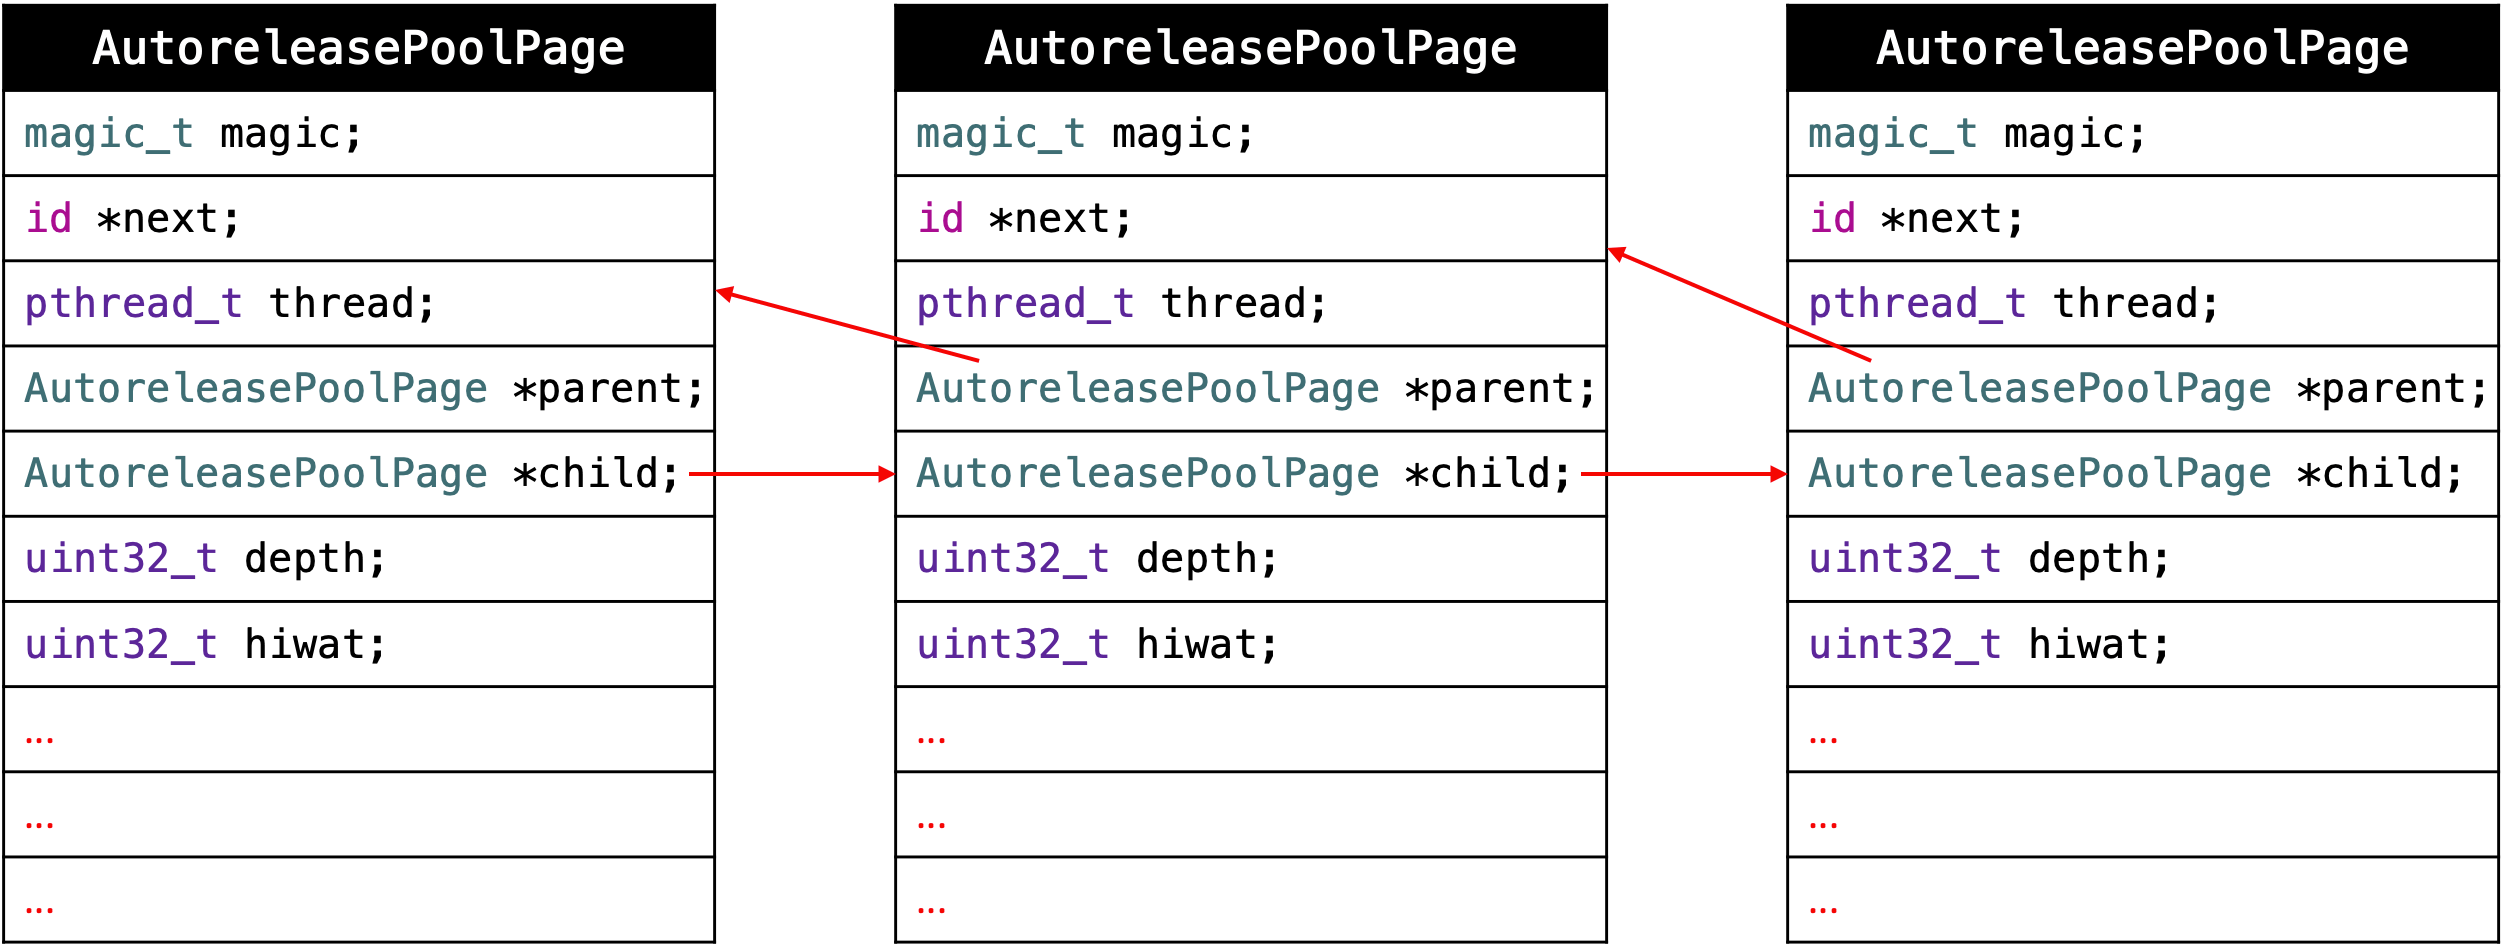
内存管理15

  • 👉 双向链表也叫双链表,是链表的一种,它的每个数据结点中都有两个指针,分别指向直接后继和直接前驱。所以,从双向链表中的任意一个结点开始,都可以很方便地访问它的前驱结点和后继结点。
  • 👉 循环链表是另一种形式的链式存贮结构。它的特点是表中最后一个结点的指针域指向头结点,整个链表形成一个环。

原理

调用 push 方法会将一个 POOL_BOUNDARY 入栈,并且返回其存放的内存地址。
调用 pop 方法时传入一个 POOL_BOUNDARY 的内存地址,会从最后一个入栈的对象开始发送 release 消息,直到遇到这个 POOL_BOUNDARY
id *next 指向了下一个能存放 autorelease 对象地址的区域。

比如在 @autoreleasepool {} 内创建1000个 person 对象调用 autorelease

1
2
3
4
5
6
7
8
int main(int argc, const char * argv[]) {
@autoreleasepool {
for (int i=0; i<1000; i++) {
Person *person = [[[Person alloc] init] autorelease];
}
}
return 0;
}

一个 person 对象的指针占8个字节,1000个 person 对象就是8000个字节。一个 AutoreleasePoolPage 对象可以保存4040个字节,所以会再创建一个 AutoreleasePoolPage 对象用来保存剩下的 person 对象的地址值。

@autoreleasepool {} 转成 __AtAutoreleasePool

1
2
3
4
5
6
7
8
9
10
int main(int argc, const char * argv[]) {
atautoreleasepoolobj = objc_autoreleasePoolPush(); // atautoreleasepoolobj = 0x1038
for (int i=0; i<1000; i++) {
Person *person = [[[Person alloc] init] autorelease];
} // 8000个字节
objc_autoreleasePoolPop(atautoreleasepoolobj); // atautoreleasepoolobj = 0x1038
return 0;
}

objc_autoreleasePoolPush() 会调用 AutoreleasePoolPage 对象的 push() 方法,将一个 POOL_BOUNDARY 入栈,并且返回其存放的内存地址(0x1038):
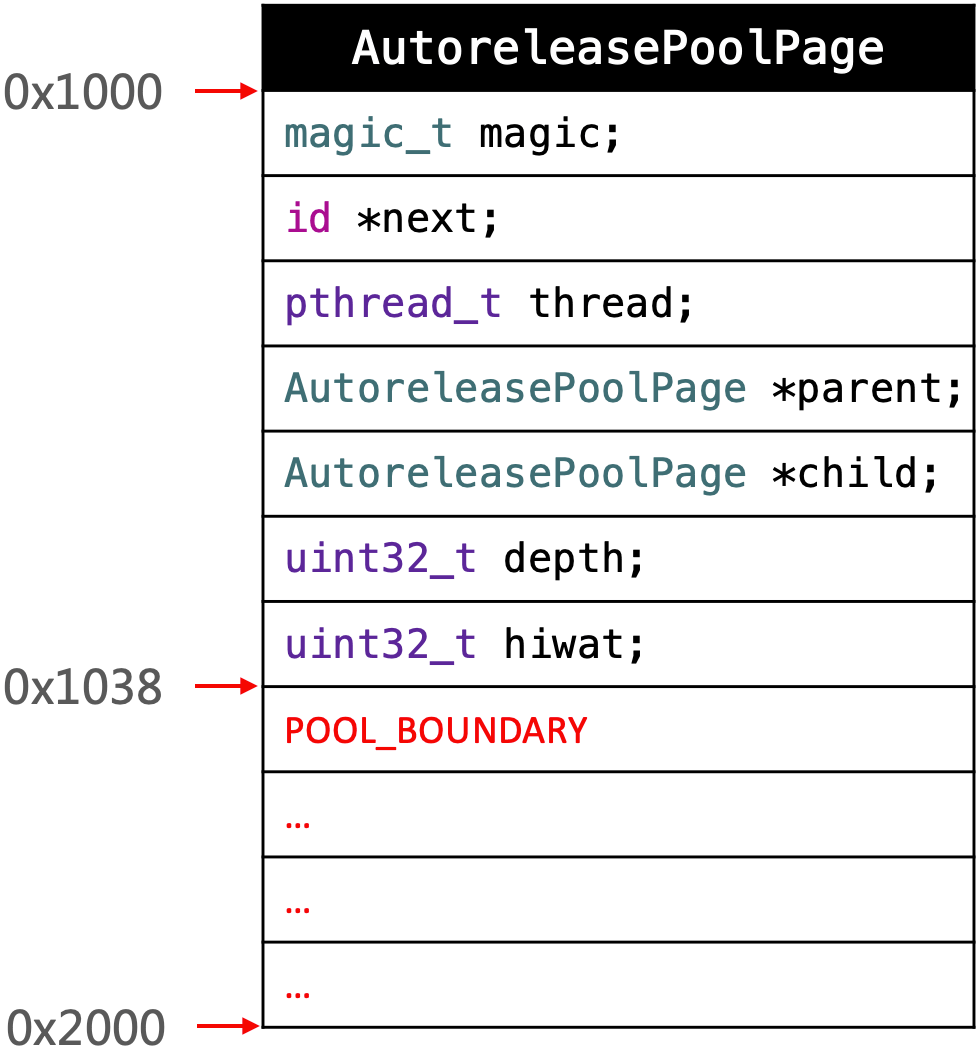
内存管理18

每个调用 autorelease 方法的 person 对象都会添加到 AutoreleasePoolPage 对象中:
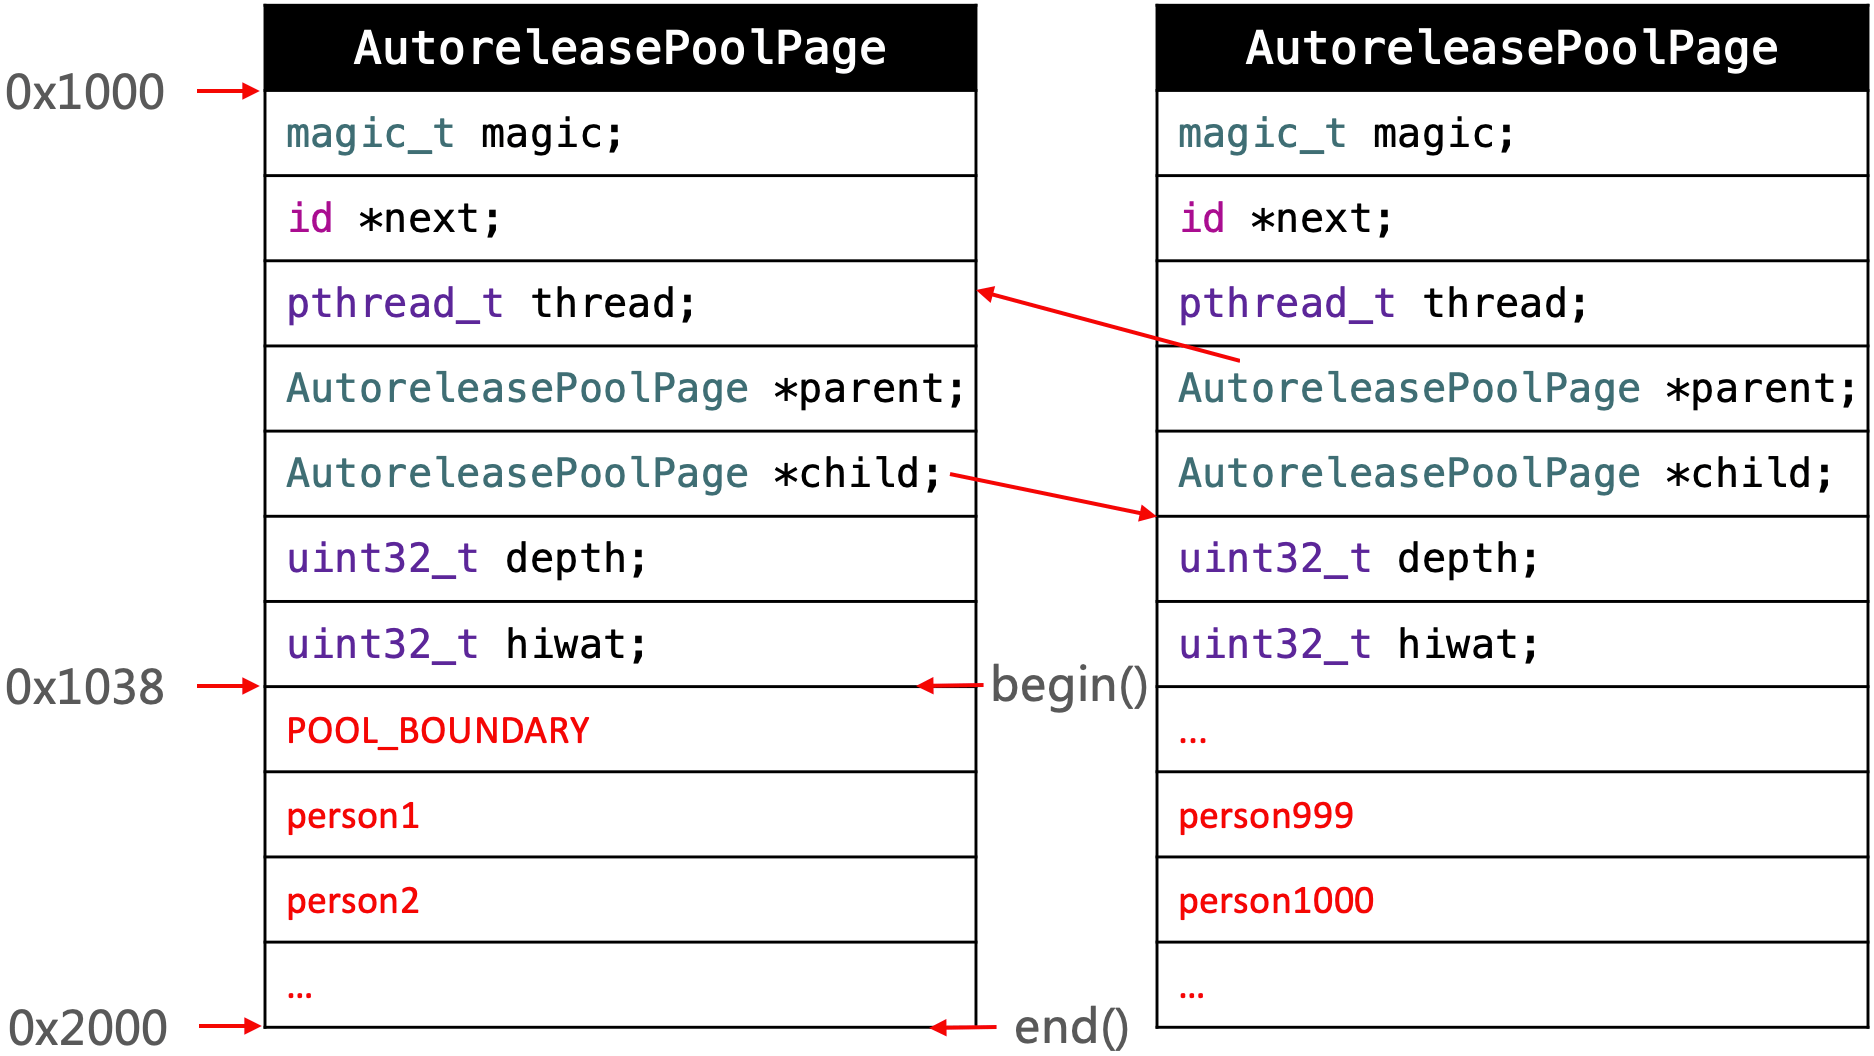
内存管理19
正如上面提到的一样,一个 AutoreleasePoolPage 对象可以保存4040个字节,所以会创建一个新的 AutoreleasePoolPage 对象用来保存剩下的 person 对象的地址值。

objc_autoreleasePoolPop(atautoreleasepoolobj) 方法传入的 atautoreleasepoolobjobjc_autoreleasePoolPush() 方法返回的 POOL_BOUNDARY 的地址值(0x1038),即 objc_autoreleasePoolPop(POOL_BOUNDARY)。拿到 POOL_BOUNDARY 后,objc_autoreleasePoolPop() 方法内部会从最后一个加入到 AutoreleasePoolPage 里的对象开始,依次调用 release 方法,直到 POOL_BOUNDARY 完成释放工作。

在整个过程中,next 指向 page 中下一个将要存放的对象的地址, 通过 *next++ = obj 来实现对象的存入并 next 指针的累加, 用 id obj = *--page->next 来取出要 release 的对象并实现 next 的递减。

验证

可以通过以下私有函数来查看自动释放池的情况:

1
extern void _objc_autoreleasePoolPrint(void);

_objc_autoreleasePoolPrint() 方法是定义在 Runtime 里的,所以是不开源的。但是可以通过 extern 关键字在 main.m 文件中声明,编译器就会自动去找到这个方法,从而实现调用。

1
2
3
4
5
6
7
8
9
10
11
12
13
14
15
16
17
18
19
20
21
22
23
24
25
26
27
28
29
30
31
32
33
34
extern void _objc_autoreleasePoolPrint(void);
int main(int argc, const char * argv[]) {
@autoreleasepool {
_objc_autoreleasePoolPrint(); // 位置0
Person *person1 = [[[Person alloc] init] autorelease];
Person *person2 = [[[Person alloc] init] autorelease];
//_objc_autoreleasePoolPrint(); // 位置1
@autoreleasepool {
Person *person3 = [[[Person alloc] init] autorelease];
Person *person4 = [[[Person alloc] init] autorelease];
//_objc_autoreleasePoolPrint(); // 位置2
@autoreleasepool {
Person *person5 = [[[Person alloc] init] autorelease];
Person *person6 = [[[Person alloc] init] autorelease];
//_objc_autoreleasePoolPrint(); // 位置3
}
//_objc_autoreleasePoolPrint(); // 位置4
}
//_objc_autoreleasePoolPrint(); // 位置5
}
//_objc_autoreleasePoolPrint(); // 位置6
return 0;
}

位置0,打印结果:

1
2
3
4
5
6
7
objc[13812]: ##############
objc[13812]: AUTORELEASE POOLS for thread 0x1000d3dc0
objc[13812]: 0 releases pending.
objc[13812]: [0x1] ................ PAGE (placeholder)
objc[13812]: [0x1] ################ POOL (placeholder)
objc[13812]: ##############
Program ended with exit code: 0

位置1,打印结果:

1
2
3
4
5
6
7
8
9
objc[13633]: ##############
objc[13633]: AUTORELEASE POOLS for thread 0x1000d3dc0
objc[13633]: 3 releases pending.
objc[13633]: [0x10400a000] ................ PAGE (hot) (cold)
objc[13633]: [0x10400a038] ################ POOL 0x10400a038
objc[13633]: [0x10400a040] 0x10293c6e0 Person
objc[13633]: [0x10400a048] 0x10293b7a0 Person
objc[13633]: ##############
Program ended with exit code: 0

位置2,打印结果:

1
2
3
4
5
6
7
8
9
10
11
12
objc[13658]: ##############
objc[13658]: AUTORELEASE POOLS for thread 0x1000d3dc0
objc[13658]: 6 releases pending.
objc[13658]: [0x10400a000] ................ PAGE (hot) (cold)
objc[13658]: [0x10400a038] ################ POOL 0x10400a038
objc[13658]: [0x10400a040] 0x102974880 Person
objc[13658]: [0x10400a048] 0x102973940 Person
objc[13658]: [0x10400a050] ################ POOL 0x10400a050
objc[13658]: [0x10400a058] 0x1029722e0 Person
objc[13658]: [0x10400a060] 0x102973800 Person
objc[13658]: ##############
Program ended with exit code: 0

位置3,打印结果:

1
2
3
4
5
6
7
8
9
10
11
12
13
14
15
objc[13677]: ##############
objc[13677]: AUTORELEASE POOLS for thread 0x1000d3dc0
objc[13677]: 9 releases pending.
objc[13677]: [0x10280d000] ................ PAGE (hot) (cold)
objc[13677]: [0x10280d038] ################ POOL 0x10280d038
objc[13677]: [0x10280d040] 0x1006addd0 Person
objc[13677]: [0x10280d048] 0x1006ace90 Person
objc[13677]: [0x10280d050] ################ POOL 0x10280d050
objc[13677]: [0x10280d058] 0x1006ab830 Person
objc[13677]: [0x10280d060] 0x1006acd50 Person
objc[13677]: [0x10280d068] ################ POOL 0x10280d068
objc[13677]: [0x10280d070] 0x1006aba20 Person
objc[13677]: [0x10280d078] 0x1006ab4f0 Person
objc[13677]: ##############
Program ended with exit code: 0

位置4,打印结果:

1
2
3
4
5
6
7
8
9
10
11
12
objc[13703]: ##############
objc[13703]: AUTORELEASE POOLS for thread 0x1000d3dc0
objc[13703]: 6 releases pending.
objc[13703]: [0x10080d000] ................ PAGE (hot) (cold)
objc[13703]: [0x10080d038] ################ POOL 0x10080d038
objc[13703]: [0x10080d040] 0x100437c20 Person
objc[13703]: [0x10080d048] 0x100436ce0 Person
objc[13703]: [0x10080d050] ################ POOL 0x10080d050
objc[13703]: [0x10080d058] 0x100435680 Person
objc[13703]: [0x10080d060] 0x100436ba0 Person
objc[13703]: ##############
Program ended with exit code: 0

位置5,打印结果:

1
2
3
4
5
6
7
8
9
objc[13735]: ##############
objc[13735]: AUTORELEASE POOLS for thread 0x1000d3dc0
objc[13735]: 3 releases pending.
objc[13735]: [0x10480a000] ................ PAGE (hot) (cold)
objc[13735]: [0x10480a038] ################ POOL 0x10480a038
objc[13735]: [0x10480a040] 0x10322c4d0 Person
objc[13735]: [0x10480a048] 0x10322b590 Person
objc[13735]: ##############
Program ended with exit code: 0

位置6,打印结果:

1
2
3
4
5
6
objc[13751]: ##############
objc[13751]: AUTORELEASE POOLS for thread 0x1000d3dc0
objc[13751]: 0 releases pending.
objc[13751]: [0x10300d000] ................ PAGE (hot) (cold)
objc[13751]: ##############
Program ended with exit code: 0

打印结果中的 POOL 代表的就是 POOL_BOUNDARY,person 代表的就是调用 autorelease 方法的对象。releases pending 表示当前自动释放池里的对象个数。

多个 AutoreleasePoolPage 对象的情况:

1
2
3
4
5
6
7
8
9
10
11
12
13
14
15
16
17
18
19
20
21
22
extern void _objc_autoreleasePoolPrint(void);
int main(int argc, const char * argv[]) {
@autoreleasepool {
Person *person1 = [[[Person alloc] init] autorelease];
Person *person2 = [[[Person alloc] init] autorelease];
@autoreleasepool {
for (int i=0; i<600; i++) {
Person *person3 = [[[Person alloc] init] autorelease];
}
@autoreleasepool {
Person *person5 = [[[Person alloc] init] autorelease];
Person *person6 = [[[Person alloc] init] autorelease];
_objc_autoreleasePoolPrint();
}
}
}
return 0;
}

打印结果:

1
2
3
4
5
6
7
8
9
10
11
12
13
14
15
16
17
18
19
20
21
objc[13947]: ##############
objc[13947]: AUTORELEASE POOLS for thread 0x1000d3dc0
objc[13947]: 607 releases pending.
objc[13947]: [0x10280c000] ................ PAGE (full) (cold)
objc[13947]: [0x10280c038] ################ POOL 0x10280c038
objc[13947]: [0x10280c040] 0x10067bc20 Person
objc[13947]: [0x10280c048] 0x10067a1d0 Person
objc[13947]: [0x10280c050] ################ POOL 0x10280c050
objc[13947]: [0x10280c058] 0x100679d60 Person
objc[13947]: [0x10280c060] 0x100678e20 Person
objc[13947]: [0x10280c068] 0x1006777c0 Person
objc[13947]: [0x10280c070] 0x100678ce0 Person
...
objc[13947]: [0x10280cff8] 0x100681ba0 Person
objc[13947]: [0x10280a000] ................ PAGE (hot)
objc[13947]: [0x10280a038] 0x100681bb0 Person
...
objc[13947]: [0x10280a348] 0x1006821d0 Person
objc[13947]: [0x10280a350] ################ POOL 0x10280a350
objc[13947]: [0x10280a358] 0x1006821e0 Person
objc[13947]: [0x10280a360] 0x1006821f0 Person

从打印结果中可以看到,第一个 page 里有两个 POOL_BOUNDARY,由于对象太多超出了第一个 page 的存储范围,所以创建出了第二个 page。第二个 page 中存储了多出来的 person 对象,还有一个 POOL_BOUNDARY
PAGE (hot) 表示该 page 为当前页,PAGE (full) (cold) 中的 full 表示这一页已经满了,cold 表示该 page 不是当前页。

源码分析

objc_autoreleasePoolPush() 方法的实现原理是调用 AutoreleasePoolPage 对象的 push() 方法。
objc_autoreleasePoolPop() 方法的实现原理是调用 AutoreleasePoolPage 对象的 pop() 方法。
autorelease 方法的实现原理则是调用了 AutoreleasePoolPage 对象的 autorelease() 方法。

objc4-781 中的 NSObject.mm 文件查看。

objc_autoreleasePoolPush(void)

1
2
3
4
5
void *
objc_autoreleasePoolPush(void)
{
return AutoreleasePoolPage::push();
}

push() 方法:

1
2
3
4
5
6
7
8
9
10
11
static inline void *push()
{
id *dest;
if (slowpath(DebugPoolAllocation)) {
dest = autoreleaseNewPage(POOL_BOUNDARY); // 传入 POOL_BOUNDARY 来新建一个 AutoreleasePoolPage 对象
} else {
dest = autoreleaseFast(POOL_BOUNDARY); // AutoreleasePoolPage 对象已经存在就直接添加
}
ASSERT(dest == EMPTY_POOL_PLACEHOLDER || *dest == POOL_BOUNDARY);
return dest;
}

如果 page 不存在就调用 autoreleaseNewPage() 方法传入 POOL_BOUNDARY 创建:

1
2
3
4
5
6
7
8
9
10
11
12
13
14
15
16
17
18
19
20
21
22
23
24
25
26
27
28
29
30
31
32
33
34
static __attribute__((noinline))
id *autoreleaseNewPage(id obj)
{
AutoreleasePoolPage *page = hotPage(); // 获取当前 page
if (page) return autoreleaseFullPage(obj, page);
else return autoreleaseNoPage(obj);
}
static inline AutoreleasePoolPage *hotPage()
{
AutoreleasePoolPage *result = (AutoreleasePoolPage *)
tls_get_direct(key);
if ((id *)result == EMPTY_POOL_PLACEHOLDER) return nil;
if (result) result->fastcheck();
return result;
}
static __attribute__((noinline))
id *autoreleaseFullPage(id obj, AutoreleasePoolPage *page)
{
// The hot page is full.
// Step to the next non-full page, adding a new page if necessary.
// Then add the object to that page.
ASSERT(page == hotPage());
ASSERT(page->full() || DebugPoolAllocation);
do {
if (page->child) page = page->child;
else page = new AutoreleasePoolPage(page);
} while (page->full());
setHotPage(page);
return page->add(obj); // 入栈 POOL_BOUNDARY
}

如果 AutoreleasePoolPage 对象已经存在就直接调用 autoreleaseFast() 方法添加 POOL_BOUNDARY

1
2
3
4
5
6
7
8
9
10
11
static inline id *autoreleaseFast(id obj)
{
AutoreleasePoolPage *page = hotPage();
if (page && !page->full()) { // page 存在 && page 没有满
return page->add(obj); // 添加 obj
} else if (page) { // page 存在 && page 满了
return autoreleaseFullPage(obj, page);
} else { // page 不存在
return autoreleaseNoPage(obj);
}
}

- (id)autorelease

1
2
3
4
5
6
7
8
9
10
11
12
13
14
15
16
17
18
- (id)autorelease {
return _objc_rootAutorelease(self);
}
NEVER_INLINE id
_objc_rootAutorelease(id obj)
{
ASSERT(obj);
return obj->rootAutorelease();
}
__attribute__((noinline,used))
id
objc_object::rootAutorelease2()
{
ASSERT(!isTaggedPointer());
return AutoreleasePoolPage::autorelease((id)this); // 将当前对象 this 加入 page
}

autorelease((id)this) 方法:

1
2
3
4
5
6
7
8
static inline id autorelease(id obj)
{
ASSERT(obj);
ASSERT(!obj->isTaggedPointer());
id *dest __unused = autoreleaseFast(obj); // 添加 obj
ASSERT(!dest || dest == EMPTY_POOL_PLACEHOLDER || *dest == obj);
return obj;
}

调用 autoreleaseFast() 方法添加 obj:

1
2
3
4
5
6
7
8
9
10
11
static inline id *autoreleaseFast(id obj)
{
AutoreleasePoolPage *page = hotPage();
if (page && !page->full()) { // page 存在 && page 没有满
return page->add(obj); // 添加 obj
} else if (page) { // page 存在 && page 满了
return autoreleaseFullPage(obj, page);
} else { // page 不存在
return autoreleaseNoPage(obj);
}
}

autorelease 方法最终是通过调用 autoreleaseFast() 方法,将调用了 autorelease 方法的对象保存到了 page 中。

objc_autoreleasePoolPop(void *ctxt)

1
2
3
4
5
6
NEVER_INLINE
void
objc_autoreleasePoolPop(void *ctxt)
{
AutoreleasePoolPage::pop(ctxt);
}

pop() 方法:

1
2
3
4
5
6
7
8
9
10
11
12
13
14
15
16
17
18
19
20
21
22
23
24
25
26
27
28
29
30
31
32
33
34
35
36
37
38
static inline void
pop(void *token)
{
AutoreleasePoolPage *page;
id *stop;
if (token == (void*)EMPTY_POOL_PLACEHOLDER) {
page = hotPage(); // 从当前的 page 开始 pop
if (!page) {
// Pool was never used. Clear the placeholder.
return setHotPage(nil);
}
// Pool was used. Pop its contents normally.
// Pool pages remain allocated for re-use as usual.
page = coldPage();
token = page->begin();
} else {
page = pageForPointer(token);
}
stop = (id *)token;
if (*stop != POOL_BOUNDARY) {
if (stop == page->begin() && !page->parent) {
// Start of coldest page may correctly not be POOL_BOUNDARY:
// 1. top-level pool is popped, leaving the cold page in place
// 2. an object is autoreleased with no pool
} else {
// Error. For bincompat purposes this is not
// fatal in executables built with old SDKs.
return badPop(token);
}
}
if (slowpath(PrintPoolHiwat || DebugPoolAllocation || DebugMissingPools)) {
return popPageDebug(token, page, stop);
}
return popPage<false>(token, page, stop); // 释放对象
}

popPageDebug() 方法:

1
2
3
4
5
6
__attribute__((noinline, cold))
static void
popPageDebug(void *token, AutoreleasePoolPage *page, id *stop)
{
popPage<true>(token, page, stop);
}

popPage() 方法:

1
2
3
4
5
6
7
8
9
10
11
12
13
14
15
16
17
18
19
20
21
22
23
24
25
26
27
28
29
template<bool allowDebug>
static void
popPage(void *token, AutoreleasePoolPage *page, id *stop)
{
if (allowDebug && PrintPoolHiwat) printHiwat();
page->releaseUntil(stop); // 释放 page 里的所有对象,知道遇到 stop 才停止
// memory: delete empty children
if (allowDebug && DebugPoolAllocation && page->empty()) {
// special case: delete everything during page-per-pool debugging
AutoreleasePoolPage *parent = page->parent;
page->kill();
setHotPage(parent);
} else if (allowDebug && DebugMissingPools && page->empty() && !page->parent) {
// special case: delete everything for pop(top)
// when debugging missing autorelease pools
page->kill();
setHotPage(nil);
} else if (page->child) {
// hysteresis: keep one empty child if page is more than half full
if (page->lessThanHalfFull()) {
page->child->kill();
}
else if (page->child->child) {
page->child->child->kill();
}
}
}

releaseUntil() 方法:

1
2
3
4
5
6
7
8
9
10
11
12
13
14
15
16
17
18
19
20
21
22
void releaseUntil(id *stop)
{
while (this->next != stop) {
AutoreleasePoolPage *page = hotPage(); // 取出当前 page
while (page->empty()) {
page = page->parent;
setHotPage(page);
}
page->unprotect();
id obj = *--page->next; // 取出最后面的一个 obj
memset((void*)page->next, SCRIBBLE, sizeof(*page->next));
page->protect();
if (obj != POOL_BOUNDARY) {
objc_release(obj); // 调用obj的release方法
}
}
setHotPage(this);
}

pop() 方法最终是通过调用 releaseUntil() 方法,将 page 里的对象依次调用 objc_release(obj) 方法释放掉了。

autorelease 释放时机

创建一个 iOS 项目,选择 MRC 环境,修改 main.m 文件(当前XCode版本11.6)。

1
2
3
4
5
6
7
int main(int argc, char * argv[]) {
NSString * appDelegateClassName;
@autoreleasepool {
appDelegateClassName = NSStringFromClass([AppDelegate class]);
return UIApplicationMain(argc, argv, nil, appDelegateClassName);
}
}

定义 Person 类,添加打印:

1
2
3
4
5
6
7
8
9
10
11
12
13
14
15
16
17
18
19
20
21
22
23
24
25
26
27
@implementation Person
- (void)dealloc
{
NSLog(@"%s", __func__);
[super dealloc];
}
@end
@implementation ViewController
- (void)viewDidLoad {
[super viewDidLoad];
Person *person = [[[Person alloc] init] autorelease];
NSLog(@"%s", __func__);
}
- (void)viewWillAppear:(BOOL)animated
{
[super viewWillAppear:animated];
NSLog(@"%s", __func__);
}
- (void)viewDidAppear:(BOOL)animated
{
[super viewDidAppear:animated];
NSLog(@"%s", __func__);
}
@end

打印结果:

1
2
3
4
-[ViewController viewDidLoad]
-[ViewController viewWillAppear:]
-[Person dealloc]
-[ViewController viewDidAppear:]

从打印结果可以看到,person 对象是在 viewWillAppear 方法执行完成后被释放的。

Runloop和Autorelease

iOS 在主线程的 Runloop 中注册了两个 Observer:
第一个 Observer 监听了 kCFRunLoopEntry 事件,会调用 objc_autoreleasePoolPush()
第二个 Observer 监听了 kCFRunLoopBeforeWaiting 事件,会调用 objc_autoreleasePoolPop()objc_autoreleasePoolPush(),监听了 kCFRunLoopBeforeExit 事件,会调用 objc_autoreleasePoolPop()

打印当前的 RunLoop,查看 Observers:

1
2
3
4
5
6
7
8
9
@implementation ViewController
- (void)viewDidLoad {
[super viewDidLoad];
Person *person = [[[Person alloc] init] autorelease];
NSLog(@"%s", __func__);
NSLog(@"%@", [NSRunLoop currentRunLoop]);
}
@end

打印结果里有很多内容,这里是摘出来的跟 Autorelease 相关的两个 Observe:

1
2
3
4
5
observers = (
"<CFRunLoopObserver 0x6000009fc1e0 [0x7fff8062d750]>{valid = Yes, activities = 0x1, repeats = Yes, order = -2147483647, callout = _wrapRunLoopWithAutoreleasePoolHandler (0x7fff4931eaa4), context = <CFArray 0x60000368ce70 [0x7fff8062d750]>{type = mutable-small, count = 1, values = (\n\t0 : <0x7fdaef00a048>\n)}}",
"<CFRunLoopObserver 0x6000009fc280 [0x7fff8062d750]>{valid = Yes, activities = 0xa0, repeats = Yes, order = 2147483647, callout = _wrapRunLoopWithAutoreleasePoolHandler (0x7fff4931eaa4), context = <CFArray 0x60000368ce70 [0x7fff8062d750]>{type = mutable-small, count = 1, values = (\n\t0 : <0x7fdaef00a048>\n)}}"
),

_wrapRunLoopWithAutoreleasePoolHandler 是回调方法,在收到消息时用来处理 Autorelease 相关操作。

第一个 observe 的 activities0x1,第二个 observe 的 activities0xa0

activities 对应的枚举:

1
2
3
4
5
6
7
8
9
typedef CF_OPTIONS(CFOptionFlags, CFRunLoopActivity) {
kCFRunLoopEntry = (1UL << 0), // 1(十进制)
kCFRunLoopBeforeTimers = (1UL << 1), // 2
kCFRunLoopBeforeSources = (1UL << 2), // 4
kCFRunLoopBeforeWaiting = (1UL << 5), // 32
kCFRunLoopAfterWaiting = (1UL << 6), // 64
kCFRunLoopExit = (1UL << 7), // 128
kCFRunLoopAllActivities = 0x0FFFFFFFU
};

因为:
0x1(十六进制)-> 1(十进制)
0xa0(十六进制)-> 160(十进制)
所以:

1
2
0x1:kCFRunLoopEntry
0xa0:kCFRunLoopAfterWaiting | kCFRunLoopExit

所以第一个 observe 监听的状态就是 kCFRunLoopEntry,第二个 observe 监听的状态就是 kCFRunLoopAfterWaitingkCFRunLoopExit

内存管理20

  • 第一次循环:
    01 状态是 kCFRunLoopEntry,RunLoop 会调用 objc_autoreleasePoolPush() 方法;
    07 状态是 kCFRunLoopAfterWaiting,RunLoop 会先调用 objc_autoreleasePoolPop() 方法,然后调用 objc_autoreleasePoolPush() 方法;
  • 非第一次循环:
    10-1 回到 02 继续循环至 07;
    07 状态是 kCFRunLoopAfterWaiting,RunLoop 会先调用 objc_autoreleasePoolPop() 方法,然后调用 objc_autoreleasePoolPush() 方法;
    10-1 回到 02 继续循环至 07;
  • 结束循环:
    10-2 退出 RunLoop;
    11 状态是 kCFRunLoopExit,RunLoop 会调用 objc_autoreleasePoolPop() 方法。

因为 02 会先调用 objc_autoreleasePoolPop() 方法,然后调用 objc_autoreleasePoolPush() 方法,所以 push()pop() 实现了一一对应的关系。

在看打印结果:

1
2
3
4
-[ViewController viewDidLoad]
-[ViewController viewWillAppear:]
-[Person dealloc]
-[ViewController viewDidAppear:]

viewWillAppear 执行完成后,RunLoop 到了 02 的位置。此时 RunLoop 监听到了 kCFRunLoopAfterWaiting 状态,会先调用 objc_autoreleasePoolPop() 方法,然后调用 objc_autoreleasePoolPush() 方法。在调用 objc_autoreleasePoolPop() 方法时,Autorelease 中的 person 对象就被释放了。

另外,打印结果也说明了 viewDidLoadviewWillAppear 方法是在同一个循环中执行的。

ARC环境下的release

1
2
3
4
5
6
7
8
9
10
11
12
13
14
15
16
17
18
19
20
@implementation ViewController
- (void)viewDidLoad {
[super viewDidLoad];
Person *person = [[Person alloc] init];
NSLog(@"%s", __func__);
}
- (void)viewWillAppear:(BOOL)animated
{
[super viewWillAppear:animated];
NSLog(@"%s", __func__);
}
- (void)viewDidAppear:(BOOL)animated
{
[super viewDidAppear:animated];
NSLog(@"%s", __func__);
}
@end

打印结果:

1
2
3
4
-[ViewController viewDidLoad]
-[Person dealloc]
-[ViewController viewWillAppear:]
-[ViewController viewDidAppear:]

从打印结果可以看到,person 对象在 viewDidLoad 方法执行完就释放了。所以在 ARC 环境下,在方法最后结束前,对方法内部的局部变量调用了 release 方法:

1
2
3
4
5
6
7
- (void)viewDidLoad {
[super viewDidLoad];
Person *person = [[Person alloc] init];
NSLog(@"%s", __func__);
// [person release];
}

总结

  • 使用 CADisplayLink、NSTimer 有什么注意点?
    CADisplayLink 和 NSTimer 依赖于 RunLoop,如果 RunLoop 的任务过于繁重,可能会导致 CADisplayLink 和 NSTimer 不准时。
    CADisplayLink 和 NSTimer 有可能会造成循环引用问题,CADisplayLink 可以通过使用代理对象(NSProxy)解决,NSTimer 除了可以通过使用代理对象(NSProxy)解决外,还可以使用带有 block 回调的初始化方法。

  • 介绍下内存的几大区域
    代码段:编译之后的代码
    数据段:字符串常量、已初始化数据和未初始化数据
    栈:函数调用开销,比如局部变量。(分配的内存空间地址越来越小)
    堆:通过 alloc、malloc、calloc 等动态分配的空间,分配的内存空间地址越来越大

  • 讲一下你对 iOS 内存管理的理解
    在 iOS 中,使用引用计数来管理 OC 对象的内存。
    一个新创建的 OC 对象引用计数默认是1,当引用计数减为0,OC 对象就会销毁,释放其占用的内存空间。
    调用 retain 会让 OC 对象的引用计数+1,调用 release 会让 OC 对象的引用计数-1。
    内存管理的经验总结:
    当调用 alloc、new、copy、mutableCopy 方法返回了一个对象,在不需要这个对象时,要调用 release 或者 autorelease 来释放它。
    想拥有某个对象,就让它的引用计数+1;不想再拥有某个对象,就让它的引用计数-1。

  • ARC 都帮我们做了什么?(LLVM + Runtime)
    ARC 是 LLVM 编译器和 Runtime 协作协作实现的。ARC 利用 LLVM 编译器自动生成 release、retain 和 autorelease 等内存管理相关的代码,利用 Runtime 实现在运行时对弱引用的管理(添加和清除)。

  • weak 指针的实现原理
    将弱引用存储在一个弱引用表(哈希表)里面,在对象要销毁时,就以对象的地址值 & mask 得到一个索引取出对应的弱引用表,并把弱引用表里存储的弱引用都清除掉。

  • autorelease 对象在什么时机会被调用 release?
    autorelease 对象在什么时候调用 release 是由 RunLoop 控制的,在 RunLoop 监听到 kCFRunLoopAfterWaitingkCFRunLoopExit 状态时会调用 objc_autoreleasePoolPop() 方法,此时 autorelease 对象会调用 release。即在 RunLoop 进入休眠或者退出时调用 release。

  • 方法里有局部对象, 出了方法后会立即释放吗?
    会。在方法结束前,runtime 会自动为方法内部的局部对象调用 release 方法进行释放。

相关阅读:
深入理解 Tagged Pointer