Alamofire

Alamofire

用法

高级用法

相关文档:

apple - Property Wrappers

apple - Key Path Member Lookup

Alamofire源码学习目录合集

链式调用与@dynamicMemberLookup

SwiftUI 和 Swift 5.1 新特性(3) Key Path Member Lookup
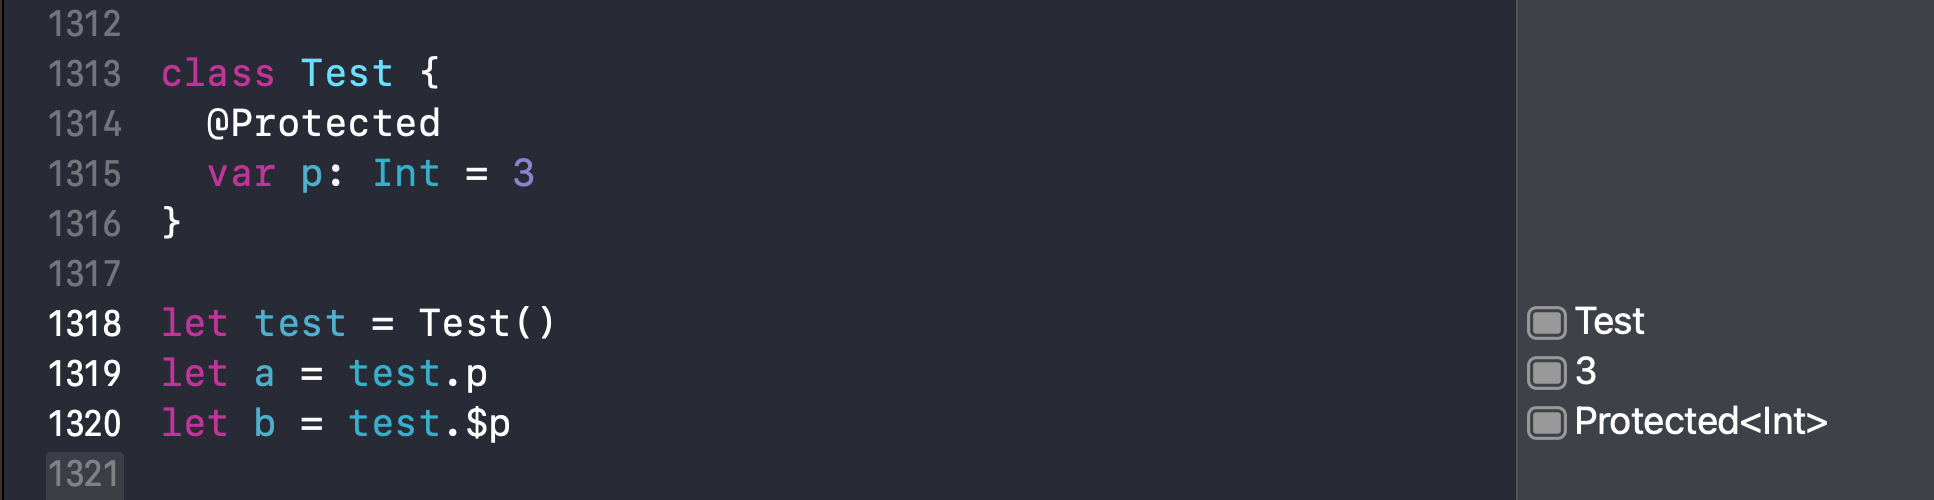
Protected

定义一个协议 Lock,让实现该协议的类拥有lock()unlock()around()能力,其中lock()unlock()需要遵循协议的类自定义实现。

1
2
3
4
5
6
7
8
9
10
11
12
13
14
15
16
17
18
19
20
21
22
private protocol Lock {
func lock()
func unlock()
}
extension Lock {
/// 在获取锁的同时执行返回值的闭包。
///
/// - Parameter closure: 要运行的闭包。
///
/// - Returns: 闭包生成的值。
func around<T>(_ closure: () throws -> T) rethrows -> T {
lock(); defer { unlock() }
return try closure()
}
/// 获取锁时执行闭包。
func around(_ closure: () throws -> Void) rethrows {
lock(); defer { unlock() }
try closure()
}
}

自定义锁 UnfairLock 遵循 Lock 协议,并自定义实现lock()unlock()能力。

1
2
3
4
5
6
7
8
9
10
11
12
13
14
15
16
17
18
19
20
21
final class UnfairLock: Lock {
private let unfairLock: os_unfair_lock_t
init() {
unfairLock = .allocate(capacity: 1)
unfairLock.initialize(to: os_unfair_lock())
}
deinit {
unfairLock.deinitialize(count: 1)
unfairLock.deallocate()
}
fileprivate func lock() {
os_unfair_lock_lock(unfairLock)
}
fileprivate func unlock() {
os_unfair_lock_unlock(unfairLock)
}
}

使用 @propertyWrapper@dynamicMemberLookup 两个批注,自定义属性包裹器 Protected,实现属性的读写安全。

1
2
3
4
5
6
7
8
9
10
11
12
13
14
15
16
17
18
19
20
21
22
23
24
25
26
27
28
29
30
31
32
33
34
35
36
37
38
39
40
41
42
43
44
45
46
47
48
49
@propertyWrapper
@dynamicMemberLookup
final class Protected<T> {
private let lock = UnfairLock()
private var value: T
init(_ value: T) {
self.value = value
}
/// propertyWrapper修饰必须要有的属性, 用来保存包裹的值
/// 只保证读写安全
var wrappedValue: T {
get { lock.around { value } }
set { lock.around { value = newValue } }
}
/// projectedValue 是 Swift 的语法糖,支持 `$` 访问
var projectedValue: Protected<T> { self }
/// 允许为包装后的值提供初始值
init(wrappedValue: T) {
value = wrappedValue
}
/// 同步读取或转换包含的值。
///
/// - Parameter closure: 要执行的闭包。
///
/// - Returns: 传递的闭包的返回值。
func read<U>(_ closure: (T) throws -> U) rethrows -> U {
try lock.around { try closure(self.value) }
}
/// 同步修改受保护的值。
@discardableResult
func write<U>(_ closure: (inout T) throws -> U) rethrows -> U {
try lock.around { try closure(&self.value) }
}
subscript<Property>(dynamicMember keyPath: WritableKeyPath<T, Property>) -> Property {
get { lock.around { value[keyPath: keyPath] } }
set { lock.around { value[keyPath: keyPath] = newValue } }
}
subscript<Property>(dynamicMember keyPath: KeyPath<T, Property>) -> Property {
lock.around { value[keyPath: keyPath] }
}
}

应用:

1
2
3
4
5
6
7
8
9
10
11
12
13
14
15
class Test {
@Protected
var p: Int = 3
}
let test = Test()
let a = test.p // 3
let b = test.$p // 此时 b 为 Protected<Int> 类型,可以调用 Protected 类中定义的方法
b.read {
$0 // 3
}
print("a = \(a)") // Prints "a = 3"
print("b = \(b)") // Prints "b = __lldb_expr_15.Protected<Swift.Int>"
print("b = \(b.read{ $0 })") // Prints "b = 3"

@propertyWrapper

属性包装器是一种通用结构,用于封装属性的读写访问,或添加其他行为。比如限制可用的属性值、向读写访问添加额外逻辑、添加方法等。

Swift 5.1 为创建属性包装器提供了一种新的解决方案,使用@propertyWrapper批注标记属性包装器。

wrappedValue:使用@propertyWrapper的包装器,要求包装器对象必须包含一个被包装的值的非静态属性

1
2
3
4
5
6
7
8
9
10
11
/// propertyWrapper修饰必须要有的属性, 用来保存包裹的值
/// 只保证读写安全
var wrappedValue: T {
get { lock.around { value } }
set { lock.around { value = newValue } }
}
/// 允许为包装后的值提供初始值
init(wrappedValue: T) {
value = wrappedValue
}

projectedValue@propertyWrapper 提供了另一种语法糖——投影值,通过在属性前加$前缀来访问属性值。

01

@dynamicMemberLookup

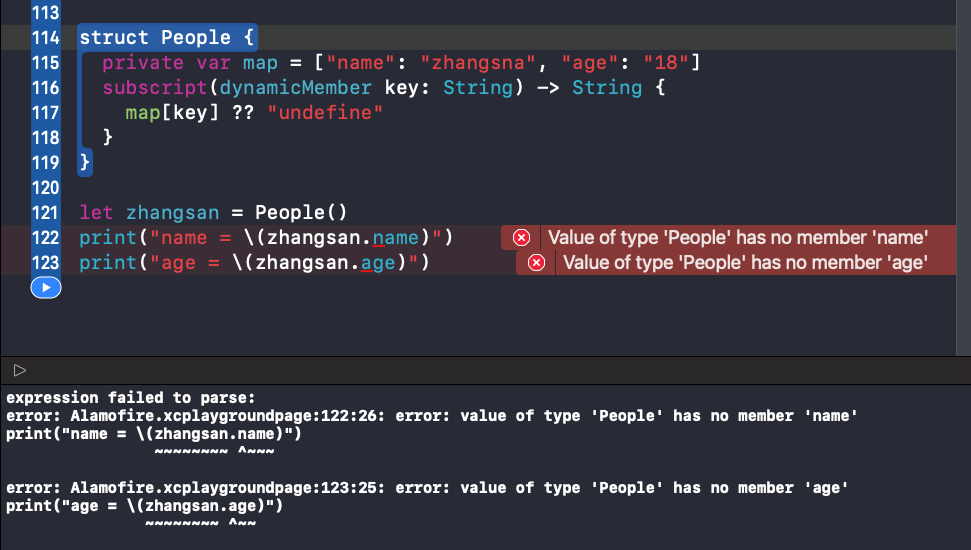
@dynamicMemberLookup 称为动态成员查找,是Swift的一项功能特性,允许动态成员查找调用看起来像范文类型属性的常规调用。

1
2
let dic = ["name": "zhangsan"]
let name = dic.name

name是从字典中查找的,而不是作为 dic 的属性访问的。

实现支持动态查找的People类:

  1. 使用@dynamicMemberLookup标注People的类型;
  2. 实现 subscript(dynamicMember key:) 方法。
1
2
3
4
5
6
7
8
9
10
11
@dynamicMemberLookup
struct People {
private var map = ["name": "zhangsna", "age": "18"]
subscript(dynamicMember key: String) -> String {
map[key] ?? "undefine"
}
}
let zhangsan = People()
print("name = \(zhangsan.name)") // Prints "name = zhangsna"
print("age = \(zhangsan.age)") // Prints "age = 18"

没有使用 @dynamicMemberLookup 标注的情况会报错:

02

1. KeyPath

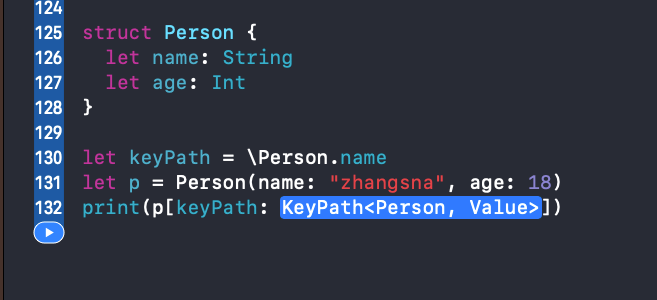
KeyPath<Root, Value> 泛型类型,用来表示从 Root 类型到 Value 属性的访问路径。

1
2
3
4
5
6
7
8
9
struct Person {
let name: String
let age: Int
}
let keyPath = \Person.name
let p = Person(name: "zhangsna", age: 18)
print(p[keyPath: keyPath])
// Prints "zhangsna"

这里用到了一个语法 \Person.name,它的类型是 KeyPath<Person, String>

03

  • 同一类型 KeyPath<Root, Value> 可以代表多种获取路径:KeyPath<Person, Int> 既可以表示\Person.age,也可以表示\Person.name.count

  • 两个 KeyPath 可以拼接成一个新的 KeyPath:KeyPath1 的类型是 KeyPath<Person, String>\String.count 的类型是 KeyPath<String, Int>,调用 appending 函数后变成了 KeyPath<Person, Int> 类型。

1
2
3
4
5
6
7
let keyPath1 = \Person.name
let keyPath2 = \String.count
let keyPath3 = keyPath1.appending(path: \String.count)
print(type(of: keyPath)) // Prints "KeyPath<Person, String>"
print(type(of: keyPath2)) // Prints "KeyPath<String, Int>"
print(type(of: keyPath3)) // Prints "KeyPath<Person, Int>"
  • KeyPathWriteableKeyPath 的父类,WriteableKeyPathReferenceWritableKeyPath 的父类。

  • KeyPath 的能力是最弱的,只能以只读的方式访问属性。

1
2
3
4
5
6
7
8
9
struct Person {
let name: String
let age: Int
}
let keyPath = \Person.name
let p = Person(name: "zhangsna", age: 18)
print(p[keyPath: keyPath])
// Prints "zhangsna"
  • WriteableKeyPath 可以对可变属性进行读写操作。将 let 改成 var,则 person.name 的类型就变成了 WriteableKeyPath,可以直接修改 p[keyPath: keyPath] = "lisi"
1
2
3
4
5
6
7
8
9
10
struct Person {
var name: String
let age: Int
}
let keyPath = \Person.name
var p = Person(name: "zhangsna", age: 18)
p[keyPath: keyPath] = "lisi"
print(p[keyPath: keyPath])
// Prints "lisi"
  • ReferenceWritableKeyPath 可以对引用类型的可变属性进行写入。将struct改成class,则 Person.name 的类型变成 ReferenceWritableKeyPath
1
2
3
4
5
6
7
8
9
10
class Person {
var name: String = ""
let age: Int = 0
}
let keyPath = \Person.name
var p = Person()
p[keyPath: keyPath] = "lisi"
print(p[keyPath: keyPath])
// Prints "lisi"

2. 动态成员查找 Dynamic Member Lookup

Swift4.2 引入了动态成员查找特性,实现使用静态的语法做动态的查找。

1
2
3
4
5
6
7
8
9
10
11
@dynamicMemberLookup
struct People {
private var map = ["name": "zhangsna", "age": "18"]
subscript(dynamicMember key: String) -> String {
map[key] ?? "undefine"
}
}
let zhangsan = People()
print("name = \(zhangsan.name)") // Prints "name = zhangsna"
print("age = \(zhangsan.age)") // Prints "age = 18"

支持动态成员查找的类型首先需要用 @dynamicMemberLookup 来修饰,然后实现动态查找方法subscript(dynamicMember member: String)

直接使用 .property 的语法访问属性貌似静态实则动态,该语法实际上调用的是subscript(dynamicMember member: String)方法。

3. 成员查找 Key Path Member Lookup

Swift5.1 引入的成员查找。

编译器可以从 KeyPath 查询所有的目标,以及它们的类型:

1
2
3
4
5
6
7
8
9
10
11
12
13
14
15
16
@dynamicMemberLookup
struct Person {
struct Info {
var name: String
}
var info: Info
subscript<Property>(dynamicMember keyPath: WritableKeyPath<Info, Property>) -> Property {
get { info[keyPath: keyPath] }
set { info[keyPath: keyPath] = newValue }
}
}
var person = Person(info: Person.Info(name: "zhangsan"))
person.name = "lisi"
print(person.name)
// Prints "lisi"

person.info.name 可以直接写成 person.name

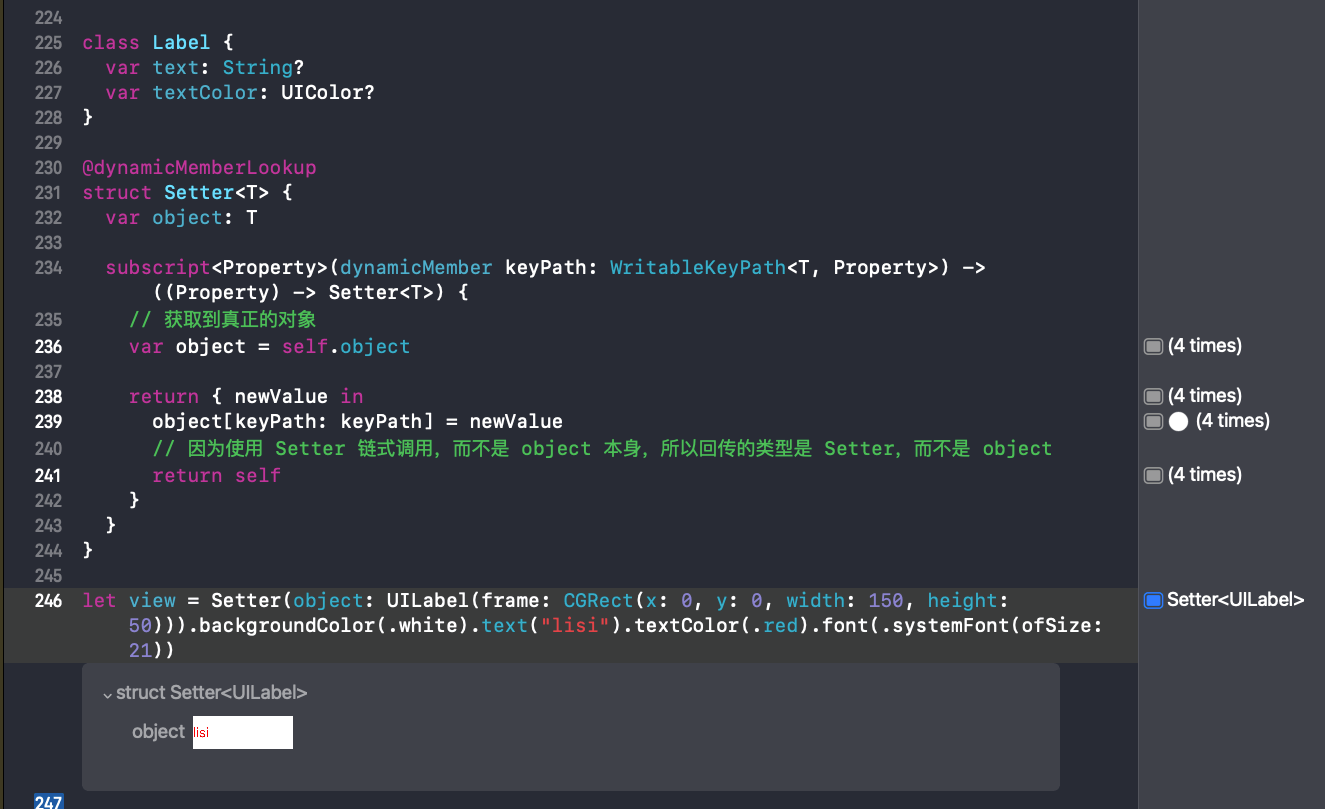
@dynamicMemberLookup 非常适用于包装类型:

1
2
3
4
5
6
7
8
9
10
11
12
13
14
15
16
17
18
19
20
21
22
23
struct Person {
var name: String
var age: Int
}
@dynamicMemberLookup
struct Wrapper<T> {
var value: T
init(value: T) {
self.value = value
}
subscript<Property>(dynamicMember keyPath: WritableKeyPath<T, Property>) -> Property {
get { value[keyPath: keyPath] }
set { value[keyPath: keyPath] = newValue }
}
}
var teacher = Wrapper(value: Person(name: "zhangsan", age: 18))
teacher.age = 35
print(teacher.age)
// Prints "35"

链式调用

通过回传 self,实现链式调用:

1
2
3
4
5
6
7
8
9
10
11
12
13
14
15
16
17
18
19
20
21
22
23
import UIKit
class Label {
var text: String?
var textColor: UIColor?
}
/// setter
extension Label {
func text(_ text: String) -> Label {
self.text = text
return self
}
func textColor(_ textColor: UIColor) -> Label {
self.textColor = textColor
return self
}
}
Label()
.text("name")
.textColor(.black)

这种方法被动性比较大,如果 Label 的属性变化,则对应的 setter 方法也得改变。

使用动态成员查找实现:

1
2
3
4
5
6
7
8
9
10
11
12
13
14
15
16
17
18
19
20
21
22
23
24
class Label {
var text: String?
var textColor: UIColor?
}
@dynamicMemberLookup
struct Setter<T> {
var object: T
subscript<Property>(dynamicMember keyPath: WritableKeyPath<T, Property>) -> ((Property) -> Setter<T>) {
// 获取到真正的对象
var object = self.object
return { newValue in
object[keyPath: keyPath] = newValue
// 因为使用 Setter 链式调用,而不是 object 本身,所以回传的类型是 Setter,而不是 object
return self
}
}
}
let s = Setter(object: Label()).text("zhangsan").textColor(.blue).object
print(s.text)
// Prints "Optional("zhangsan")"

创建一个 UILabel

04

线程安全的属性 MutableState

在 Request.swift 文件中,Alamofire 使用 @Protected 标注,实现了一个线程安全的对象 mutableState

1
2
3
/// 受保护的`MutableState`值,该值提供对状态值的线程安全访问。
@Protected
fileprivate var mutableState = MutableState()

MutableState 中定义了很多变量,这些变量可能在异步线程调用:

1
2
3
4
5
6
7
8
9
10
11
12
13
14
15
16
17
18
19
20
21
22
23
24
25
26
27
28
29
30
31
32
33
34
35
36
37
38
39
40
41
42
43
44
45
46
47
48
49
50
51
52
53
54
55
56
57
58
59
60
61
/// 封装可变状态的类型,他们可能在从“underlyingQueue”以外的任何位置访问。
struct MutableState {
/// `Request`的状态
var state: State = .initialized
/// 为上传进度回调提供的`ProgressHandler`和`DispatchQueue`。
var uploadProgressHandler: (handler: ProgressHandler, queue: DispatchQueue)?
/// 为下载进度回调提供的`ProgressHandler`和`DispatchQueue`。
var downloadProgressHandler: (handler: ProgressHandler, queue: DispatchQueue)?
/// 为处理请求重定向提供的`RedirectHandler`
var redirectHandler: RedirectHandler?
/// 为处理响应缓存提供的`CachedResponseHandler`
var cachedResponseHandler: CachedResponseHandler?
/// 当`Request`能够创建其自身的cURL描述时,调用队列和闭包。
var cURLHandler: (queue: DispatchQueue, handler: (String) -> Void)?
/// 当`Request`创建`URLRequest`时调用队列和闭包。
var urlRequestHandler: (queue: DispatchQueue, handler: (URLRequest) -> Void)?
/// `Request`创建`URLSessionTask`时调用的队列和闭包。
var urlSessionTaskHandler: (queue: DispatchQueue, handler: (URLSessionTask) -> Void)?
/// 处理响应解析的响应序列化闭包。
var responseSerializers: [() -> Void] = []
/// 所有响应序列化程序完成后执行的响应序列化完成闭包。
var responseSerializerCompletions: [() -> Void] = []
/// 响应序列化程序处理是否完成。
var responseSerializerProcessingFinished = false
/// `URLCredential `用于身份验证质询。
var credential: URLCredential?
/// Alamofire代表请求创建的所有URLRequest。
var requests: [URLRequest] = []
/// Alamofire代表请求创建的所有URLSessionTask。
var tasks: [URLSessionTask] = []
/// Alamofire代表`Request`收集的所有`URLSessionTaskMetrics`值。应与创建的“任务”完全对应。
/// 「PS:对发送请求/DNS查询/TLS握手/请求响应等各种环节时间上的统计」
var metrics: [URLSessionTaskMetrics] = []
/// 提供的任何重试器重试“请求”的次数。
var retryCount = 0
/// `Request`的最终`AFError`,无论是来自各种内部Alamofire调用还是作为“任务”的结果。
var error: AFError?
/// 实例是否已调用`finish()`并正在运行序列化程序。将来应该用状态机中的表示替换。
var isFinishing = false
/// 请求完成时要运行的操作。用于并发支持。
var finishHandlers: [() -> Void] = []
}

比如:

1
2
3
4
5
6
7
8
9
10
11
12
13
14
/// 当代表实例创建了初始“URLRequest”时调用。如果“RequestAdapter”处于活跃状态,则“URLRequest”将在发出之前进行调整。
///
/// - Parameter request: 已创建“URLRequest”。
func didCreateInitialURLRequest(_ request: URLRequest) {
dispatchPrecondition(condition: .onQueue(underlyingQueue))
/*
1. 通过 $mutableState.write 调用一个线程安全的闭包,`$` 保证闭包线程安全
2. 将 request 添加到 .requets 数组中,`$` 保证 setter 方法线程安全
*/
$mutableState.write { $0.requests.append(request) }
eventMonitor?.request(self, didCreateInitialURLRequest: request)
}

或者

1
2
3
4
5
6
7
8
9
10
11
12
13
14
15
16
17
18
/// 完成此“请求”并启动响应序列化程序。
///
/// - Parameter error: 实例结束时可能出现的“错误”。
func finish(error: AFError? = nil) {
dispatchPrecondition(condition: .onQueue(underlyingQueue))
guard !$mutableState.isFinishing else { return }
// `$` 保证了 setter 方法是线程安全的
$mutableState.isFinishing = true
if let error = error { self.error = error }
// Start response handlers
processNextResponseSerializer()
eventMonitor?.requestDidFinish(self)
}

AlamofireExtended

Alamofire 扩展包裹器,用来对系统类进行扩展时包裹使用,避免方法入侵。

第一种方式

通过添加全局方法的方式扩展两个新的方法:

1
2
3
4
5
6
7
extension UIButton {
func method1() {}
func method2() {}
}
let button = UIButton(type: .custom)
button.method1()

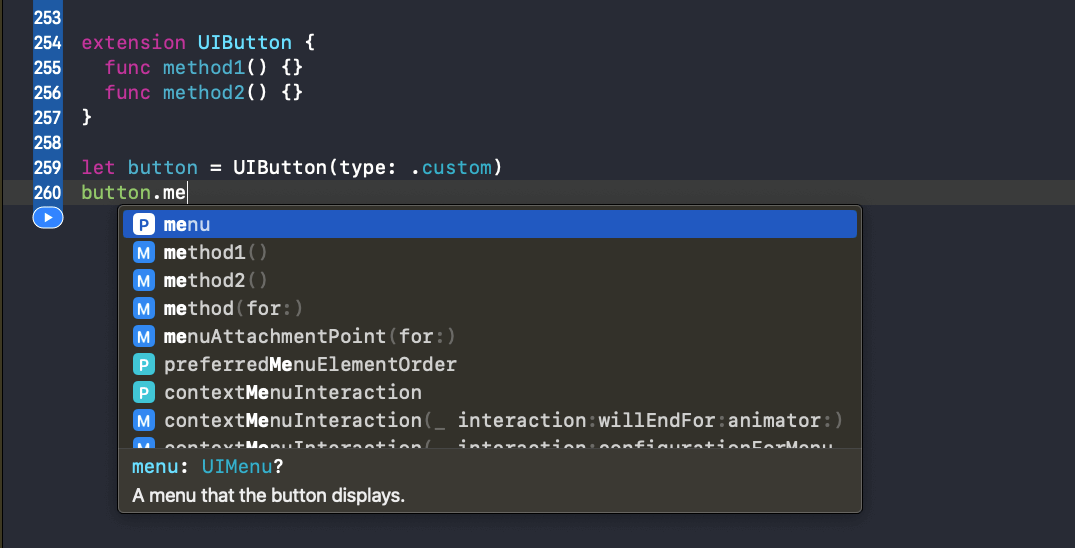
通过这种方式添加的方法,在所有能访问到该扩展的地方都可以调用。调用时,扩展的方法直接出现在 UIButton 提示的方法列表中。这有一个问题,一方面会给调用者造成困惑,另一方发面会存在同名的风险,造成方法污染👇:

05

第二种方式

写一个包裹器,将 UIButton 包裹起来,在包裹器中添加需要扩展的方法。

1
2
3
4
5
6
7
8
9
10
11
12
13
14
15
struct UIButtonWrapper {
let button: UIButton
func method1() {}
func method2() {}
}
extension UIButton {
var wrapper: UIButtonWrapper {
get { UIButtonWrapper.init(button: self) }
}
}
let button = UIButton(type: .custom)
button.wrapper.method1()

通过实现一个包裹器wrapper,扩展的方法只会出现在wrapper的调用提示方法列表里,UIButton的调用提示方法列表里只新增了一个 wrapper,从而避免了对UIButton的方法污染。

UIButtonWrapper 是针对UIButton设计的一个包裹器,只适用于UIButton。可以借用Swift泛型扩展约束的力量,实现一个泛型包裹器,从而实现为需要的任何类型扩展方法。

第三种方式

使用泛型和扩展约束,实现一个泛型包裹器:

1
2
3
4
5
6
7
8
9
10
11
12
13
14
15
16
17
18
19
20
21
22
23
24
25
26
27
28
29
30
31
32
33
34
35
36
37
38
public struct AlamofireExtension<ExtendedType> {
public private(set) var type: ExtendedType
public init(_ type: ExtendedType) {
self.type = type
}
}
// MARK: —— UIButton Extension
extension AlamofireExtension where ExtendedType == UIButton {
func methodForButton1() {}
func methodForButton2() {}
}
extension UIButton {
var af: AlamofireExtension<UIButton> {
// AlamofireExtension.init(self)
get { AlamofireExtension(self) }
}
}
// MARK: —— UILabel Extension
extension AlamofireExtension where ExtendedType == UILabel {
func methodForLabel1() {}
func methodForLabel2() {}
}
extension UILabel {
var af: AlamofireExtension<UILabel> {
get { AlamofireExtension(self) }
}
}
let button = UIButton(type: .custom)
button.af.methodForButton1()
let label = UILabel()
label.af.methodForLabel1()

通过泛型 AlamofireExtension<ExtendedType> 实现了对UIButtonUILabel的同时支持,扩展约束 where ExtendedType == UIButton 实现了对UIButtonUILabel扩展方法的区分,这种区分可以从调用提示方法列表中看出来:

UILabel提示方法列表:
06

UIButton提示方法列表:
07

通过UIButtonUILabel的扩展方式可以看出,在为类型扩展方法时,首先需要添加 af 计算属性来返回泛型包裹器AlamofireExtension<ExtendedType>

1
2
3
4
var af: AlamofireExtension<UIButton> {
// AlamofireExtension.init(self)
get { AlamofireExtension(self) }
}

可以使用泛型协议扩展的方式,添加默认实现,从而省略掉这一步。

第四种方式

使用泛型协议扩展的,实现af计算属性:

1
2
3
4
5
6
7
8
9
10
11
12
13
14
15
16
17
18
19
20
21
22
23
24
25
26
27
28
29
30
31
32
33
34
35
36
// MARK: —— 通用扩展类型
public struct AlamofireExtension<ExtendedType> {
public private(set) var type: ExtendedType
public init(_ type: ExtendedType) {
self.type = type
}
}
// MARK: —— 描述“通用拓展类型”的协议
public protocol AlamofireExtended {
// 正在扩展的类型
associatedtype ExtendedType
// 静态包裹器
static var af: AlamofireExtension<ExtendedType>.Type { get set }
// 实例包裹器
var af: AlamofireExtension<ExtendedType> { get set }
}
extension AlamofireExtended {
// 静态包裹器默认实现
public static var af: AlamofireExtension<Self>.Type {
get { AlamofireExtension<Self>.self }
set {}
}
// 实例包裹器默认实现
public var af: AlamofireExtension<Self> {
get { AlamofireExtension(self) }
set {}
}
}

应用:

1
2
3
4
5
6
7
8
9
10
11
12
13
14
15
16
17
18
19
20
// 扩展方法
extension AlamofireExtension where ExtendedType == UIButton {
func methodForButton1() {}
func methodForButton2() {}
}
extension AlamofireExtension where ExtendedType == UILabel {
func methodForLabel1() {}
func methodForLabel2() {}
}
// 采纳协议
extension UIButton: AlamofireExtended {}
extension UILabel: AlamofireExtended {}
let button = UIButton()
button.af.methodForButton1()
let label = UILabel()
label.af.methodForLabel1()

静态包裹器扩展了类型方法:

1
2
3
4
5
6
7
8
extension AlamofireExtension where ExtendedType == UIButton {
func methodForButton1() {}
func methodForButton2() {}
static func methodForButton3() {}
static func methodForButton4() {}
}
UIButton.af.methodForButton3()

扩展的类型方法,也有对应的提示方法列表:

08

EventMonitor

protocol EventMonitor 协议概述了 Alamofire 生命周期里的内部事件。EventMonitor 既包括从各种 URLSession 委托协议接收的事件,也包括Request 及其子类生命周期内的各种事件。

1
2
3
4
5
6
7
8
9
10
11
12
13
14
15
16
17
18
19
20
21
22
23
24
25
26
27
public protocol EventMonitor {
/// 调度事件的调度队列,默认是主队列
var queue: DispatchQueue { get }
// MARK: - URLSession Events
// MARK: URLSessionDelegate Events
func urlSession(_ session: URLSession, didBecomeInvalidWithError error: Error?)
// MARK: URLSessionTaskDelegate Events
// MARK: URLSessionDataDelegate Events
// MARK: URLSessionDownloadDelegate Events
// MARK: - Request Events
// MARK: DataRequest Events
// MARK: DataStreamRequest Events
// MARK: UploadRequest Events
// MARK: DownloadRequest Events
}

实例代码中只展示了URLSessionDelegate协议相关方法的声明,其它协议的声明省略。

EventMonitor 协议声明完方法后,还要对这些方法提供默认实现:

1
2
3
4
5
6
7
8
9
10
11
12
13
14
15
16
17
18
19
20
21
22
23
24
25
26
27
28
29
30
31
32
33
34
35
36
37
38
39
40
41
42
43
44
45
46
47
48
49
50
51
52
53
54
55
56
57
58
59
60
61
62
63
64
65
66
67
68
69
70
71
72
73
74
75
76
77
78
79
80
81
82
83
84
85
86
87
88
extension EventMonitor {
/// 调度事件的调度队列,默认是主队列
public var queue: DispatchQueue { .main }
// MARK: Default Implementations
public func urlSession(_ session: URLSession, didBecomeInvalidWithError error: Error?) {}
public func urlSession(_ session: URLSession,
task: URLSessionTask,
didReceive challenge: URLAuthenticationChallenge) {}
public func urlSession(_ session: URLSession,
task: URLSessionTask,
didSendBodyData bytesSent: Int64,
totalBytesSent: Int64,
totalBytesExpectedToSend: Int64) {}
public func urlSession(_ session: URLSession, taskNeedsNewBodyStream task: URLSessionTask) {}
public func urlSession(_ session: URLSession,
task: URLSessionTask,
willPerformHTTPRedirection response: HTTPURLResponse,
newRequest request: URLRequest) {}
public func urlSession(_ session: URLSession,
task: URLSessionTask,
didFinishCollecting metrics: URLSessionTaskMetrics) {}
public func urlSession(_ session: URLSession, task: URLSessionTask, didCompleteWithError error: Error?) {}
public func urlSession(_ session: URLSession, taskIsWaitingForConnectivity task: URLSessionTask) {}
public func urlSession(_ session: URLSession, dataTask: URLSessionDataTask, didReceive data: Data) {}
public func urlSession(_ session: URLSession,
dataTask: URLSessionDataTask,
willCacheResponse proposedResponse: CachedURLResponse) {}
public func urlSession(_ session: URLSession,
downloadTask: URLSessionDownloadTask,
didResumeAtOffset fileOffset: Int64,
expectedTotalBytes: Int64) {}
public func urlSession(_ session: URLSession,
downloadTask: URLSessionDownloadTask,
didWriteData bytesWritten: Int64,
totalBytesWritten: Int64,
totalBytesExpectedToWrite: Int64) {}
public func urlSession(_ session: URLSession,
downloadTask: URLSessionDownloadTask,
didFinishDownloadingTo location: URL) {}
public func request(_ request: Request, didCreateInitialURLRequest urlRequest: URLRequest) {}
public func request(_ request: Request, didFailToCreateURLRequestWithError error: AFError) {}
public func request(_ request: Request,
didAdaptInitialRequest initialRequest: URLRequest,
to adaptedRequest: URLRequest) {}
public func request(_ request: Request,
didFailToAdaptURLRequest initialRequest: URLRequest,
withError error: AFError) {}
public func request(_ request: Request, didCreateURLRequest urlRequest: URLRequest) {}
public func request(_ request: Request, didCreateTask task: URLSessionTask) {}
public func request(_ request: Request, didGatherMetrics metrics: URLSessionTaskMetrics) {}
public func request(_ request: Request, didFailTask task: URLSessionTask, earlyWithError error: AFError) {}
public func request(_ request: Request, didCompleteTask task: URLSessionTask, with error: AFError?) {}
public func requestIsRetrying(_ request: Request) {}
public func requestDidFinish(_ request: Request) {}
public func requestDidResume(_ request: Request) {}
public func request(_ request: Request, didResumeTask task: URLSessionTask) {}
public func requestDidSuspend(_ request: Request) {}
public func request(_ request: Request, didSuspendTask task: URLSessionTask) {}
public func requestDidCancel(_ request: Request) {}
public func request(_ request: Request, didCancelTask task: URLSessionTask) {}
public func request(_ request: DataRequest,
didValidateRequest urlRequest: URLRequest?,
response: HTTPURLResponse,
data: Data?,
withResult result: Request.ValidationResult) {}
public func request(_ request: DataRequest, didParseResponse response: DataResponse<Data?, AFError>) {}
public func request<Value>(_ request: DataRequest, didParseResponse response: DataResponse<Value, AFError>) {}
public func request(_ request: DataStreamRequest,
didValidateRequest urlRequest: URLRequest?,
response: HTTPURLResponse,
withResult result: Request.ValidationResult) {}
public func request<Value>(_ request: DataStreamRequest, didParseStream result: Result<Value, AFError>) {}
public func request(_ request: UploadRequest, didCreateUploadable uploadable: UploadRequest.Uploadable) {}
public func request(_ request: UploadRequest, didFailToCreateUploadableWithError error: AFError) {}
public func request(_ request: UploadRequest, didProvideInputStream stream: InputStream) {}
public func request(_ request: DownloadRequest, didFinishDownloadingUsing task: URLSessionTask, with result: Result<URL, AFError>) {}
public func request(_ request: DownloadRequest, didCreateDestinationURL url: URL) {}
public func request(_ request: DownloadRequest,
didValidateRequest urlRequest: URLRequest?,
response: HTTPURLResponse,
fileURL: URL?,
withResult result: Request.ValidationResult) {}
public func request(_ request: DownloadRequest, didParseResponse response: DownloadResponse<URL?, AFError>) {}
public func request<Value>(_ request: DownloadRequest, didParseResponse response: DownloadResponse<Value, AFError>) {}
}

因为 EventMonitor 协议包含了 URLSession 和 Request 的各种事件,所以方法比较多。实现中什么也没做,只是提供了默认实现。

EventMonitor 协议就像一个显示器,完整且全面的展示了 Alamofire 内部发生的各种事件,透过它可以大概了解 Alamofire 都做了些什么。然而,EventMonitor 只是一个抽象类,在Alamofire的逻辑代码部分用到的并不是它,而是遵循了 EventMonitor 协议的类 CompositeEventMonitor,负责处理 Alamofire 中的各种事件。

1
2
3
4
5
6
7
8
9
10
11
12
13
14
15
16
17
18
19
20
21
22
23
24
25
26
27
28
29
30
31
32
/// `EventMonitor`包含在所有实例中。`[AlamofireNotifications()]`默认情况下。
public let defaultEventMonitors: [EventMonitor] = [AlamofireNotifications()]
/// Session 的初始化方法
/// - eventMonitors: 实例使用的其他“EventMonitor”们(自定义)。
public init(session: URLSession,
delegate: SessionDelegate,
rootQueue: DispatchQueue,
startRequestsImmediately: Bool = true,
requestQueue: DispatchQueue? = nil,
serializationQueue: DispatchQueue? = nil,
interceptor: RequestInterceptor? = nil,
serverTrustManager: ServerTrustManager? = nil,
redirectHandler: RedirectHandler? = nil,
cachedResponseHandler: CachedResponseHandler? = nil,
eventMonitors: [EventMonitor] = []) {
precondition(session.configuration.identifier == nil,
"Alamofire does not support background URLSessionConfigurations.")
precondition(session.delegateQueue.underlyingQueue === rootQueue,
"Session(session:) initializer must be passed the DispatchQueue used as the delegateQueue's underlyingQueue as rootQueue.")
self.session = session
self.delegate = delegate
// ...
// 设置内部事件监听器们
eventMonitor = CompositeEventMonitor(monitors: defaultEventMonitors + eventMonitors)
delegate.eventMonitor = eventMonitor
// ...
}

CompositeEventMonitor

CompositeEventMonitor,负责处理 Alamofire 中的各种事件。从命名就可以看出,这是一个批量处理事件的“管理类”,可以称为事件监视器集合。

1
2
3
4
5
6
7
8
9
10
11
12
13
14
15
16
17
18
19
20
21
22
23
24
25
26
27
28
29
public final class CompositeEventMonitor: EventMonitor {
public let queue = DispatchQueue(label: "org.alamofire.compositeEventMonitor", qos: .utility)
let monitors: [EventMonitor]
init(monitors: [EventMonitor]) {
self.monitors = monitors
}
func performEvent(_ event: @escaping (EventMonitor) -> Void) {
queue.async {
for monitor in self.monitors {
monitor.queue.async { event(monitor) }
}
}
}
public func urlSession(_ session: URLSession, didBecomeInvalidWithError error: Error?) {
performEvent { $0.urlSession(session, didBecomeInvalidWithError: error) }
}
public func urlSession(_ session: URLSession,
task: URLSessionTask,
didReceive challenge: URLAuthenticationChallenge) {
performEvent { $0.urlSession(session, task: task, didReceive: challenge) }
}
// 省略
}

CompositeEventMonitor 遵循了 EventMonitor 协议,并且实现了全部方法。这里也只提供两个方法,其它方法省略。

CompositeEventMonitor 实现这些方法为了是使用队列来调度方法的调用,所以方法实现部分都是一样的,都调用了 performEvent 方法:

  1. 在 Session 和 Request 事件回调时,最终都会来到 performEvent 方法;
  2. 依次取出数组里的事件监视器,放到同步队列里执行。
1
2
3
4
5
6
7
func performEvent(_ event: @escaping (EventMonitor) -> Void) {
queue.async {
for monitor in self.monitors {
monitor.queue.async { event(monitor) }
}
}
}

event(monitor) 调用了闭包,闭包内部实现👇,$0 是参数 monitor

1
$0.urlSession(session, didBecomeInvalidWithError: error)

defaultEventMonitors

在 Session 的初始化方法里👆🏻,eventMonitors 数组里包含两个部分,一个是默认的 defaultEventMonitors,另一个是调用者添加的自定义事件监听器:

1
eventMonitor = CompositeEventMonitor(monitors: defaultEventMonitors + eventMonitors)

defaultEventMonitors 的定义:

1
public let defaultEventMonitors: [EventMonitor] = [AlamofireNotifications()]

AlamofireNotifications 提供Alamofire通知的事件监视器。

  1. 遵循 EventMonitor 协议;
  2. 实现需要监听的方法;
1
2
3
4
5
6
7
8
9
10
11
12
13
14
15
16
17
18
19
20
21
22
23
24
25
26
27
28
29
30
31
32
33
public final class AlamofireNotifications: EventMonitor {
public func requestDidResume(_ request: Request) {
NotificationCenter.default.postNotification(named: Request.didResumeNotification, with: request)
}
public func requestDidSuspend(_ request: Request) {
NotificationCenter.default.postNotification(named: Request.didSuspendNotification, with: request)
}
public func requestDidCancel(_ request: Request) {
NotificationCenter.default.postNotification(named: Request.didCancelNotification, with: request)
}
public func requestDidFinish(_ request: Request) {
NotificationCenter.default.postNotification(named: Request.didFinishNotification, with: request)
}
public func request(_ request: Request, didResumeTask task: URLSessionTask) {
NotificationCenter.default.postNotification(named: Request.didResumeTaskNotification, with: request)
}
public func request(_ request: Request, didSuspendTask task: URLSessionTask) {
NotificationCenter.default.postNotification(named: Request.didSuspendTaskNotification, with: request)
}
public func request(_ request: Request, didCancelTask task: URLSessionTask) {
NotificationCenter.default.postNotification(named: Request.didCancelTaskNotification, with: request)
}
public func request(_ request: Request, didCompleteTask task: URLSessionTask, with error: AFError?) {
NotificationCenter.default.postNotification(named: Request.didCompleteTaskNotification, with: request)
}
}

CompositeEventMonitorperformEvent 方法里,event(monitor) 会调用 AlamofireNotifications,触发对应的方法。

ClosureEventMonitor

事件监视器——允许将可选闭包设置为接收事件。

1
2
3
4
5
6
7
8
9
10
11
12
13
14
15
16
17
18
19
20
21
22
23
24
25
26
open class ClosureEventMonitor: EventMonitor {
/// 用于 `urlSession(_:didBecomeInvalidWithError:)` 事件调用的闭包
open var sessionDidBecomeInvalidWithError: ((URLSession, Error?) -> Void)?
/// 用于 `urlSession(_:task:didReceive:completionHandler:)` 事件调用的闭包.
open var taskDidReceiveChallenge: ((URLSession, URLSessionTask, URLAuthenticationChallenge) -> Void)?
// ...
public let queue: DispatchQueue
/// 用于执行事件闭包的队列
public init(queue: DispatchQueue = .main) {
self.queue = queue
}
open func urlSession(_ session: URLSession, didBecomeInvalidWithError error: Error?) {
sessionDidBecomeInvalidWithError?(session, error)
}
open func urlSession(_ session: URLSession, task: URLSessionTask, didReceive challenge: URLAuthenticationChallenge) {
taskDidReceiveChallenge?(session, task, challenge)
}
// ...
}

1、CompositeEventMonitor 的 performEvent,获取到 ClosureEventMonitor,将事件放入队列中;

1
2
3
4
5
6
7
func performEvent(_ event: @escaping (EventMonitor) -> Void) {
queue.async {
for monitor in self.monitors {
monitor.queue.async { event(monitor) }
}
}
}

2、ClosureEventMonitor 调用实现的代理方法;

1
$0.urlSession(session, didBecomeInvalidWithError: error)

3、从而调用对应的闭包

1
2
3
open func urlSession(_ session: URLSession, didBecomeInvalidWithError error: Error?) {
sessionDidBecomeInvalidWithError?(session, error)
}

Concurrency

async-await

1
2
3
4
5
6
7
8
9
10
11
12
13
14
15
16
17
18
19
20
21
22
23
24
25
26
27
var startTime = Date.now
var count = 20
var finish = 0
// 4.280519008636475-
func work(_ action: String) {
print("\(action)_①")
sleep(2)
Task {
print("\(action)_②")
sleep(1)
print("\(action)_③")
}
print("\(action)_④")
sleep(2)
print("\(action)_⑤")
finish += 1
if finish == count {
print("\(Date.now.timeIntervalSince1970 - startTime.timeIntervalSince1970)" + "-")
}
}
for i in 1...count {
Task {
work("\(i)")
}
}

打印结果:

1
2
3
4
5
6
7
8
9
10
11
12
13
14
15
16
17
18
19
20
21
22
23
24
25
26
27
28
29
30
31
32
33
34
35
36
37
38
39
40
41
42
43
44
45
46
47
48
49
50
51
1_①
2_①
3_①
4_①
5_①
6_①
7_①
8_①
9_①
10_①
1_②
1_④
2_④
2_②
3_④
9_④
4_④
5_④
7_④
6_④
8_④
10_④
1_③
3_②
2_③
4_②
1_⑤
5_②
2_⑤
3_③
8_②
3_⑤
9_②
7_②
9_⑤
7_⑤
5_⑤
4_⑤
4_③
10_⑤
6_⑤
6_②
8_⑤
10_②
4.024436950683594-
5_③
8_③
9_③
7_③
6_③
10_③

增加测试数据:

1
2
3
4
5
6
7
8
9
10
11
12
13
14
15
16
17
18
19
20
21
22
23
24
25
26
27
var startTime = Date.now
var count = 20
var finish = 0
// 8.030163764953613-
func work(_ action: String) {
print("\(action)_①")
sleep(2)
Task {
print("\(action)_②")
sleep(1)
print("\(action)_③")
}
print("\(action)_④")
sleep(2)
print("\(action)_⑤")
finish += 1
if finish == count {
print("\(Date.now.timeIntervalSince1970 - startTime.timeIntervalSince1970)" + "-")
}
}
for i in 1...count {
Task {
work("\(i)")
}
}

打印结果:

1
2
3
4
5
6
7
8
9
10
11
12
13
14
15
16
17
18
19
20
21
22
23
24
25
26
27
28
29
30
31
32
33
34
35
36
37
38
39
40
41
42
43
44
45
46
47
48
49
50
51
52
53
54
55
56
57
58
59
60
61
62
63
64
65
66
67
68
69
70
71
72
73
74
75
76
77
78
79
80
81
82
83
84
85
86
87
88
89
90
91
92
93
94
95
96
97
98
99
100
101
1_①
2_①
3_①
4_①
5_①
6_①
7_①
8_①
9_①
10_①
11_①
12_①
3_④
8_④
1_④
10_④
11_④
6_④
5_④
12_④
7_④
9_④
4_④
2_④
7_⑤
1_⑤
11_⑤
10_⑤
9_⑤
5_⑤
3_⑤
6_⑤
12_⑤
8_⑤
4_⑤
2_⑤
13_①
15_①
18_①
14_①
16_①
19_①
4_②
17_①
20_①
10_②
1_②
6_②
10_③
4_③
1_③
3_②
8_②
6_③
11_②
5_②
11_③
5_③
16_④
14_④
3_③
18_④
15_④
20_④
19_④
17_④
9_②
12_②
13_④
8_③
7_②
2_②
9_③
12_③
2_③
14_②
7_③
15_②
19_②
18_②
16_⑤
20_⑤
17_⑤
14_⑤
19_⑤
15_⑤
18_⑤
13_②
17_②
20_②
13_⑤
16_②
8.013674974441528-
14_③
19_③
15_③
18_③
13_③
17_③
16_③
20_③

使用 Task.sleep(nanoseconds:)

1
2
3
4
5
6
7
8
9
10
11
12
13
14
15
16
17
18
19
20
21
22
23
24
25
26
27
var startTime = Date.now
var count = 20
var finish = 0
// 4.280519008636475-
func work(_ action: String) async throws {
print("\(action)_①")
try await Task.sleep(nanoseconds: 2 * 1_000_000_000)
Task {
print("\(action)_②")
try await Task.sleep(nanoseconds: 1 * 1_000_000_000)
print("\(action)_③")
}
print("\(action)_④")
try await Task.sleep(nanoseconds: 2 * 1_000_000_000)
print("\(action)_⑤")
finish += 1
if finish == count {
print("\(Date.now.timeIntervalSince1970 - startTime.timeIntervalSince1970)" + "-")
}
}
for i in 1...count {
Task {
try await work("\(i)")
}
}

打印结果:

1
2
3
4
5
6
7
8
9
10
11
12
13
14
15
16
17
18
19
20
21
22
23
24
25
26
27
28
29
30
31
32
33
34
35
36
37
38
39
40
41
42
43
44
45
46
47
48
49
50
51
52
53
54
55
56
57
58
59
60
61
62
63
64
65
66
67
68
69
70
71
72
73
74
75
76
77
78
79
80
81
82
83
84
85
86
87
88
89
90
91
92
93
94
95
96
97
98
99
100
101
1_①
2_①
3_①
4_①
5_①
6_①
7_①
8_①
9_①
10_①
11_①
12_①
13_①
14_①
15_①
16_①
17_①
18_①
19_①
20_①
2_④
1_④
3_④
7_④
6_④
2_②
4_④
9_④
12_④
5_④
8_④
3_②
6_②
1_②
12_②
10_④
11_④
8_②
9_②
13_④
10_②
14_④
7_②
4_②
20_④
5_②
17_④
11_②
18_②
15_④
19_④
16_④
13_②
16_②
15_②
14_②
18_④
17_②
20_②
19_②
2_③
3_③
12_③
8_③
10_③
1_③
18_③
7_③
6_③
5_③
16_③
15_③
9_③
13_③
14_③
20_③
17_③
11_③
4_③
19_③
2_⑤
1_⑤
9_⑤
8_⑤
12_⑤
5_⑤
11_⑤
3_⑤
10_⑤
4_⑤
7_⑤
6_⑤
13_⑤
17_⑤
18_⑤
14_⑤
19_⑤
16_⑤
20_⑤
15_⑤
4.280519008636475-

await Task.sleep(nanoseconds:) 方法有可能会调用失败,所以需要加 try